SecretStasher
Member
Hey guys!
Those thatve seen me around a couple of weeks ago know that my very first real grow turned out to be a male and had to be chopped.
I took a break for a couple of days to determine what my main problems were and how to fix them.
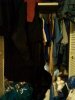
So my first plan of action was to grow out two plants instead of one. This will dramatically increase the chances for me getting a female, and I'm feeling lucky. For this I used the same largest plastic tub that Walmart sells (which is so high quality its already split on the side) as a foundation to try this crazy idea that I came up with while super high. I have only a third of a closet to work with, it is roughly 3 times as tall in available space as it is wide. So my idea was to build a...
Suspension Tent
This idea needed some supplies, here's the list of everything besides my dirt which is secret")
Luckily I knew what I needed and how I could use it before I went shopping, this is very important
Because some things you need to invest in more than others:
~~~~~~~~~~~~~~~~~~~~~~~~~~~~~~~~~~~~~~~~
A.) 8 bottle lamp kits, these are my bread and butter for lighting. I buy more when I get my paycheck every month. I can have a maximum of 12 I think... I forgot how many sockets I have.
$6.50 each, which is low considering they range from $6 to $8.50. Back 3-4 years ago these were pennies
B.) 2 basic 4' metal fans, one blue one black. You'd be surprised at how well one can control not only circulation but also temperature and humidity with just fans.
$4.50 each
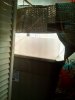
C.) 2 "One size fits all" car windshield reflector. Anything that looks mylar catches my eye. I had bought one last time that I out in a spot that light loved to leak out of. They're cheap but extreeeemly important for extremely low budget when you have only a handful of lights, every single lumen/lux/etc matters. The state of my grow tent only has 4 bulbs on to keep a comfortable 80 degrees. I tested with and without the reflectors and lumen for lumen the efficiency of my tent is like having 6 unreflected bulbs on at the same distance. It does matter.
$4 to $6, but this is something you should truely invest in if you're like me and looking to grow good stuff on a broke guys budget.
+++++
D.) ~8-9 Bulbs. I've honestly lost some during the 4 hour construction but here's a couple I have now
2x 1600 Lumen daylight(blue) LEDs
$6 to $14 each. It should be a crime but where I live, higher output bulbs are gold standard. But they are as important as they are expensive. Many have an estimated lifespan of over 8 years, which isn't bad!!!
4x 1500 Lumen daylight LEDs. Oddly much cheaper, you guessed right I bought these instead of more of those.
$3-7 each depending on a lot of variables ...
2x 1600 lumen soft white LEDs. Great bulbs in general, and much cheaper than the blue counterparts conversely.
$34 each
1x 2750 Lumen Soft White(Red) CFL, its a permanent light in my suspension tent because of its output. I've never seen them on the shelves again. I wouldn't mind having one in blue either.
$8~
1x 3300+ Lumen Mercury Vapor Soft White incandescent. This bulb is currently collecting dust. Ive had worse impulse buys.
$4
+++++
E.) 3 flat white double sided posters. This was also an impulse buy but like I said, reflection is literally equally important as the lights themselves. These came in very handy and I'll explain later.
$.75 each.
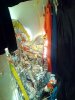
F.) 1 highly reflective mylar(I think?) Survival tent. It's by far the most important feature of my tent. It acts as a wide and spot reflector to reduce light leaks and a portable insulator(literally my tents outer layer).
$6 to $8
G.) 2 20 feet hollow braid nylon boat rope. This is crucial to making a suspended grow tent because it is your work horse. Do note that you need to have basic knowledge of managing lines/ropes/strings as well as how knots such as basic know-how on how hitches or bends work and why you might need them.
$3 each
H.) 1x Grow Snake, which is 16 feet of stretchy synthetic rubber covered wire. Great for devising holding devices for bulbs, holding this or that, and I'm sure it'd work great when used to LST plants.
$6~
I.) 120 heavy duty cable ties(zip ties), cheap but priceless in terms of utility and function. They're meant to be permenant, and anything that can be used to organize and/or attach 10 separate wires to something else permenantly is great in my book.
$2.33
J.) 1 roll of T-Rex tape, which is great stuff despite its higher cost. I build my entire box with postage tape for the places that just need to be "held" vs T-Rex tape on places that have to stay. Postage tape is better than one might imagine, it only stops working if it's dry or dirty and the former is easily worked with.
$5 to 6
K.) Can't forget about my big ass grey storage tub!
$5 to $8
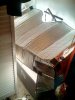
L.) A minimalistic aluminum wire shelf, this is used as the second stage suspension device which I will explain in a moment.
And that is my list of basic ingredients for this basic suspension tent!
I will post pictures and explain the rest BELOW!
It may be more than an hour for me to do this as I have to do some life things first!
Aka smoke a bowl or two

Those thatve seen me around a couple of weeks ago know that my very first real grow turned out to be a male and had to be chopped.
I took a break for a couple of days to determine what my main problems were and how to fix them.
So my first plan of action was to grow out two plants instead of one. This will dramatically increase the chances for me getting a female, and I'm feeling lucky. For this I used the same largest plastic tub that Walmart sells (which is so high quality its already split on the side) as a foundation to try this crazy idea that I came up with while super high. I have only a third of a closet to work with, it is roughly 3 times as tall in available space as it is wide. So my idea was to build a...
Suspension Tent
This idea needed some supplies, here's the list of everything besides my dirt which is secret
Luckily I knew what I needed and how I could use it before I went shopping, this is very important
Because some things you need to invest in more than others:
~~~~~~~~~~~~~~~~~~~~~~~~~~~~~~~~~~~~~~~~
A.) 8 bottle lamp kits, these are my bread and butter for lighting. I buy more when I get my paycheck every month. I can have a maximum of 12 I think... I forgot how many sockets I have.
$6.50 each, which is low considering they range from $6 to $8.50. Back 3-4 years ago these were pennies
B.) 2 basic 4' metal fans, one blue one black. You'd be surprised at how well one can control not only circulation but also temperature and humidity with just fans.
$4.50 each
C.) 2 "One size fits all" car windshield reflector. Anything that looks mylar catches my eye. I had bought one last time that I out in a spot that light loved to leak out of. They're cheap but extreeeemly important for extremely low budget when you have only a handful of lights, every single lumen/lux/etc matters. The state of my grow tent only has 4 bulbs on to keep a comfortable 80 degrees. I tested with and without the reflectors and lumen for lumen the efficiency of my tent is like having 6 unreflected bulbs on at the same distance. It does matter.
$4 to $6, but this is something you should truely invest in if you're like me and looking to grow good stuff on a broke guys budget.
+++++
D.) ~8-9 Bulbs. I've honestly lost some during the 4 hour construction but here's a couple I have now
2x 1600 Lumen daylight(blue) LEDs
$6 to $14 each. It should be a crime but where I live, higher output bulbs are gold standard. But they are as important as they are expensive. Many have an estimated lifespan of over 8 years, which isn't bad!!!
4x 1500 Lumen daylight LEDs. Oddly much cheaper, you guessed right I bought these instead of more of those.
$3-7 each depending on a lot of variables ...
2x 1600 lumen soft white LEDs. Great bulbs in general, and much cheaper than the blue counterparts conversely.
$34 each
1x 2750 Lumen Soft White(Red) CFL, its a permanent light in my suspension tent because of its output. I've never seen them on the shelves again. I wouldn't mind having one in blue either.
$8~
1x 3300+ Lumen Mercury Vapor Soft White incandescent. This bulb is currently collecting dust. Ive had worse impulse buys.
$4
+++++
E.) 3 flat white double sided posters. This was also an impulse buy but like I said, reflection is literally equally important as the lights themselves. These came in very handy and I'll explain later.
$.75 each.
F.) 1 highly reflective mylar(I think?) Survival tent. It's by far the most important feature of my tent. It acts as a wide and spot reflector to reduce light leaks and a portable insulator(literally my tents outer layer).
$6 to $8
G.) 2 20 feet hollow braid nylon boat rope. This is crucial to making a suspended grow tent because it is your work horse. Do note that you need to have basic knowledge of managing lines/ropes/strings as well as how knots such as basic know-how on how hitches or bends work and why you might need them.
$3 each
H.) 1x Grow Snake, which is 16 feet of stretchy synthetic rubber covered wire. Great for devising holding devices for bulbs, holding this or that, and I'm sure it'd work great when used to LST plants.
$6~
I.) 120 heavy duty cable ties(zip ties), cheap but priceless in terms of utility and function. They're meant to be permenant, and anything that can be used to organize and/or attach 10 separate wires to something else permenantly is great in my book.
$2.33
J.) 1 roll of T-Rex tape, which is great stuff despite its higher cost. I build my entire box with postage tape for the places that just need to be "held" vs T-Rex tape on places that have to stay. Postage tape is better than one might imagine, it only stops working if it's dry or dirty and the former is easily worked with.
$5 to 6
K.) Can't forget about my big ass grey storage tub!
$5 to $8
L.) A minimalistic aluminum wire shelf, this is used as the second stage suspension device which I will explain in a moment.
And that is my list of basic ingredients for this basic suspension tent!
I will post pictures and explain the rest BELOW!
It may be more than an hour for me to do this as I have to do some life things first!
Aka smoke a bowl or two