GrowBigOrBuyIt
Member
Do you have limited space for growing? Want to maximize yield, have a kickass looking garden, and get the most out of your lights? Well, if so, then this is your lucky day! Below is a full detailed guide, with pictures on how to build a Professional looking, sturdy, and effect ScrOG! *For those who are not familiar with the ScrOG method, it is an advanced method of growing, similar to SOG, except you use less plants and have BIGGER yields! Rule of Thumb is 1 plant per square foot of screen. The screen below is a total of 8 square feet and can handle 8 plants! However, I will grow between 4-6. Who doesn't want bigger yields? Anybody? Thought so! So, smoke a J, bowl, blunt, whatever it is you prefer and get ready to improve your grow room, your yield, and have a great time assembling!
Materials Needed:
- 3/4" PVC Pipe (Preferably white). *Will cover amount needed later*
- 4, 3/4" 90 degree PVC w/ side outlet elbow $1.00 each
- PVC cement $3.67 at Lowes
- 20-30 6" or 8" zip ties $2.00
- 2" Mesh Poultry Wire or "Chicken Wire" $8.00
Tools Required:
- Tape Measure (To measure PVC for cuts)
- Table Saw if accessible, or hack saw. Toothed Knifes also work. (For cuts)
- Wire Clippers (To cut poultry wire to size and to clip zip tie hang offs)
- Pen or Marker (To mark where to cut and for calculations)
Calculate Needed Amount of PVC:
- Determine the needed size of your screen. For example: A screen that is 4' long by 2' in depth with 2' legs require 20' total. 4+4 (length), 2+2 (Depth), 4x2' (legs) = 20' . Don't worry, you will have about 15" of leftover PVC because of elbows.
Elbows add extra length:
- Standard 3/4" elbows with the side outlet add an extra 1 1/8" to your dimensions.
- Therefore, if your depth needs to be 2' then calculate this way. 24" total, 2 elbows add a total of 2 1/4". 24-2 1/4 = 21 3/4 therefore the size of PVC to cut for your depth is 21 3/4"
- Apply this to your entire screen frame
- However, your legs will only encounter 1 elbow, therefore calculate your cut for only 1 1/8" added
Procedure:
1. Gather needed tools and materials.
2. Figure out your needed dimensions and calculate each cut you need to make (as discussed above).
3. Once you have your calculation, mark one cut and do the cut. The blade can take up to 1/16" away from PVC. Make a mark for your next cut and do the cut. Repeat this until all cuts are made.
4. Clean all the pipes, your grow room needs to be very clean!
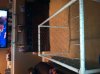
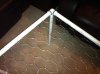
5. Once pipes are clean, put all the frame together including legs. This is self explanatory. However, refer to the picture if extra assistance is needed.
6. If you are happy with the frame, then it is time to glue. Use the cement to glue PVC in place. TIP: don't glue the legs in! This will allow for better maneuverability and you adjust your legs later if needed!
7. Allow 15 minutes for glue to dry.
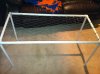
8. Put your legs back on, don't glue them in, and it is time to apply the screen!
9. Your screen is the same size as your frame, however I suggest adding an extra 2 inches to length and depth as you will adjust it and cut off excess after.
10. Spread screen over top frame. I start zip tying down on one side and continue clockwise.
11. The screen is a little stretchy. Therefore, I find a part in the mesh that can tie to the frame by pulling it closer to make screen have less slack.
12. Install the screen, make sure all zip ties are as tight as possible. Cut excess screen that won't be needed and trim the hangovers from the zip ties.
You now have a good looking, long lasting ScrOG that can be used over and over again! For 20 bucks you can't beat it!
Materials Needed:
- 3/4" PVC Pipe (Preferably white). *Will cover amount needed later*
- 4, 3/4" 90 degree PVC w/ side outlet elbow $1.00 each
- PVC cement $3.67 at Lowes
- 20-30 6" or 8" zip ties $2.00
- 2" Mesh Poultry Wire or "Chicken Wire" $8.00
Tools Required:
- Tape Measure (To measure PVC for cuts)
- Table Saw if accessible, or hack saw. Toothed Knifes also work. (For cuts)
- Wire Clippers (To cut poultry wire to size and to clip zip tie hang offs)
- Pen or Marker (To mark where to cut and for calculations)
Calculate Needed Amount of PVC:
- Determine the needed size of your screen. For example: A screen that is 4' long by 2' in depth with 2' legs require 20' total. 4+4 (length), 2+2 (Depth), 4x2' (legs) = 20' . Don't worry, you will have about 15" of leftover PVC because of elbows.
Elbows add extra length:
- Standard 3/4" elbows with the side outlet add an extra 1 1/8" to your dimensions.
- Therefore, if your depth needs to be 2' then calculate this way. 24" total, 2 elbows add a total of 2 1/4". 24-2 1/4 = 21 3/4 therefore the size of PVC to cut for your depth is 21 3/4"
- Apply this to your entire screen frame
- However, your legs will only encounter 1 elbow, therefore calculate your cut for only 1 1/8" added
Procedure:
1. Gather needed tools and materials.
2. Figure out your needed dimensions and calculate each cut you need to make (as discussed above).
3. Once you have your calculation, mark one cut and do the cut. The blade can take up to 1/16" away from PVC. Make a mark for your next cut and do the cut. Repeat this until all cuts are made.
4. Clean all the pipes, your grow room needs to be very clean!
5. Once pipes are clean, put all the frame together including legs. This is self explanatory. However, refer to the picture if extra assistance is needed.
6. If you are happy with the frame, then it is time to glue. Use the cement to glue PVC in place. TIP: don't glue the legs in! This will allow for better maneuverability and you adjust your legs later if needed!
7. Allow 15 minutes for glue to dry.
8. Put your legs back on, don't glue them in, and it is time to apply the screen!
9. Your screen is the same size as your frame, however I suggest adding an extra 2 inches to length and depth as you will adjust it and cut off excess after.
10. Spread screen over top frame. I start zip tying down on one side and continue clockwise.
11. The screen is a little stretchy. Therefore, I find a part in the mesh that can tie to the frame by pulling it closer to make screen have less slack.
12. Install the screen, make sure all zip ties are as tight as possible. Cut excess screen that won't be needed and trim the hangovers from the zip ties.
You now have a good looking, long lasting ScrOG that can be used over and over again! For 20 bucks you can't beat it!