How To Grow Marijuana

Is this the best "how to" this month?


  • Total voters
    29
Status
Not open for further replies.

Widow Maker

Well-Known Member
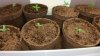
Welcome to my article on the basics of growing weed!

I have been growing for 15 years off and on. Some of my techniques may be out dated so if some of you grow nerds see something wrong with my techniques please send me a pm and we can fix it. I would like to make sure we get the best knowledge to the people. Im sure I left a few things out but...

I cant go into every detail but these are the basics...

Edit 2/11/14

Well it looks like the server crashed my pictures. Im gonna work on rebuilding this thread over the next few weeks. Its been about 7years since I wrote this. I have picked up a few more tricks over the years. I will add a few. Also I will try to go into a little more detail to help answer the many pm's I have recieved. Stay tuned.
 

Widow Maker

Well-Known Member
Seeds

If you want some killer pot you have to start out with killer seeds. You will want to do a little research before you pick out the strain you are going to grow. Some strains like outdoors and lots of light and some like indoors under lower light conditions. I like indoors because you can control the plants environment. Plus you don't have to worry about pest and critters eating your plants. Well not totally but your chances are better than the open outdoors.

The seed is where it all begins. You cant just take any old pot seed and expect it to grow bad ass weed. Its all in the genetics. To grow bad ass weed you have to have bad ass seeds.
 

Attachments

Widow Maker

Well-Known Member
Germinating

The best way I have found to germinate is using a paper towel, tap water and a ziplock bag. I place my seeds on a paper towel. Wrap them up and wet the towel. Not too wet. But good and moist. If your not too sure how moist just wrap the towel and place under the tap and wet 3/4 of the towel. Let the rest soak in. Once folded and wet place it in the ziplock and seel the bag. It doesnt have to be a lot but leave some air in the bag. Place in a warm (75-85f), dark place. Wait 3-5 days and check for roots. As soon as you see a root you can plant it. This is a pretty much fool proof way to germinate. If you add too much water the seed can rot. You want to use a quality paper towel. Not tissue paper. It seems the thicker the paper the better it works. I usually grab a blue shop towel but hosehold towels work fine as you can see im using below. Ok so its been 3 days now. Looking at the last pic you can see the roots growing out of the seed. This may have been 4 days. I usually like to plant them while the root is smaller but its gonna be ok.
 

Attachments

Widow Maker

Well-Known Member
Grow mediums

Deciding what to grow in is a big decision to make.

Soil- I would recomend soil for new growers because it is the most forgiving medium. You want a soil rich in nutrients. Unless its a seedling. Normally even the best soils need added nutrients. I dont add anything but water untill the plant starts to lighten in color. Watch out for soils with time release nutrients. Its not terrible but think about it. You may wonder why your feeding less and the plant is still burning. Also watch out for soils with extreem ph. 6-7ph is what you want. Some miracle grow has ph of like 5. Way too acidic. I would never use mg anyways. I look for more of an organic blend. I like fox farm ocean forest. Its hot, it will burn small (6") plants. They usually bounce back in a few days so dont worry if it happens. They have a red bag thats not as hot and a seed starter called light warrior. You wont find any of these at home depot or lowes. Prolly not even the local nusery. You will have to find a hydroponic or organic store. If you cant find it local, order it online. Or try your luck at home depot. I believe they sell scotts. Its ok but not the greatest for this application. Organic soil is going to produce the best flavors. The downfalls are it attracts bugs and its a pain to dispose of.


Soiless- Most advanced growers go this route. The soiless products usually contain zero nutrients. That way the grower knows exactly whats in their medium. Coco fiber is a common one. People either love it or hate it. Coco holds a ton of water and thats why I hate it. I prefer the sphagnum moss. Its light and hold a good amount of water. Closer to real soil than coco. Pro mix, bcuzz and sunshine are some examples of sphagnum moss. These are usually mixed with perlite and vermiculite. You will need to use a hydroponic nutrient since there will be no micro/macro nutrients in the soiless products.


Rockwool- This is a medium made from volcanic rock spun into a fiber. It looks like fiberglass and comes in many forms. Sugar cubes, small cubes, large cubes and 3' slabs. I like rockwool for cloning. I use 1" cubes to start and then I can go soil or hydro. Rockwool holds alot of water be carefull watering. Wait untill the rockwool is close to dry before rewatering. Rockwool also works well for nft systems. Basically a constant drip of cool airated water. Thats more of an advanced system that would require a special timer that turns on/off in seconds. Stick with a passive system if your just starting out.


Hydroton- This is one of my favorites. Its volcanic rock balls with a clay outer surface. Hydroton is another love/hate medium. For starters it holds very little water and needs to be watered every 3-6 hours. Works good in almost all hydroponic systems. Its a pain to clean them but they are reusable. The biggest problem is they like to roll around and can get everywhere.


Water- Aeroponics and deepwater cultivation (dwc) fall into this catagory. Basically you have no medium and the roots are either suspended in the air with water misting them(aero) or completely submerged in airated water (dwc).
These hydro techniques are for more advanced growers. They are both temperature sensitive and when things go wrong they go fast. On the other hand... they grow real fast too.
 

Widow Maker

Well-Known Member
Planting the seed

Once you figure out what medium to use we can go ahead transplant into a seeding soil or rockwool cubes. I like to use rockwool for clones. And soil for seeds. I use plastic cups filled with seeding soil to plant in. Poke/cut holes in the bottom of the cup for drainage. Take your seed and bury it a half inch deep in the soil. Water it in lightly. You want to put your seeds under light as soon as you plant them. I use t5 fluorescent lights to start my seeds/clones. Shop lights(t12 fluorescents) work good also at about 1-3" away. Im using a couple t5 bulbs 3" away. You want a light strong enough so the seeds dont stretch but not too strong where it could burn it. This is the most fragile time of the plants life. It needs humidity but not too much. Around 60-80% is good. Too much it molds and dies. Not enough and it dries out and dies. Keep temps around 80-85f. If the new seedling stretches too much you can plant it deeper when you transplant.


I fill the cup with soil.
Then I poke about a half inch deep hole in the soil.
I place 1 seed in the hole root down if possible.
Then I gently cover it up. Make sure you water it in. Always water anytime you transplant. I used peat cups in the picture. Started out some shoreline seeds. 3 days old.
 

Attachments

Widow Maker

Well-Known Member
Lights

I strongly suggest using a combination of cool white and warm white florescent bulbs for growing your newly hatched plants. Place the lights about an inch away from the lights. Its ok if the plant grows into and touches the light a little since florescents don't get very hot. You will be fine. Just try to keep an average of one inch away. In less than a week you should see the roots working their way to the bottom of the cup. After this stage you can upgrade pots. I would suggest a gallon pot for your next transplant. You can continue using the florescent bulbs but they really don't put off enough light for fast growth. Compact florescent bulbs (cfl's) work good too. You will want a bunch of them . T5 bulbs are the way to go. They are the brightest of fluorescent bulbs.

I like to use mh (metal halide) lights for my vegetative cycle. They emit a lot of the blue spectrum which the plant likes for root, stem and leaf growth. Depending on the size of your garden will determine what wattage you should use. I do it big so I use 1000 watt bulbs. They have smaller bulbs. Your plant will love this light. The me bulb has ultra violet light that the hps doesn't have. The plant ends up stretching for the uv light. That's why growers usually veg with an mh bulb.

Hps (high pressure sodium) bulbs are like mh lights but they put out a lot of red light. The plant likes this light when flowering. It also is a little bit brighter than a mh light of the same wattage. A 1000 watt mh puts out around 80,000 lumens and the hps put out about 125,000 lumens. And yes brighter is better. These lights are not cheap and if you can only afford one then just get the hps light.

The mh and hps lights (High intensity discharge) put out lots of heat. You will need a good ventilation system or a good a/c to keep the room from getting too hot. Some light hoods have built in vents you can hook up an a/c duct to exhaust the heat. Another thing that should be addressed here is a light mover. I talked my friend into buying one for his crop and he yielded 3 times more than normal. We use the light tracks that go back and forth only 2 feet max for best results. They also make sun circles that twist in a circle. Either way you will get the whole crop good light instead of just a few plants directly under the light with a stationary light.

For a stationary light you will want to keep it at least 14-24 inches away from the tops of your plants. With a track you can lower the lights to 12 inches or less. With the hood we use we can touch the tops of the plants with the light hood without burning the plant. These cool tube hoods are not cheap but they seem superior to everything else I have used. See pic. But a good rule of thumb is to place your hand under the light and if it burns your hand it will burn your plant.


Here are some florescent tubes.
Fluorescent-Lamp-Energy-Saving-Lamp.jpg

A metal halide bulb.
300px-Metaalhalidelamp.JPG

A high pressure sodium bulb.
HIGH_PRESSURE_SODIUM_LAMP.jpg

The light mover.
5_light_wired.jpg
 

Widow Maker

Well-Known Member
Electricity

This is going to be your biggest expense after your light investment. It takes a lot of electricity to run a grow room. You have lights, vents, charcoal canisters, air conditioners and a few other things like pumps and fans. My bill has raised about $350-$500 with my system. Its fairly large so yours probably wont get this high. I have 4 1000 lights, a big 240 a/c and a few fans and canister.

Don't steal electricity. Whatever the bill is just pay it. If the elec. company reads their grid meter and things don't add up they will start investigating. That will probably get you busted. Some power companies can see what your meter is doing every day. They can see the power jump up at 8pm and drop back down at 8am every day. But don't worry because everything is pretty much automated. A real person doesn't get involved unless there is a problem. The cops can use this to bust you, but they wont check unless they have reason to believe you are doing something wrong. If thats the case you are already busted. They just use that to help get a warrant.

One major important thing is not to overload your circuits. 1000watt Hps and mh lights pull 9 amps at 120v. So if you are going to have a multi light system you may need to run some more cables to your breaker box. I always build a 240v power/timer box. I already know I will blow all the breakers in the room with ease. They sell these boxes for $200-300. I make mine for about $60-$80. I put about 8 120v plugs and around 4-6 240v plugs in it. I also use a 240v hot water heater timer. Works great up to 50 amps.


Here is a pic of the 220/110v timer box I make.


The ballast for my hps lights.
 

Widow Maker

Well-Known Member
Fertilizers

I use a hydroponics solution even for my soil plants. Basically it has everything a plant needs to live in it since water alone doesn't have these. There are 14 nutrients that a plant needs to survive. But all we are going to talk about are the main nutrients. N-P-k. Nitrogen, phosphorous and potassium. Ever wondered what those 3 numbers on the front of the bottle meant? Well there you go.

During our grow cycle the plant likes a fertilizer high in nitrogen. Something like 20-5-5. It uses the nitrogen for strong stem and leaf growth. After you change over to your flowering cycle you will want a fertilizer that is high in phosphorous and potassium. Something like 5-15-15 should work well.

I use a two part solution that I feed the plant all year round. I use enhancement solutions for root, grow or bloom for what ever cycle I am in. It is a bit more costly this way but I have had good results so I am staying with it. Its more for the semi-advanced grower since a little more thinking is involved.


Here are my grow nutrients.


And my budding nutrients. This shit gets expensive.
 

Widow Maker

Well-Known Member
PPM

Parts per million is how we measure the amount of fertilizer (salts) thats in the water solution. You will need a ppm meter to read this. I have a $50 one and also a $300 one that reads ph and ec. Basically start out cheap and when a few crops start rolling in then buy the big baller stuff.
Unless you can afford it up front unlike most of us.

I try to keep my seedlings and clones at about 100-250 ppms. After about 10 days I bump up the ppm to around 500-600 ppm for the next 2-3 weeks. After about a month I raise it to 800-1000 ppm. When I start to bud I am at around 1000 and start taking it up slowly to no more than 1500 ppm. I don't suggest going past 1300 till you have a couple crops down.

If you over fertilize your leaves will start to burn. If you see this you will need to flush immediately. Just use pure water and basically drown the plant. Four times the amount of grow medium should be fine. One other thing. If I use tap water it usually has a ppm of 250 in my area. I pretty much add 250 to whatever I'm shooting for. So for a 1000 ppm my meter will read 1250. I will get into waters later.

After the hairs on my buds get 1/4 red I stop feeding the plant nutrients and just give them pure water. This will allow the plant to use up the nutrients it already has and makes the smoke taste a lot smoother with out all the chemical taste.

These are my ppm and ph meters.


Over fertilized.


Widow Maker

Well-Known Member
Ph

Ok so we need to control our ph in our nutrient solution/ medium for healthy plant growth and good nutrient absorption. Weed likes a slightly acidic medium. For soil plants I keep my ph around 6.2-6.8. For hydroponics I keep a lower ph of 5.5- 6.5.

So how do I figure what my ph is? Its simple, buy a ph meter. Duh. Mine is a cheap digital meter that cost me $75. Mine is for water but they sell them for soil too. They can get expensive into the $300 range. If your tight on cash you can also buy ph drops. Its been a while but I think they are less than $10. So now you got your meter and need to change your ph. I go to the local hydroponic store and buy a bottle of ph up and ph down. Makes things real easy to adjust. You can also use baking soda to go up and vinegar to go down.

I stole this off my ph up bottle.
 

Widow Maker

Well-Known Member
Water

Some people swear by distilled water. It usually has a ppm of 1 or less. Or you can get you a couple of 5 gallon bottles and go to the local walmart and fill them with reverse osmosis water which is almost as clean as distilled. Or you can buy an osmosis filter for your home. They waist allot of water and need the filters changed regularly but the water sure does taste good. And you will have as much as you want on hand. Like I said it waist allot of water so expect to see the water bill go up.

I use plain tap water. The chlorine in it will burn the tips of the leaves. I usually let my water sit out for a couple days to allow the chlorine to dissipate. You can also use those drops for the fish tank. I hear that works too.

One thing thats helps is to keep a fish tank pump bubbling in your water so it doesn't get stagnate. Try not to leave fertilized water laying around for a long time. Molds will grow and use up nutrients. And it just looks bad. But if you have a hydroponic system you will need to keep a reservoir. So just keep it out of the light for the most part. Also keep an air bubbler in your reservoir to keep oxygen in the water. The roots will like this.

These are my water containers. I usually keep fresh clean water in one and when I decide to water I fill up the other can so I can mix my solution. I only use what I know I will need. So I dont ruin my solution from sitting over time. Notice the air pumps and I have a submergable pump/hose that I feed with.


Here is an osmosis filter.
 

Widow Maker

Well-Known Member
More water Having problems posting...

Misting your plants is a good thing to do. You can foilar feed at I believe 1% fertilizer. I use plain water so I dont have to look at salts on my leaves.The misting helps keep dust and bugs off your plants. Try to spray the underside of the leaves too. Its not a good idea to mist your buds. It can mold the buds.

Spider mites like to live under the leaves. Misting underneath helps keep them away. Trust me you don't want this dreaded pest in your garden. They are hard to get rid of and can destroy your entire crop.

DON'T MIST WHILE THE LIGHTS ARE ON. THEY WILL BLOW UP!!!!11!!ONE11!!

If you over water you can drown your plants. They usually turn yellow and may fall over. The side of the leaf will curl. Let your medium dry before watering.

I almost lost my entire crop from this.


You have to watch your mothers too.


Since I brought up spider mites. This is what I used to kill them. Actually I used it 3 weeks in a row. And I am a happy grower again. This is not just any bomb. I got this from the hydroponic store and is safe for fruits. It takes care of most of the pest out there. Avid works even better but isnt very safe for smoking.
 

Widow Maker

Well-Known Member
Grow seasons

Basically a mj plant grows during the summer and buds in the fall once it senses winter is getting close. The female plant wants to produce seeds so when it freezes and dies it will have life next year. Different strands flower at different times during the fall. So you will have to research your strand to see when it harvest.

Indoors we manipulate the seasons by keeping long hours of light for growth. 18-24 hours of light will keep the plant in grow mode. I usually leave my clones on 24 hours. And then when I put them under my mh light I keep it on 18 hours to save some money on my electric bill.

Once you are ready to bud the plants you will change the lights to 12 on 12 off. Mimicking fall/winter. We do not want any light getting into our room while the lights are off. Ever!

One thing to think about when you purchase a timer for the lights is the amps your lights will use. You don't want to melt your timer or even worse burn your factory down. A 1000 watt light uses about 9 amps. So make sure you buy the right stuff.

My plants in the vegetative (grow) cycle. 18hrs of light.


The bloom room. 12 hrs of light.
 

Widow Maker

Well-Known Member
Co2

We breath o2 and breath out co2. Plant are the opposite. They grow faster under a higher concentration of co2. You can get a co2 tank and regulator and put it on a timer. I have never used co2 this way so I'm a little ignorant of how much to use.
What I use runs off a propane bottle and is basically a pilot light that burns when my lights are on. I bought it at the local hydroponic shop. It raises the temperature in my room about 10 degrees. Its kinda bad but when you are in a co2 enriched environment the plant actually does better at higher temps. 85*+.

Here is a co2 generator that burns propane.
 

Widow Maker

Well-Known Member
Temperature

Pot plants like the temperature around 75*-85*F. So basically that means 75* at night when the lights are off and 85* when they are on. Like I said before about the co2, you can grow good at 90* with co2 but without it you will slow growth at 90*+. I believe you don't want to go below 60* either, But that probably wont be a problem since these rooms make a lot of heat.


Widow Maker

Well-Known Member
Ventilation

Your whole room will need good ventilation. The lights will need some exhaust ducting to help cool them. You will probably be ok with not having vents if you only have one light.

I have oscillating fans that blow on my plants. It keeps them breathing fresh air and makes the stems strong. You will need strong stems to hold up those huge buds you are going to grow. Basically the wind rips the plant cells just like building a muscle.


Here you can see a few fans, ducts and a/c.
 

Widow Maker

Well-Known Member
Sexing

The female plant is what grows the buds. The male plant produces pollen and little to no thc compared to the female.

To sex a plant you will have to put it into the budding cycle. So basically you will need to grow your plants(mothers) for about a month or two and then take a clone/ cutting from your new plants. I will get into cloning later. Anyways you will need to let your clone grow for a week or two till it has roots, grows the size you want. Then put them in your budding room. Make sure you label your clones so you don't get them mixed up from the parents. After about 10 days in the flower room you should start seeing the clones flower.

The female flower looks like a tear drop with two hairs coming out of the top.

The male flower looks like a very small bunch of grapes. These (grapes) burst open and release pollen. The pollen will float or be carried by pest over to the female flower and impregnate the female. This is not good because now she is going to produce a seed(s). And puts the plants energy into seeds instead of buds. Unless you are trying to get seeds you don't want the males around anymore. Kill them all and the moms they came from. Or should I say dads. I wouldn't even keep them in the same house cause pollen is known to travel many miles much less a hallway. Just kill them.

Edit: With the seeds I won I had a couple of males and took a pic. Veiw attachment.
herijuanna 025.jpgth.jpg

Photo 1 is male
Photo 2 is female
 

Attachments

Widow Maker

Well-Known Member
Odors

If your going to grow pot then expect to stink up the place. Specially when you are budding. We have to prevent the neighbors from smelling skunk all the time.

The best way to do this is to buy a charcoal canister. These things work very well. I was doubtful myself but ended up buying one for about $600. They have smaller ones that are cheaper. You will just need to know how many cubic feet is in your grow room and select the right size for your garden. You will have to change the charcoal every year. I have heard that if you put the charcoal in an oven on warm setting for 1-1.5 hours then it will reactivate the charcoal.

Another way to eliminate odors is to buy an ozone generator. Ozone generators can be dangerous and can kill you if your exposed to large amounts of it. You will know when its on because it will burn your eyes and can burn your lungs. These don't work as good as I would think in your garden but putting one in-line with your exhaust duct (from charcoal canister) works pretty good. You will need a tumble box in-line and at least 25 feet of duct to make sure all the odors are neutralized. If you use one that is how I would use it.

There are many air fresheners you can buy to mask the smell too.

You will want to make sure your room is sealed or odors may get out.


Here is my charcoal canister. Works awsome!


A smaller one.


Notice how we sealed the window. Light cant get in and odors cant get out.
 

Widow Maker

Well-Known Member
Clones

Clones are easy to make. And they are the exact genetics as their mother. I keep 8 mother plants and grow them about 3-4 feet. Large enough so I can take 50 or so clones from each mother. Moms wont ever bud cause we keep them in the grow (18 hours of light) room. Sorry I had to throw that in real quick.

To make a clone you will need some sort of cloning solution or powder. These have hormones that help the clone root.

I take a clean razor and cut the shoots off the plant at a 45* angle in between the nodes. I try to make them around 4-5 inches tall. Usually about 4 nodes will do it. I have had good success with larger clones too. The node is where the plant branches out from the main shoots. We need to cut the clone and put it in our root solution pretty quick. We don't want to get an air bubble in the stem of our new clone. That slows things down if the clone even takes. So I just dipped the clone in the root solution and now I'm going to place them in my 1 inch rock wool cube. I push it in the cube till I feel the stem kinda rip through the wool some. This assures me that its held in tight and isn't just sitting in the open air. Don't go all the way through the wool cause that would be pointless.

I mist my clones with pure water daily. Some people use a clear top for their clone tray to help keep moisture in but I don't practice this. If you do use a cover make sure you open the top a few times a day or you can mold the new clones pretty quick. That is why I don't practice this style. I just mist them a couple times a day for about 10 day to 2 weeks. You will start seeing roots. I keep the clones under florescent tubes at 24 hours of light. For the first 3-4 days I keep them about 4-5 inches from the bulb. After that I place them about 1 inch from the light till I see roots. Once we have roots then I transplant into dirt cups or slap them in baskets for my airoponics system. We can now put the clones under our hid light and grow them like no tomorrow.

Edit... Lately I have benn using "Woods" cloning dip and soaking my rockwool with "Clonex". I have seen roots in three days using this combination.


Attachments

Status
Not open for further replies.
Top