How to Build a Growroom 101

subcool

Well-Known Member
So in this tutorial we will discuss and go over methods used in construction of a grow room. I poorly designed room is very hard to manage. One that is properly designed can make your life easier preventing mold and heat problems.

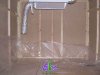
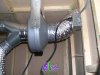
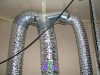
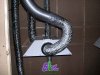
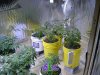
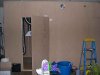
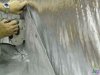
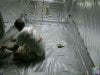
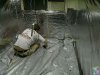
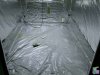
First we want to construct a enclosure I prefer 5 x 5 for each 1000 watt hood so most of my bud rooms are 10x6 some enough to squeeze by to the rear when there young. Once room is done I caulk the floor and every joint in the plywood. I also lay down a layer of 4 mil plastic to prevent any infiltration of bugs from the floor area.
 

Attachments

  • Growroompicsf.jpg
    Growroompicsf.jpg
    33.2 KB · Views: 1,082
  • Growroompicsa.jpg
    Growroompicsa.jpg
    41.9 KB · Views: 782
  • Growroompicsb.jpg
    Growroompicsb.jpg
    53.1 KB · Views: 662
  • Growroompicsc.jpg
    Growroompicsc.jpg
    34 KB · Views: 644
  • Growroompicsd.jpg
    Growroompicsd.jpg
    49.4 KB · Views: 663
Holes are drilled for all the wiring and exhaust and then re sealed. This room uses a 465 cfm Vortex with 6” venting to cool the hoods. The fan is mounted to exhaust up and all ducting is connected so that air PULLS through the hoods. Make up air is provided through 6” flex ducts with no 90 degree turns. Keep restrictions and distance to a minimum. Each turn adds 4 linear feet to the length of the run. Intake low and exhaust high.

If you have to make a turn use a large duct and a wide sweeping turn!

I will discuss venting in another thread titled get your Ducts in a row.

A good fitting door is a must I like to staple a 6” wide black plastic light blocker at the door jam. Stapled in the shape of a U it makes a nice flexible gasket to block out all light!
Stand inside once its done and check for light leaks using brite lights outside.
 

Attachments

  • Growroompicsj.jpg
    Growroompicsj.jpg
    64.2 KB · Views: 808
  • Growroompicsh.jpg
    Growroompicsh.jpg
    48.7 KB · Views: 697
  • Growroompics.jpg
    Growroompics.jpg
    32.6 KB · Views: 748
  • Growroompicse.jpg
    Growroompicse.jpg
    53.2 KB · Views: 637
These shots are taken in another grow room I had to build when we moved. This will lay out installation of a water proof floor and Foylon. Good reflection is crucial for good yields. I like it because it’s durable and washable Mylar sucks IMO. This stuff is hard to even cut with scissors and can be taken down and reused because we did!
This room was constructed in a bed room and there are three total areas, a 10x6 bud. A 4x6 veg and Per bud and a 8x8 Photo room that doubles as a Clone room as well.
Separate electrical circuits were run and home wiring is used only for fans and the window A/C that keeps things cool.
 

Attachments

  • Finish bud room2.jpg
    Finish bud room2.jpg
    36.1 KB · Views: 482
  • Finish bud room3.jpg
    Finish bud room3.jpg
    49.6 KB · Views: 575
  • Finish bud room5.jpg
    Finish bud room5.jpg
    33.6 KB · Views: 617
  • Goldroom.jpg
    Goldroom.jpg
    67.1 KB · Views: 492
  • Finish bud room.jpg
    Finish bud room.jpg
    49.8 KB · Views: 653
These shots are taken in another grow room I had to build when we moved. This will lay out installation of a water proof floor and Foylon. Good reflection is crucial for good yields. I like it because it’s durable and washable Mylar sucks IMO. This stuff is hard to even cut with scissors and can be taken down and reused because we did!
This room was constructed in a bed room and there are three total areas, a 10x6 bud. A 4x6 veg and Per bud and a 8x8 Photo room that doubles as a Clone room as well.
Separate electrical circuits were run and home wiring is used only for fans and the window A/C that keeps things cool. All this is located behind a discreet door upstairs where no one comes so not only is it a 100% legal garden it is hidden as well so we can live a normal life in the rest of the home.
 

Attachments

  • Finish bud room4.jpg
    Finish bud room4.jpg
    49.5 KB · Views: 525
  • Goldroom1.jpg
    Goldroom1.jpg
    32.2 KB · Views: 631
  • Goldroom2.jpg
    Goldroom2.jpg
    75.6 KB · Views: 567
  • Goldroom3.jpg
    Goldroom3.jpg
    95.6 KB · Views: 501
  • newroomday7a.jpg
    newroomday7a.jpg
    87.7 KB · Views: 672
It was really more like 2 days on the upstairs room and like a week on that free standing one.
 
Room 1 1 K MH using Hortilux Blue
Room 2 1k MH using 1100 Sunmaster
Main room 2 1k HPS Hortilux and a 400 sunmaster warm
Temp area 4 400 MH with Horitlux Blue
 
These shots are taken in another grow room I had to build when we moved. This will lay out installation of a water proof floor and Foylon. Good reflection is crucial for good yields. I like it because it’s durable and washable Mylar sucks IMO. This stuff is hard to even cut with scissors and can be taken down and reused because we did!
This room was constructed in a bed room and there are three total areas, a 10x6 bud. A 4x6 veg and Per bud and a 8x8 Photo room that doubles as a Clone room as well.
Separate electrical circuits were run and home wiring is used only for fans and the window A/C that keeps things cool. All this is located behind a discreet door upstairs where no one comes so not only is it a 100% legal garden it is hidden as well so we can live a normal life in the rest of the home.
how do you separate your areas? I.e., how do you separate your veg area from your flower area? I tried using black and white poly but I found that light leaked out of the edges where it wasn't tightly fastened; but, if I tightly fastened it, it was a pain to move between rooms.
 
I built separate rooms with sheet rock etc. You can use celotex house insulation 2x2's and panda film though if your not building a permanent structure.
 
Back
Top