How to build a carbon scrubber for odor control

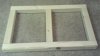
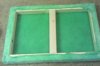
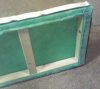
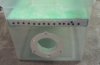
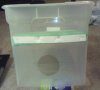
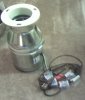
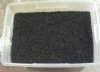
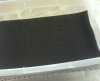
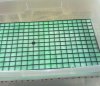
Here is my Activated Carbon Scrubber that I recently built to help with the odor problem. This scrubber pulls air in from the top through the carbon and out the exhaust fan. I will post step by step instructions on here so please don’t post any comments until I am done.

Shopping List:

Wal-Mart:
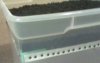
73qt Plastic Tote - $8
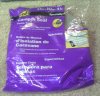
Universal Odor Control Air Filter kit - $10
Silicone Sealant - $3

Meijer:
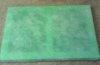
Activated Carbon (6lbs) - $20

Home Depot:
2”x2”x8’ Lumber - $2
Foam Camper Seal - $6
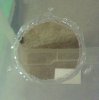
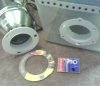
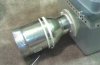
Quick Connect Duct Flange - $7
4in to 6in Duct Reducer - $6
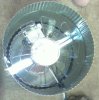
6in Inline Duct Fan - $28
6in Clamp - $2
4in Clamp - $2
Extension Cord - $6

Total Cost: $100
 

Attachments

Making the filter base:

I made the frame for the base out of 2x2 lumber. If you don’t have a power saw at your house Home Depot or Lowes will cut the wood for free; they have a sign that says only the first 2 cuts are free but I have never been charged extra. I had them cut two pieces at 19.75in and three pieces at 10.5in

Build the base, as shown in the picture, with the longer pieces on the outside. Use one 3in wood screw at each point. The filter kit that I bought came with three pieces; a green filter sheet, a carbon filter and plastic mesh for extra support. Set the plastic mesh and carbon filter aside; they will be used later. Lay the base on top of green filter sheet and wrap it around the back of the base, stapling it in place with a staple gun. Apply camper seal around all the edges and use a few staples just to hold it in place during installation. This will help ensure an air tight seal around the edges.
 

Attachments

Installing the filter base and duct flange into the plastic tote.

The duct flange I chose is for a dryer vent going through a wall. I chose this particular version because it is a two piece quick connect version, meaning I can remove the exhaust fan very easily. Set the duct flange on the plastic tote and trace around it to mark the hole. I did not have a hole saw large enough to make this cut so I used a 1/8in drill bit and drilled about 50 holes all the way around the area then used a knife to cut between each hole. The plastic tote can crack very easily when trying to cut the entire hole with a knife so be careful here.

Once the hole is done and the flange has a good fit drill three holes for the mounting bolts. Apply a generous amount of silicone sealant around the hole and were the bolts will be going through the plastic tote. Install the flange and three bolts to hold it securely. From the inside of the tote apply silicon sealant around the hole smoothing it out with your finger; we want this as air tight as possible.

Press the filter base into the tote about 6-8 inches from the top. You may need to use a mallet to get it to fit all the way; we want this to be snug. Insert 1in wood screws through the tote into the filter base around all four edges. This will pull the tote tight against the base making an air tight seal.
 

Attachments

Assembling the fan

For the exhaust I used a 250cfm 6in fan and a 6in to 4in reducer. The reducer will need to be crimped on the 6in side to fit into the fan. The crimping “shrinks” the metal; this is how you get two 6in pieces to fit into each other. The tool for this is $20 and I did not want to buy this for a one time deal so I talked the Home Depot guy into crimping it for me. They happened to have one in the tool box at their store so it worked out good.

Slide the Fan into the reducer and apply some camper seal all the way around the joint. Use the 6in clamp over the camper seal to ensure its air tight. Next slide the duct flange onto the 4in side of the reducer and secure it with the 4in clamp.

For the wiring I used an 8ft extension cord. They sell replacement cords at Home Depot that have nothing on the other end except stripped wires but its cheaper just to buy an extension cord and cut off the end, this makes no sense, lol. The connections are very easy for the fan; green to green, black to black and white to white. If your line and neutral wires are not color coded on your extension cord it really doesn’t matter which one you connect to line or neutral because it is AC, just make sure you get ground (the green one) right. Make sure you use wire nuts for the connection and not just electrical tape, safety first!
 

Attachments

Adding the activated carbon

Trim the plastic mesh and carbon filter from the Universal Filter kit to fit inside the tote. Lay the mesh down first followed by the carbon filter. Now its time to add the activated carbon; you want to have about two inches of carbon here, for me this was just over six pounds. Make sure you rinse off your carbon first because this stuff is very very very dusty. You may want to do this outside. I poured mine into a bucket with a bunch of holes in the bottom and rinsed it with the hose for a few minutes. Then I pored it in a bowl a let it sit to dry while I built the scrubber.

Once your all done place the scrubber in your grow area, twist the fan onto the tote and let it run at all times.

Thanks for reading, post away!
 

Attachments

Top