GrowCab 2.0 is here, Time for round 2.

letam06

Well-Known Member
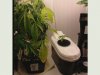
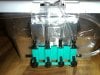
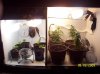
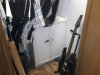
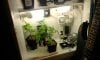
Heres my new grow cabinet. Its 1' Deep x 2.5' Wide x 3' Tall. Those are just rough dimensions from memory. If anybody wants the exact dimensions just let me know. I bought this little cabinet from meijer for around 25 bucks and converted it into a growbox complete with Veg/Clone (top) and Flower (bottom). It is meant to run with 300w of light in the flowering and around 60-100 in the veg/clone. Not all lights are currently installed until heat issue is taken care of, About 60% are in use now.

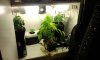
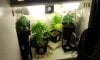
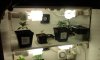
All intake/Exhaust fans are 80mm PC fans that advertise to move roughly 35CFM. I have ordered 2 new fans that move roughly 50+ CFM, One new one for Intake and Exhaust. I have one exhaust for each room near the top and exits out the back of the cab. I also have 2 Intakes down in the bottom right of the flower champer to pull in cool, fresh air from under the cab. Theres about a 3 in. gap between the bottom of the cab and the floor, believe its called a toekick. I have this back part sealed off as well with a 3" dryer vent going around the side to the front of the cab to suck in cool air. I also have another pc fan circulating air from the bottom chamber to the top to better disperse heat. My temps are still running a little high but I control the heat better and better every day. The temp of the veg gets roughly 85 and the flower roughly 80, these are max's along with average. Almost there... Aiming for 80 in Veg and 75 in flower, I believe these temp. goals are very achievable. My last growbox was much smaller and had like 10 42w cfls and I used the same exact fans and my temps were fine. Usually around 80. Any Comments are welcome.

I am using Technaflora Nutrients. I currently have the little starter kit. Never tried these nutrients before and didnt want to spend like $100 of all of the bigger versions. This will be enough for at least 1 grow and Ill know if I like them, If I dont, the kit was only like $35. So far I love them. Excellent results.
Here are the products included in the kit.
-B.C. Boost
-B.C. Grow <-- Macro-Nutrients
-B.C. Bloom
-Root 66 <-- Root Stimulator/Booster
-Sugar Daddy <-- Improves Flavor/Smell
-Thrive Alive B1 Red
-Thrive Alive B1 Green <-- Micro-Nutrients (B1 Red/Green)
-MagiCal <-- Calcium, Magnesium, Iron
-Awesome Blossom <-- Flowering Booster

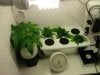
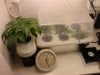
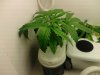
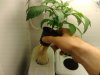
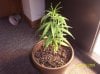
Have a 2 Gallon bucket I keep my water in. I'm just using tap water, Hard water of course. Keep a 6" Airstone in the bottom of the bucket on 75% of each day. The airated tap water always sits for 24 hours so the chlorine can evaporate. I always adjust the PH of the water to roughly 6.0 before watering my plants. I am also using Happy Frog Organic Soil mix. Its basically a mixture of 50% coco, 30% worm castings, 20% Perlite. At least by eyeballing it. Its nice and fluffy soil that allows plenty of air to the roots along with retaining moisture.
 

Attachments

letam06

Well-Known Member
The two biggest plants are AK-47 Clones and I have been saving the seeds from the best smoke for a couple years now and thats what the other plants are. Hopefully, good bagseed. haha.
 

goodolboy

Active Member
Thats pretty neat, looks like alot for such a little space though. Im getting ready to make a CFL growbox, im just trying to figure out wether i want to use a fridge shell or dryer shell.
 

sparkabowl

Active Member
Nice setup. I was thinking of using the BC sampler as well, cool how you can try the whole lineup without buying a bunch of $20-30 bottles. More nute companies should offer something like that.

Your last box was smaller? Did you tie them down? How tall were they when they were done?

Oh yeah, and how do you test your water? Sorry so many ?'s.
 

letam06

Well-Known Member
I have General Hydroponics PH test kit I bought at the local horticulture shop for around $20. It comes with a little dropper, a vial with sealed lid, PH up, and PH down, and PH Test Indicator Solution. Fill the vial halfway with water and put in 3 drops of indicator solution, tells you the ph based on color of solution. works magnificent. Also love the Nutes to. Work very well.

In my last box they got roughly 14" tall or so. I had glass separating them from the 42w cfls so they could be super close and not get burned. This box Ill be able to get them around 18"-2'. Im using both champers right now for veg to speed things up. Waiting for the aquired AK clones to get real healthy again so I can clone them. Once I do that I will have 1 25w Full spectrum bulb up top to keep 2 ak clones alive while I put the bottom chamber on flower. I will be removing all the bulbs currently in the lower chamber and replacing them with 4 55w 2700k and 1 40w 6700k cfl. That should be plenty of watts for around 2-4 18" plants. And will have room for more. Also have Variable speed 80mm PC fans that move 75CFM. So I'll be able to dial in the temp and use way more watts. Ill have 2 intakes and 2 exhausts all wired to 2 different speed controllers. That way I can adjust intake and exhaust speed separetly as I plan to install carbon filter system when the time comes.

I also built a single plant bubble bucket today. Its pretty kick ass. Its a 1.75L containter with sealing lid. Its Oblong, like tylenol shaped. Each end has an opening with a lid for pouring, one with small holes and the others open. Which works excellent for running the air tube to the air stone (side with holes) and holding it in place, and for testing ph and adding nutrients (open pouring side). Without removing the lid or the plant. I took a very small plant from soil and tossed it in a 2" net pot with a rubber grommet to hold the stem. roots hanging just barely in the nut solution. I have a 6" Ceramic airstone at the bottom. This airstone works great, its not one of those cheap blue ones that are super common. Ebay for 5 bucks. It makes really really small bubbles, millions of them. So more air is circulated through the water more efficiently. Which also keeps the roots above the water nice and moist. I have a friend using a 4 gallon bucket with 5 2" net pots with autoflowers in them using one of these airstones and it works amazingly. I also added 1-2 drops of Sugar Daddy, Root66, and B1-Red to the Bubble Nute Solution. PH of the solution is 6.0. Hope the Plants lives.. If not oh well, Gunna take clone in a couple days. Will post pics soon.
 

letam06

Well-Known Member
Oh ya, I tied my last plants down with string and white duct tape. I would tie a VERY lose knot around the stem and tape the string to the side of the pot. That way I could pull the string every couple days and it would pull the plant a little further down. I only experimented with LST with one plant. Grew the damn thing in a circle around the pot. It was pretty damn cool looking all budded out. A wall of buds like 2-3" tall circling the pot, none in the middle. Wish I had more pics from last grow. Camera broke halfway through and couldnt afford another one, didnt want to just buy another POS. Also experimented with some Topping and FIM on 1 plant each. The rest were all just SOG style around 14".
 

MJH54321

Well-Known Member
Oh ya, I tied my last plants down with string and white duct tape. I would tie a VERY lose knot around the stem and tape the string to the side of the pot. That way I could pull the string every couple days and it would pull the plant a little further down. I only experimented with LST with one plant. Grew the damn thing in a circle around the pot. It was pretty damn cool looking all budded out. A wall of buds like 2-3" tall circling the pot, none in the middle. Wish I had more pics from last grow. Camera broke halfway through and couldnt afford another one, didnt want to just buy another POS. Also experimented with some Topping and FIM on 1 plant each. The rest were all just SOG style around 14".


If you tie ANYTHING with string or any other material make sure is dust free first, my friend used an old fone wire and it had dust on it and it caused spider mite.
 

letam06

Well-Known Member
I'm fairly certain a little bit of dust on a phone cord wasnt the direct cause of the spider mites. Just about every indoor grower gets spidermites at some point. Sooner or later its inevitable. Ask anyone. And it was brand new string. I would never use something old and dusty in/with/around my plants.
 

letam06

Well-Known Member
Here is a little bubble bucket I built a few days ago. I'm using a 1.75 plastic storage container. The lid has openings on each end. One end allows pouring with small holes. The other side is just open. Each side opening on the lid also has a lid. I'm sorry if this sounds complicated to you stoned readers. In the ceter of the lid (between lid end openings) is a whole for a 2" Net pot with a rubber grommet. The water is roughly 4/5 full. It reaches the bottom 1/4 of the net pot. I took a small seedling from soil and removed all the soil very gently and then placed in the 2" net pot w/ grommet. Allowing the roots to dangle to the bottom of the net pot. In the bottom of the container there is a 6" ceramic air stone that produces micro-bubbles. Millions of them at a time, all through the airstone, end to end. More bubbles = better aeration. I also added 3 Drops of B1-Red, 2 Drops Root66, and 3 Drops SugarDaddy to the reseviour. Also adjusted the PH of the nutrient solution to 6.0.

Now I did all this a few days ago. There are some pictures of the day I built it and some taken recently. The plant is now recovering from the transplant shock and starting to grow again. Roots look amazing and have probably doubled in size since Transplant. Also a whole set of 3rd leaves developed in 1 light cycle.

I have decided to just clone the AK's and when I do clone them directly to bubble buckets. A dude I know is using one for cloning with amazing results, also using some for full grow. After I clone the AK's to bubble buckets Im going to flower everything out except the 2 ak clones. After everything is done I'm switching everything over to this basic hydroponic style. Faster, bigger, better results with less maintenance and care. Also works wonders for the small size. Also have been looking at like 100W LED setups on EBay. Thinking about buying one for flowering. I seen some for like $40 for a decent one. Ones I have seen results with on here. That way Ill keep heat waaayyyy down and still use CFL for veg to keep it from getting to cool.
 

Attachments

lochem

Well-Known Member
hey i got a Q for ya....
how do you maintain total darkness in the flowering chamber when the lights are on in the veg chamber?? if the air is moving around thru both chambers then surely it cant be totally sealed off one from the other....
 
looks like a nice setup man. i'm hopefully setting up my new grow box this weekend, was wondering how you power the pc fans? sounds like a nice cheap way to vent so i might try it too :)
 

letam06

Well-Known Member
I keep light from reaching the top 2 ways. 1: The flower chamber is on at the same time the veg is on so than I just have to worry bout light leaking down into the flower chamber. 2. I bought a cheap black grow tray, fits perfectly inside. The shelf has 2 2" holes in it to let air from the bottom go to the top. The black tray sits on the shelf with the holes in it and is raised up off the shelf by about an 1" or so. That way air can still circulate up into the veg chamber yet the tray blocks the light and lets air seep up around the edges of the tray.

I power the fans using a 12v like 8amp printer cable I bought off newegg. Plugs into the wall than converts the 120v into 12v. The lower the voltage supplied to the fan the slower it spins and therefore the less air is moved. Each fan also uses like .25 amps. Which means I can power many many fans off this one unit and still recieve full power to each fan. I have had 10 fans working off this in the past with no problems at all. Currently I have roughly 5 pc fans hooked up that way. I will also be installing a 4" neon green pc light so I can open it when the lights are off. Green light will not hurt your plants if the photoperiod is dark, plants do not absorb green light, only reflect it. Whats nice about using that 12v adapter and pc fans is anything from a computer is 12v. So i can wire in this green led light tube thingy no problem.

Also I am seeing such great results with the bubble bucket, I am converting everything over to hydroponic bubble buckets. You guys should see the one plant in the single bucket. Its huge now. Never seen such fast root development or growth. Also cranked up the nutes a few days ago and holy shit. I built a 6 plant bubble bucket out of a plastic shoe bin. It has 2 7" microbubble airstones in it with 6 2" net pots w/ rubber grommets. Also has its own independent air stone airflow controller so I can adjust how many bubbles/air pressure to airstones. will post pics later tonight, prolly in about 2 to 3 hours or so.
 

letam06

Well-Known Member
Heres some pics of the 6 plant bubble bucket. Im going to be filling it up tonight and taking probably at least 1 maybe 2 clones and hopefully they will root. I am also debating of adding like 3 drops of B1 Red and some root66 as the nutrient sheet says for taking cuttings, even though they are for using rockwook. Worked last time so should help this time as well. Last time wasnt a cutting though, it was a seedling that was in dirt and I transplated to hydro. Also the BB has those controls on the side. Picked that up for 5 bucks at the local pet sore. That will let me increase/decrease pressure to each airstone, or shut one or the other or both off if I want. It will also allow me to splice into that air line for other airstones or bubble buckets if need be. As of right now I have a regular single line pump and a dual line pump. The 6 banger will be using the one of the lines from the dual line pump and the other line will go to the single BB.
 

Attachments

letam06

Well-Known Member
Ended up taking the 3 plants I had growing and soil and just basically cloning them over to the bubble buckets. Don't really care if they live or not. I can get about 4-6 different clone strains right now and plan on it in a week or so. The bubble bucket should work great. The 2 airstones def. produce enough bubbles considering the single plant bucket is doing just amazing with one airstone and ALOT less resevior space. Have to fill the 1.75L 1 plant bucket every other day because the roots drink so much, they are absolutely huge. Ill post more pics later tonight. All soil plants are gone! WOOT. So much less work is ahead of me. haha.
 

letam06

Well-Known Member
Alright. So heres some updated pics. The single plant bucket is doing excellent. A few days ago I bumped up the parts per million. I added to the reservoir:
* -.25 ML B1-Red
-.5 ML Boost
-.5 ML Grow
-.25 ML MagiCal
-.25 ML Root66
-1 ML Sugar Daddy
[FONT=&quot] -2 ML Hydrogen Peroxide (3%[/FONT])

I also made sure the PH of the nutrient solution was around 6.0. Plant absolutely love it. Its drinking so fast I have to fill the res every other day or so, its almost at the point where I need to everyday, damn 1.75L container. Oh well, Its still a hell of a lot less maintenance than soil compared to the results. I would have to say for my first time ever using hydroponics I am doing fairly well, even though I am using one of the easiest and cheapest hydro systems.


I also took the 3 soil plants that were in full veg stage and just cut them down and cloned them into the 6 plant bucket. They are all just bagseed so I dont care if they die. I doubt they will though considering the single plant in the single bucket was transplanted from soil only a week after it sprouted from oil, actually took it directly out of a jiffy pellet, haha, and it is flourishing. I am using Rootech Cloning Gel that came with my nutrient kit.

I did have 2 AK clones but with the small soil pots they required way to frequent watering, had to just about on a daily basis and I am busier than your average person. One day about a week ago they were due for a watering and I had a very very busy day and was super exhausted. My lights are on from 10:30 to 3:30 and was waiting thil they came on to water. I ended up falling asleep before I watered them and woke up the next day to them shriveled and dry as shit. oh well. I will be getting some clones soon. I am either going to be getting Lemon Skunk, G13, Blueberry, White Widow, AK-47, Afghan Kush, and theres a few other I cant remember. So far I am leaning towards a couple Lemon Skunk clones and a couple Afghan Kush clones and maybe a blueberry.

I am also debating on making the top chamber smaller and just use it as a place to gather the hot air before it is exhausted out the back, I have noticed not using the chamber my box stays way cooler, around 75 with the full 300W of CFL's. That way I would be able to grow my plants a little bit taller to. If I did this I would build another, separate veg. chamber. Whats nice about this is I can make the veg chamber very very small. Just needs to be big enough to hold 2 small mother plants and can have enough space to fit another 6 plant bucket for a cloner. In my old box my veg was roughly 14" wide by 16" tall by 18" deep and that worked really good for just exactly that. I kept 2 mothers and could have up to 6 clones at once. And they were all in soil so I could even go smaller if I wanted, but that is unnecessary. I haven't fully decided yet. Also toying with the idea of just buying another cab since I already have all the innards and it wouldn't take long to set up another one, maybe one long night at most. Might get something a little shorter but a foot or so wider so I can set it up like my GrowCab 1.0. That one worked very well and had roughly 400Watts worth of CFL's and it was smaller than the current setup. The last few pics are from my old grow cab. Might just keep the single chamber and do it grow by grow since clones are pretty easily available to me all year around. So as you can see im thinking about several different options. My setup works fine now it just could be more efficient and Im a little bit of a perfectionist. Gotta love the Medical Card!
 

Attachments

Top