Grow Room Design for new grower.

GrassBurner

Well-Known Member
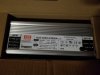
Hey hows it going. Just ordered everything for my first grow. Lights will be 4 qb 120's on a HLG-320H-C2800A driver turned down to accommodate for the 70 watt max of each board.
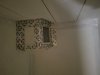
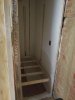
I live in a tiny cabin, with an 8x12 loft upstairs. What is determining my grow cabinet size and orientation are the windows in the loft as well as where you enter. Kitchen is underneath on the left side, and I just use a ladder over on the right side. The view from this sketch would be sitting on my bed, it "floats" above the kitchen. loft.jpg

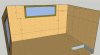
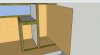
So that's what I'm working with. Thanks to ILoveReggae's advice, here is the direction I'm headed.
grnew.jpg

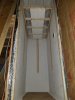
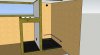
I had originally planned to mount a 5 gallon bucket on a shelf in the smaller box. It wouldn't take me but an hour to run a piece of pex up through the wall into the room. After I get a few grows under my belt, the smaller box could be used for clones and veg right? Seems good to have options. Here are my plans for all the electrical components. 1 fan will pull air from the exterior room through a slot and feed into the grow cabinet, and another fan will be mounted low, pulling exterior air from a slot close to the floor.
grelec.jpg

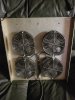
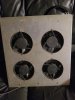
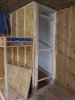
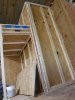
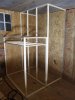
Here is as close as I could figure on a final design that will give me some flexibility. Got any suggestions before I start framing this up? Decided to use 1x2's and 1x3's for the frame. Save a little space, and I have the materials on hand. Ill have 1/2" osb on the exterior which should give plenty of support. Been building a few tiny cabins and I've got quite a bit of good scrap. My plan is to exhaust the cabinet through a 4" pipe filled with activated charcoal pellets into the soffit of my roof so it isnt visible. 1 fan pulling and 1 fan pushing. It's about 18' off the ground where it would exit.
grf.jpg

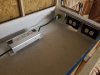
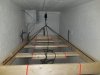
What do you guys think? Trays in the bottom would both have drains in them ran into my main drain line.
 

GrassBurner

Well-Known Member
Thanks for the advice! Luckily my roof is just a flat sloped roof. 2x6s filled with insulation and pine boards as the ceiling finish. But the area where the soffit boards are, is about a 4'x12'x8" space. I'll paint it all black inside before I install the soffit and run the vent securely to an area with holes drilled in it, as well as seal up where the pipe meets the soffit. I just put the tongue and groove ceiling up a couple months ago, could be a pain getting up in there to install the pipe, but I think it will be the most discreet.
 

GrassBurner

Well-Known Member
Grabbed (12) 1x2's and was able to get most of the frame built. Need a couple more pieces, but I'm almost there. The smaller 2x4 cabinet needs doors on the long side instead of the short as I originally planned. I cant squeeze my ass into a 21" wide opening. Tall cabinet measures 24" wide inside, 46 1/2" long, 6'6" tall at the back, and 6'2 at the front. Small cabinet is 21" wide inside, 46 1/2" long, and 40 1/2" tall.
20200407_010021.jpg
 

GrassBurner

Well-Known Member
Today was a good day. Beans showed up, as well as 3 bags of FFOF and my driver :hump:.

20200408_162824.jpg

20200408_193948.jpg
For those of you that have built cabinets, what did you use for your wall covering? I've got a bunch of 1/2" osb laying around. I can slap it up and killz everything. wouldn't have to worry about light penetration. I've got a couple rolls of window tape, it's basically flat adhesive rubber that's about 3" wide. I can seal all the seams up with that.
Plant trays seem a little pricey from greenhouse suppliers. I'm looking at 2 black plastic trays from Rural King, 24"x24"x2", $7.99 each. Originally intended as trays for rabbit cages. Im gonna build platforms with casters as ILoveReggae suggested, so the plastic bins wont be supporting anything. I just want something to keep most of the water off the floor. Any suggestions for the smart pots, should I build little platforms out of some hog wire to keep them about an inch off the tray?
Had to run into town for some materials, got some more 1x2's and 1x3s today, gonna try to finish the frame up.
Went and got my fans out of the shed. They are 6" fans. Not sure of the cfm, not having any luck looking them up by the part numbers. I used to use them in the cabin to bring fresh air in, they move a decent amount of air, and are super quiet. I'm still trying to learn about proper airflow, any suggestions on how I orientate the fans are welcome and appreciated. I was thinking 2 intake, 2 exhaust, but greater exhaust than intake speeds were suggested. So maybe 2 exhaust, and 1 intake? 20200408_185348.jpg

20200408_185336.jpg
 

ilovereggae

Well-Known Member
Looking good @GrassBurner. Couple of thoughts.

I am not a huge fan of smart pots, lots of people love them but I always had issues with dry pockets, they require more frequent watering, and they leak water everywhere. Im pretty OCD in my grow and dont like any mess so I couldnt deal with those. I prefer square plastic pots sitting in saucers or trays so that if there is any runoff they can reabsorb it as the plant starts drinking. Ill send link to the ones im using if interested.

Those fans look good. Im not sure how you would utilize 2 of them for exhaust though. Im thinking you will need to have one inside the top area, blowing out into your exhaust pipe. Im not clear if you were planning the entire ceiling of the grow would be a giant carbon filter? Maybe instead the celing could just be ply with a short 6" intake forcing air into it via the 2nd fan from inside the closet?

For wall covering consider that wood or other material can and will absorb humidity over time. Its also going to get wet from spills and need to be easily cleanable between rounds. I just finished killzing the inside of my cabinet to keep it sealed and mildew free, but am also going to line it with panda film for an extra layer of protection.
 
Last edited:

GrassBurner

Well-Known Member
Thanks for the advice again Reggea! I've got the smart pots ordered already, but I will be very diligent in watering. I'm thinking a plant halo or drip ring would be my best bet for watering. Funny you mentioned the panda film, I've been eyeing it the past couple days. It's basically a black fabric backing with a white plastic sheeting on the face right? With osb, one side has a waxy surface, meant to protect it before it is covered with a siding/roofing. Putting that side as the inside face of the grow cabinet would add an extra layer of security against moisture absorption.
For the filter, I've decided to scrap the original plan of building a box on top, and instead I will vent out to the roof eve. I'm thinking a 6" tube filled with activated charcoal, and a fan pushing air through that tube.
 

ilovereggae

Well-Known Member
Thanks for the advice again Reggea! I've got the smart pots ordered already, but I will be very diligent in watering. I'm thinking a plant halo or drip ring would be my best bet for watering. Funny you mentioned the panda film, I've been eyeing it the past couple days. It's basically a black fabric backing with a white plastic sheeting on the face right? With osb, one side has a waxy surface, meant to protect it before it is covered with a siding/roofing. Putting that side as the inside face of the grow cabinet would add an extra layer of security against moisture absorption.
For the filter, I've decided to scrap the original plan of building a box on top, and instead I will vent out to the roof eve. I'm thinking a 6" tube filled with activated charcoal, and a fan pushing air through that tube.
Cool I am sure you will like the smartpots. Since you have a constant water source, the Blumat system might be a good look. @SCJedi might be able to advise the best way to set that up.

I think there are different types of panda film the stuff i have is just plastic on both sides, black on one side white on the other.

Carbon filter idea seems good, Ive seen some DIY ones no clue about how well they work to be honest though. I am still figuring out best way to setup filters for the new flower cabinet I will be building after I finish this round of upgrades on the veg cabinet. I also need to do something about filtering my drying tent. My apartment currently smells like some skunks died after eating fermented citrus fruits.
 

GrassBurner

Well-Known Member
I'm definitely going to need a drain, possibly 2. If I turn the small cabinet into a clone/veg cabinet, I'll have water in there too. @ilovereggae sounds like a great smelling place!! I looked into the blumats, had a few of them in my cart, but was a little nervous about one getting stuck open. Maybe someone with experience using blumats plumbed to a pressurized supply could ease my worries. I think for now a simple valve to drip rings will get me going, but the blumats did look appealing.
 

GrassBurner

Well-Known Member
Finally able to get some more work done on the cabinet, been crazy busy the last couple weeks. I believe everything I ordered has arrived, so now I just got to get it all together. I've got the main cabinet enclosed, and sealed with an aluminum faced /rubber backed tape. It's made for sealing window openings on new construction, works great around corners and edges.
Also got my carbon filter built and installed. The 6" fan is going to fit right in the dead space between the two cabinets. I'm just going to vent the cabinet into my room upstairs, and pull air from the room below downstairs. I've got the filter box packed with 10lbs of activated charcoal pellets, filled every bit of space.
20200420_041836.jpg

20200420_041914.jpg
Got the door frame built as well, just need to put a skin on it, and get some weather stripping for where the 1x3s hit the face of the cabinet to give me a good light seal. Gonna come up with some kind of hidden latches

20200420_041952.jpg

Should I get my FFOF out and go ahead and mix my perlite and worm castings, and let it do its thing for a couple of weeks before I transplant seedlings into it?
Hopefully tomorrow evening I can finish the door, and get the frame for the qb's built. I got a 2" drain for the floor, I think I'm gonna mix up and pour about an inch of concrete on the floor. I can slick It out, should be pretty easy to clean, and I can set the drain flush with the concrete while its wet. Later on down the road if it becomes a regular closet, I'll just lay some tile over the concrete.

Got the electronics compartment all wired up as well. Got 1 240v outlet, and 4 120 outlets. Just need to mount the driver. I've heard others say their driver ran cool to the touch at 240v, if that's true I'll just put a couple passive vents in the electronics compartment.

That's all for now, I reckon it's back to work.
 

ilovereggae

Well-Known Member
Finally able to get some more work done on the cabinet, been crazy busy the last couple weeks. I believe everything I ordered has arrived, so now I just got to get it all together. I've got the main cabinet enclosed, and sealed with an aluminum faced /rubber backed tape. It's made for sealing window openings on new construction, works great around corners and edges.
Also got my carbon filter built and installed. The 6" fan is going to fit right in the dead space between the two cabinets. I'm just going to vent the cabinet into my room upstairs, and pull air from the room below downstairs. I've got the filter box packed with 10lbs of activated charcoal pellets, filled every bit of space.
View attachment 4539626

View attachment 4539647
Got the door frame built as well, just need to put a skin on it, and get some weather stripping for where the 1x3s hit the face of the cabinet to give me a good light seal. Gonna come up with some kind of hidden latches

View attachment 4539633

Should I get my FFOF out and go ahead and mix my perlite and worm castings, and let it do its thing for a couple of weeks before I transplant seedlings into it?
Hopefully tomorrow evening I can finish the door, and get the frame for the qb's built. I got a 2" drain for the floor, I think I'm gonna mix up and pour about an inch of concrete on the floor. I can slick It out, should be pretty easy to clean, and I can set the drain flush with the concrete while its wet. Later on down the road if it becomes a regular closet, I'll just lay some tile over the concrete.

Got the electronics compartment all wired up as well. Got 1 240v outlet, and 4 120 outlets. Just need to mount the driver. I've heard others say their driver ran cool to the touch at 240v, if that's true I'll just put a couple passive vents in the electronics compartment.

That's all for now, I reckon it's back to work.
Looking great man!

As for your soil, FFOF is already "cooked" in that the amendments *should* be broken down for the most part and EWC are pretty much readily available. I suppose it cant hurt tho and will be good so you arent doing it last minute but I wouldnt worry about it or rush it. Thats all stuff you can tweak over time. You could honestly just plant in FFOF your first run and get a decent yield. Wouldnt be a bad idea so that you have a baseline to know how each other thing you add affects yield.
 

GrassBurner

Well-Known Member
Got a door built today for the main cabinet. Fits tighter than prom night! Going to try to get the qb frame built this evening. I've got some casters I'm going to mount on the outside of the frame to ride up and down the side and back walls. I've got some kind of paracord lifting and lowering apparatus from Viper lights I believe it is. Seems pretty simple. I'll post some updates if I dont get too stoned.

20200421_155306.jpg
 

GrassBurner

Well-Known Member
Finally got the frame for the qb's built. I used 1x3's, zip tied the boards to the frame, and wired them up in series. Got a nice heavy duty anchor screwed into the wood ceiling, and the ratcheting pulley attached to it.

20200427_211827.jpg

I made a few "springs" out of some 16 gauge sheetmetal. Attached casters to them, and used some small trim to make "tracks" for them to ride up and down. This will keep the light from swaying or bouncing around when I do my inevitable bull in a china shop impression.

20200427_205138.jpg

20200427_212106.jpg

Picked up a pretty sweet thermometer/hyrgometer. Its bluetooth so I can monitor it without opening the cabinet. The app also allows you to set warnings for temp/humidity thresholds, and monitor hourly/daily/monthly charts for temperatures.

20200427_210431.jpg
 
Top