"Ebb Table" Concept - Input and Suggestions Needed

Buddy232

Active Member
Evening my RI friends.

Those who have gotten to know me have learned that I always have ideas floating around in my head. Recently I was brainstorming with a knowledgeable friend about creative full scale setup's - but we didn't chat much about vegging. Here is something I thought up.

The idea of this is mixing a flood table setup with the top feed technique that ebb & grow users employ - plus some plumbing. I envision something easy to setup-maintain, has a small foot print, auto feeds multiple times daily, however drys quickly. Basically, the best of both worlds.

Sorry if there is other, or even better techniques for this. Remember I'm new to soil, let alone hydroponic.

Front.jpg


TOP.png
 

Buddy232

Active Member
Continuing...


Sorry if the diagrams are hard to read. I'm terrible at drawing, and even the basic tools of MS paint is a massacre waiting to happen at my hands. BUT, I thought it was the best way to express what I'm trying to explain. Anyways, lets start with the front profile view.

1. Reservoir
2. Pump.
3. 1/2" Vinyl or clear tubing.
4. Table
5. "Distributor Bar"
6. Drain
7. Ball Valve

On the front profile everything is fairly self explanatory except for the "bar" and the valve. I will explain it all just for fun. :)

So. Whenever your timer is set to go off, water/nutes are pumped from the reservoir, through the tubing and through the "distributor bar". (Anyone wanna come up with a better name for it, please do.) The bar feed's each individual plant. The table serves simply as a holder for the plants, and has a bottom drain piped right back to the reservoir to prevent excess water from sitting on the grow medium. The ball valve on the main reservoir is for cleaning/flushing. Rather than moving anything it's easier to have a BV and either collect it into a container or pipe it off somewhere else. Work smarter not harder.

Okay for the top view. Now that I explained the front you likely don't even need this explain. But, I'll finish.

1. "Distributor Bar"
2. Growdan Cubes (with covers) Or netpots... whatever
3. 1/4" Tubing


What's you guys thoughts? I may start the build either way, however I could post a more elaborate parts list if anyone is interested. Obviously thing's don't just hook up as they do in the picture.

Bud
 

MYWhat?

Active Member
Front view #3. If you use clear tubing for this or #5 (Manifold) it will promote the growth of algae. (Same with the individual lines to each plant). You can cover them with pipe insulation on the manifold to keep the nutrient water from getting warm and to block the light. The one running up from the pump wouldn't need insulation if you use black water pipe.
Front view #6. The drain. They sell bulkhead drains for flood tables in a variety of sizes, 1/2, 3/4, 1, and 1 1/4 inches. All of which have a variety of bulkheads, risers and screen attachments. The top 3 are bulkheads, which are the actual drain attachments. Bottom row of pic the 2 on the left are the risers. (if your going to top feed you may not want these) basically used to leave an amount of nutrient water in the table. The last 3 are screens some of which have risers built in.
Bulkheads, risers and screens.jpg (Side note) If your building your own bucket system these bulkheads work way better then the grommets that come with your typical ebb-n-flow.
If your going to be going into a homemade bucket system you could save yourself a lot of time and hassle if you just use the bucket net pots. Then when you go directly into your bucket system after there done vegging, all you need to do is unhook the tubing to the drip stake and put it in your bucket system. Then hook the feed tube back up.
6 net pot bucket.jpg They have a ten inch net pot version but it's just going to use more hydroton, and your 5gal buckets have plenty of room for root growth. (the roots will look like an upside down blown open umbrella, once they grow in)
drip stakes.jpgAll I have is 1 drip stake per bucket lid and it gives all the water a plant could need. (you don't need the more expensive drip rings)
I have found that 30 seconds on and 20 minutes off works great for the bucket system. You may need to up the frequency in the flood table if there is no nutrient water left in your table once it drains back, maybe not though

I hope this helps
MYWhat?
 

Buddy232

Active Member
Evening MYW,

Thanks for the reply. I appreciate it!

I had bounced a few ideas around regarding the different types of tubing/plumbing I should use. I'm glad you shed your opinion as I completely forgot about algae growing inside the pipes!! With that said I guess the design would need to be made using ABS and black poly tubing. PVC could be used instead of ABS, however the ABS would look nicer.

For bulkheads I have a secret weapon. I've tried to introduce this to a few people but it really hasn't caught on. For any type of through hull connection, I use male/female pvc electrical terminal adapters. For $2 you can home make the most secure "bulk head" ever. I have two of these that I installed myself running as part of my old man's pond system; 50,000 gallons of water has gone through every day for 2 years now without a drip.


Do you use hyrdoton or grodon/rockwoll in your bucket lids MY? I think I would go more for the 10" lid/pot than 6" my self. 'Monstahhh' plants.


Bud
 

MYWhat?

Active Member
I'm just here to help you throw some idea's around. The idea's I post are my view on what work's best for me. So don't take anything I share as the definitive answer to any aspect of your growing style!

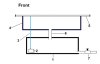
I only mention this because your bulkhead appears that it will have a built in riser. which will allow for water to remain in your table between cycles. This may promote algae to grow in the table if not covered to prevent light from getting to the table and warming up the inch or so of water that remains.

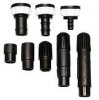
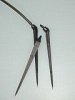
I bought a package of 10 bulkheads (3/4") for $19.99. Which gave me enough for my 6 flowering buckets, 2 for my flood table and still have a couple left to through into a couple more buckets. These seal good cause they have a 1/2" lip and a rubber washer.For like $0.50 a piece they also allow for screens to be plugged right in. Which comes in handy to help keep the roots in your bucket system from washing down the drain tube.
Bulkheads and feed lines.jpg
I only bring this up so you don't forget (if your still going to build both) you also have your buckets to outfit with bulkheads.
View attachment 1922329View attachment 1922329

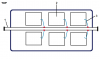
Flexible tubing fits these bulkheads snugly and don't require clamps. However I do like the more rigid drain pipes. As a matter of fact in my new flower room, I will be installing 3" solid plumbing in 2 twelve foot long rows. Elevated at the back of the room 2 to maybe 3 inches, blocked underneath and fastened right to the floor. This will allow for 4 rows of plants. The top of this pipe will have a 3/4" hole drilled for every bucket location. Outfitted with 3/4" grommets i will be able to use flexible tubing on my buckets then into the 3" solid return. The plants will be on these. I found a bunch at a local discount store for $5 a piece.
Plant dolly.jpg
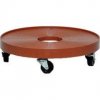
I may have to shim the plants at the back of the room with a1" plywood disk.(painted or something similar) Depending on the flexibility of the tubing installed on the buckets a 90 deg elbow may be required to attach to the solid drain through the grommets.
Coupled to the side of each 3" drain will be a 3/4" or 1" solid feed pipe. With 1/4" black poly noodle tubes that go to each bucket. They will be attached to the solid pipe by means of a small 1/4" shutoff valve.

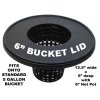
I have only used the 6" net pot lids, but haven't experienced any plant size limitation, because the buckets are still 5 gallon. I went with these simply to cut down on the ammount of hydroton I use. I am often cleaning out the inside of these buckets do to nutrient sediment and checking the roots for rot or to make sure there not growing through the screens. Which means the plants need to be lifted up. I have a family member hold them up while I use a shop vac to suck up the nutrient sediment. I then pop out the drain screen removing any roots that may be attached and give it a once over with the vac as well. I do this maybe 2 times during a full veg to flower grow, but may still be necessary once doing a flowering stage only.

A 10" pot will require more hydroton and in return weigh more. However the 10" will establish a larger upper root zone! I haven't used a 10" so I'm unsure of it's potential.

I use hydroton. I don't like how much moisture the rock wool holds right at the stock. Plus I would still need to have anotherView attachment 1922446 medium to fill the rest of the net pot for stability reasons. The hydroton also holds a ton of air in all of it's pores.

Sorry for rambling on so, but I hope the insight into how I roll helps. Of course this is just my take on things and encourage you to do what works best for you!!
MYWhat?
 

MYWhat?

Active Member
I had a wicked time with the attachments doubling up on the first pic. Tried to correct it but it's still leaving links. So sorry about all the dead links.
 
This is sort of a whatever works for you is great! It seems we all have our own differences on how to grow and they all seem to work. Myself, I use a pump to feed my nutrients to the plants 24/7 with dripper's. They naturally drain into the pan and gravity takes the nutrients back to my feed tank. It just goes around and around. Never had a problem with quality or quantity with this method.
 

Buddy232

Active Member
This is sort of a whatever works for you is great! It seems we all have our own differences on how to grow and they all seem to work. Myself, I use a pump to feed my nutrients to the plants 24/7 with dripper's. They naturally drain into the pan and gravity takes the nutrients back to my feed tank. It just goes around and around. Never had a problem with quality or quantity with this method.
I'd love to see it! Is it one pump powering everything?
 
Top