DWC LED 600W Starting from Seed :)

OG_Dreams

Member
Hey guys! I've been lurking about the forums for awhile learning from everyone's awesome posts, journals and other information/advice and have decided to start my own journal and maybe help some other growers out along the way! I am in no means an expert on growing so I look forward to any feedback, comments or questions you may have. I'll try to frequently update this post with photos and info on how the grow goes!

I really wanted this to be a true start-finish journal on how I set up my grow room and then starting to grow cannabis from seed using a single 5-gallon DWC system and if people enjoyed watching my grow bloom ;) then I could continue to expand with maybe a more complex DWC system and do another journal on that :) Anyways lets get into it!

So I started off by deciding whether a grow tent or building my own grow space would be more efficient for the space I had. I'm working with a walk in closet with dimensions around 3x4x6, and a lot of the tents I looked at were either slightly too small or too large for my closet so I decided to build my own!

Equipment used:
(2) 10x10 black/white panda wrap(honestly could have been done with 1 roll but I had some measuring issues)
(6) 1.5"x1.5"x100" wood beams
(1) 2x4 (hold the weight of the light)
Duct tape
Staple gun
Drill with drill bit attachment
3" Wood Screws
(1) 15' roll of Velcro tape

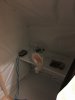
So first I measured the dimensions of all the walls, ceiling and flooring I would be using for my grow space. Used those measurements to cut my panda wrap to size(make sure to give yourself an inch or two on each side of the wrap to create an overlap.) Once all my pieces had been cut out I used the duct tape to hold the wrap in place temporarily where I would then be stapling it into its final place. This took me around 2 hours to do from start to finish.

With my reflective surface in place, I started to work on the frame which would effectively hold my light. (Note: the only reason I had to build the frame was because my closet didn't have any studs I could drill my hook into that would hold the light, and putting that much weight on drywall is no bueno. So if you're lucky enough to have a stud or some other safe method of holding weight then you can skip this!) Alright where was I, so I built my frame just shy of 3x4x6 that way I would be able to slide it into its final resting place without having to mess with my already set up panda wrap. With my wood beams being 1.5"X1.5" drilling a pilot hole is necessary before drilling my screws in so as to not spilt the wood. After I built the frame to my dimensions I measured where I would be placing my 2x4 to support the weight of my light, once that was drilled into place all that was left was to push it in place!

With everything in place it was time to create a door, I cut out a piece of the panda wrap to the door dimensions placed Velcro tape on the right length and bottom of the wrap and frame, stapled the left side and ceiling and voila you have a door. Now with the grow room set up we can start on our lighting, ventilation, our small 5-gal DWC system!
 

Attachments

Last edited:

chronicboomz

Well-Known Member
Really cool, clean looking build on your room, nice work! Also props on the quality of your first post, very detailed. I'm running nft currently but I'm planning on looking at DWC in a couple of grows time. I look forward to seeing your set up.

Best of luck with the grow! You picked a strain yet?
 

OG_Dreams

Member
Really cool, clean looking build on your room, nice work! Also props on the quality of your first post, very detailed. I'm running nft currently but I'm planning on looking at DWC in a couple of grows time. I look forward to seeing your set up.

Best of luck with the grow! You picked a strain yet?
Thank you! Hopefully some of the info I post on here will be of some use to you soon!

Yes! I chose Black Jack feminized seeds, I chose these because of my limited grow space and many reviews said they're a very resilient plant. I'm very excited to see how it turns out :)
 

OG_Dreams

Member
Now with the grow room set up, it's time to lug all those components in there that are needed to keep your plants happy!

Equipment used:
(2) 5-gallon bucket (black)
Net Pot Lid
(1) Inline fan 435cfm (I flipped mine around and made it an exhaust fan, also a smaller cfm fan could have been used but I had to run my ventilation tubing 20+ft with some turns)
25' Duct Ventilation
(1) Viparspectra 600w LED Full Spectrum light
(1) Adjustable O2 Pump 127gph
(2) Air Stones
20' Silicon tubing (to connect your pump to air stones)
Oscillating fan
Digital Thermostat

It seems like a lot but most of this stuff is fairly inexpensive and can be bought at your local Grow store. There are also full kits out there that include everything you need to get started if your looking for a quicker way to get going, I personally enjoyed going out and looking at multiple shops and what they had to offer and picked up a few things from each place.

The only installation that needed to be made was the inline fan, luckily there was a stud running across that point so I was able to drill some screws in to secure it up top. (Might have to rig up some sort of insulation around this fan, cause it is loud!)

From this point it was pretty much placing everything into the room, running some extension cords and making sure none of the cords tangled with each other or were in my way in the room.

Everything is starting to come together and look like an actual grow room, I'm excited to finish it all up in the next day or so and finally get to the fun stuff!
 

Attachments

chronicboomz

Well-Known Member
Looking good dude. Black jack looks nice, I checked out some pictures. Really interested to see how your 600w fs LED performs.

With the limited space you have and with only running 2 plants, have you considered using a scrog screen to increase yield? Not sure how the light penetration of the LED compares to a 600w HPS, but if it has less penetration a scrog would also help with that.
 

OG_Dreams

Member
I was reading up a bit on the scrog method and it really interested me but I was confused on some points. When scrogging, should I mainline first and then lst through the screen or do you just let it grow out till the screen and then lst and prune from there?
I tried looking at a few links but none were as detailed as I wanted them to be :/
 

OG_Dreams

Member
Ok, so I have everything connected and ready to go at this point in my grow!

Seed: Black Jack Feminized (hybrid)
Nutrients: Flora Trio, Clonex, And SM90 (trying to keep it simple and clean)
PH Up/Down
SNS 203 (hopefully won't have to use this)

I purchased my seeds from Nirvana. I really like this company so far, user friendly website even on mobile, fast shipping and a ton of selection. Will definitely be picking up some more strains for the future from them!

I recieved my seeds in the mail yesterday and immediately started the germinating process. My method has always had good results and use items most households already have so I thought I would share it :) You will need 2 Kitchen Plates, the darker the better, 6 coffee filters, tap water (if your area has decent water) and someplace warm! I first get my coffee filters and use these just like the normal paper towel method (I use coffee filters because I feel like they're less abrasive than paper towels and when I take the seed/tap root off the filter I don't get that "stick" that I sometimes feel with paper towels when picking them up for the first time.) Place half the filters on the plate, then seeds and then your second layer of filters on top of the seeds. Run some water over them (not soaking) and place your second plate on top of your first (creating a simple humidity dome) and let those babies soak over night. I place my plates on my seedling mat to speed up the process. With this method I've always seen tap roots by the 24hour mark, if I don't I usually chalk it up to a bad seed.

This morning my tap roots were just peaking out so I switched them over to my pre-flushed Rock wool and threw them into the humidity dome, I had some PH balanced water left over from flushing the cubes so I put that into a spray bottle and have been using it to mist inside the dome.
image.jpeg
I have my seedling heating mat resting on top of the 5-gallon bucket that will eventually be used when transplanting my seedlings from their humidity dome. I'm not sure if my light should be this close since it is 600w but I really want to avoid stretch and make the most out of my space :/
image.jpeg
I checked on my babies once I got home from work, lo and behold they already started to sprout! I immediately misted them because I noticed the rock wool looked a little dry. Should I have these girls resting in a little bit of water? Should I add some Clonex to the water in the dome to help with roots? Or wait till I transfer them over to my bucket?

Hopefully my next update will be featuring some little green leaves!

Edit: Just saw the sticky of not posting in other people's journals and I don't mind at all! I encourage you guys to comment or ask questions. I'm always about learning new ways of doing things or helping any way I can
 
Last edited:

chronicboomz

Well-Known Member
The end goal is basically to get as many side branches to act like top colas as
I was reading up a bit on the scrog method and it really interested me but I was confused on some points. When scrogging, should I mainline first and then lst through the screen or do you just let it grow out till the screen and then lst and prune from there?
I tried looking at a few links but none were as detailed as I wanted them to be :/
The aim with a scrog is essentially to develop as many side branches as possible. By continually tucking these branches back under the netting as they grow, you create an even canopy of 'top colas', all optimal distance for your light.

How you achieve this is up to you. Mainlining would be a great way to start preparing for your scrog to start. I personally top my plants above the 5th node, then again after they recover and produce 2 more nodes on each new growth. I also top any side branches that are showing themselves to be particularly strong. Set your screen about 8-12 inch above the top of your DWC bucket (make screen as big as you can to maximise yield). Then tuck any growth that reaches more than 3 inch through the screen. This means pulling the growing tip back under the net and moving it outwards one square. As your plant expands to fill the scrog, side branches pop up through the screen all over the place to fill up and spare holes you may have. A week before you flip (flip when roughly 70% of your screens holes are filled), lollipop your girls (remove all growth under the screen that isn't going to reach the height of the screen during the stretch). This concentrates energy on making the primo buds big and reducing the amount of popcorn buds. Continue to tuck till the end of the 2nd week of stretch, then let them be for the rest of your grow.

Scrog yields can be immense, even with limited space/light. A scrog also makes for a very consistent crop, most of your buds end up roughly the same size. Done correctly, I guarantee you will be more than pleased with the results! I am 4 days away from a harvest with a scrog net if you want to check out my grow.

If I missed anything or was unclear in anyway, feel free to fire some questions, I will be happy to help!
 

OG_Dreams

Member
Thanks for the info! After reading your post on scrogging and going over a few more guides on scrog, I think that's what I will end up doing. Looks like I have another reason to stop at the grow shop again :bigjoint:

I checked on my girls just recently and noticed a slightly yellow depression on one of the coytelodons and on the other seedling it seems to have a purple stem and tinged purple coytelodons as well. Are both these things normal? It's so hard to tell if I'm over/under watering!
image.jpeg
image.jpeg
 

OG_Dreams

Member
So update on the seedlings, I feel like I may have over watered, I'm not too sure. Here's a few pics of them:
image.jpeg
image.jpeg
image.jpeg
They just don't seem happy and one of them looks like it has blisters on one of the leaves!
Any one see anything like this before?
 

chronicboomz

Well-Known Member
So update on the seedlings, I feel like I may have over watered, I'm not too sure. Here's a few pics of them:
View attachment 3683302
View attachment 3683303
View attachment 3683304
They just don't seem happy and one of them looks like it has blisters on one of the leaves!
Any one see anything like this before?
Most likely due to too high light intensity for such young leaves. Raise your lamp by 12 inch until the seedling has 3rd set of true leaves coming through. I wouldn't worry too much about it dude, it really won't make any difference in the long run.

So long as your cubes are not sopping wet, but damp, your good to go.
 

eastcoastmo

Well-Known Member
Looking like a great setup mate, top stuff.
I'd say they aren't liking the radiance from the light, minimum height for seedlings is about 24 inches until they reach 3rd set of leaves. LEDs can be tricky to dial in but once they are, they take off pretty quickly! Keep up the good work with the research man amd best of luck with the grow :)
Easty
 

OG_Dreams

Member
Lovin the feedback and support, keep it coming! :bigjoint:

Day 4:
Update for the day, I came home to find both the seedlings had a root coming out the bottom of the rock wool so I transferred them to my 5-gal buckets, surrounded with hydroton. One bucket I have the o2 tubes running through the net, and the other I drilled holes into the side of the bucket, just wanted to see which way would work best for me.
image.jpeg
Temp is a little high because I turned off the exhaust fan while I was in there working, it usually sits at 76-77F. I can't seem to raise my humidity up, think I might have to go pick up a humidifier.
image.jpeg
This girl started off strong but now the leaves have started to droop, I still think she is suffering from overwatering.
image.jpeg
This one I have no idea about, the leaves from the beginning pointed upwards, the leaves seem a little dark, but I haven't used any nutes just yet.

Thanks for keeping up with the grow
 

OG_Dreams

Member
Looking like a great setup mate, top stuff.
I'd say they aren't liking the radiance from the light, minimum height for seedlings is about 24 inches until they reach 3rd set of leaves. LEDs can be tricky to dial in but once they are, they take off pretty quickly! Keep up the good work with the research man amd best of luck with the grow :)
Easty
Thanks man I appreciate it! I moved my lights up about 8" to the 24" mark and think it was for the best, it was too close
 

Kannah-krazy

Well-Known Member
And dark green is good , its when it starts to get so green it almost looks black/ blue is where id start to worry

Conrats on a successful transplant into there buckets , this is often the most stressfull stage for a young seedling and it seems like you have managed to transplant with no issues or undue stress.

Grow hard .
 

eastcoastmo

Well-Known Member
Thanks man I appreciate it! I moved my lights up about 8" to the 24" mark and think it was for the best, it was too close
No probs mate and good work moving it up! As they grow up, you'll find that sweet spot where everything grows very lush!
With the watering, try and let them dry out a bit more, you'd be surprised how little they need under a LED. Mine get watered every 3 days under my LED where i used to water every day under the hps. Let the plants tell you when they need it!
 
Top