DIY flood tables and grow trays

ruwtz

Well-Known Member
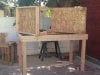
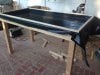
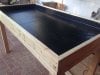
Today I built up my own flood table and 4 grow trays from lumber, lined with a waterproof poly membrane, and finished with a drain hole.

This flood table is for my veg room and measures just short of 4x8ft, sitting 3 1/2ft off the ground which is an ideal working height for me and suits perfectly the lights and room dimensions.

IMG_1673.jpg

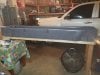
I also built four smaller grow trays, one for each of my lights in flower, built to fit 4 x 7 gallon pots, or 6 if I have to push it.

IMG_1661.jpg

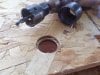
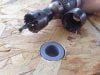
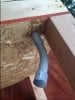
All these are fitted with a drain hole so I can collect runoff when I pull the plug.

They are not built to hold water all the time, although they probably could cope with that.

I have a lot of lumber stock around so this came in super cheap, but even from scratch this can easily be achieved for much less than the cost of hydro flood tables or similar if price is your prerogative.

Build specs to follow with pics...
 

ruwtz

Well-Known Member
Here's a decent view of the framing.

Table surface is OSB board (using the smooth side up to avoid ripping the membrane), framed underneath with 2x3 lumber for rigidity and 4x4 posts for legs. At 42" high this is tall to suit me and my needs: now I don't have to bend or sit to prune, LST etc. My plants are right where I want them.

On top of the surface is a 2x4 frame to give it sides, like a low tide tray. All wood seams were caulked for protection.

I will be adding additional bracing across the legs once I move it into the space, and also at this height I've won myself some free storage space the table. I'll probably shelf this up for a reservoir and other bulky stuff to keep out of the way. I like to keep the floor completely clear.

IMG_1639.jpg

Stacked on top are the smaller tables for the flower room, with 10" inch legs only to keep them slightly elevated enough for me to slide something under to collect runoff. These have been sized to fit my flower room with just enough room to walk/work between them, and can be positioned to best suit the lighting footprint.
 

ruwtz

Well-Known Member
I ran a drain hole into each table like this, working as close to an edge corner as I could.

A 1 1/8th hole saw bit cut half depth to counter sink the plastic piece I chose to use as a sink hole, and then ran a 7/8th hole bit all the way through.

IMG_1642.jpg

Here's the plastic piece recessed into the wood to finish nice and flush with the table surface. I opted for whats called a box adapter used in PVC electrical conduit as I couldn't find anything similar in plumbing that had the 'lip' feature to keep it in place in the hole.

IMG_1643.jpg
 

ruwtz

Well-Known Member
Now for setting down the lining. I went about gluing with Liquid Nails as I had a bunch lying around, and its cheap.

As with most things I like to squirt it out liberally and rub in with a putty knife, and I think most men are the same.

IMG_1652.jpg

Once all the surfaces were smothered in white stuff I knew I was done here.

IMG_1653.jpg
 

Attachments

ruwtz

Well-Known Member
I cut a piece of 6 mil poly lining to fit the box and the sides with enough to fold all the way over the edges of the wood.

Working quickly and cleanly I smoothed the lining over the surface, pushing out as many wrinkles and air pockets as I could manage. The corners are tricky but a bit of wrapping-paper folding does the trick nicely. I let the glue do its thing whilst I cut the trim to finish the top sides.

IMG_1654.jpg

IMG_1658.jpg
 

ruwtz

Well-Known Member
Here's the drain hole sunk into the poly lining. I am ignoring my pedantic self and choosing to find peace with the damn wrinkles.

IMG_1674.jpg

The box adapter drain hole is met on the underside by a 3/4" conduit sweep, glued with PVC cement and all edges caulked. The sweep is finished with a cap that I can pop off when I want to drain the tables after watering.

Pretty simple really. And probably a bit ghetto, but hey it suits my needs and I saved a bunch of cash.

IMG_1678.jpg
 

cindysid

Well-Known Member
I just built something similar with a pond liner I had lying around. Mine are trays for my 5 x 5 tent and veg closet. I even put a similar tray (using the floor in place of wood on the bottom) in my new 9x9 grow room. I'm always spilling water or soil, so now I can get out the wet vac for a quick cleanup with no worries about it damaging the subfloor! Your trays are awesome. I appreciate your attention to detail. The wrinkles really bug me too, especially in the grow room! The plants are in there now though, so any imperfections are undetectable!
 

jijiandfarmgang

Well-Known Member
I used to grow using tables. They can be cool if you get around the caveats. Basically no light should hit down below. I've seen some pretty cool encapsulating ideas using poly.

- Jiji
 

jijiandfarmgang

Well-Known Member
What do you mean by "below"? The Res?
Well you don't want light hitting the res. But what I meant was you don't want light hitting the roots. The plant will still grow either way, its just better that the lights don't hit the root zone, so It doesn't hinder the roots growth.

- Jiji
 
Top