tat2ue
Well-Known Member
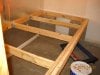
Step 1
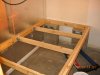
Build a solid strong base in which to put your table on top of. I can't stress enough how important it is to get this supporting frame as level as possible. If it's not level, instead of draining completely...the results will be pooling water in different spots on your table which could lead to root rot. I used concrete cinder blocks as a guide and to support the frame as I built it. Once complete, I used door shims at key spots to level it out and then attached it to the surrounding walls using 3" drywall screws.
Step 2 (Building the table)
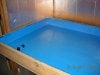
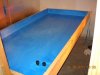
I used a 4x8 sheet of 3/4 inch cabinet grade plywood for the bottom and 2x6's for the sides. Attach the 2x6's to the plywood using inch and 3/4 course thread drywall screws. Once attached, use 3" drywall screws with washers to attach the 2x6's together at the corners. Make sure your cuts are straight so that when screwed together, they will make a very tight corner with "NO" gaps.
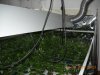
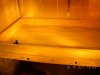
Step 3 (placement of F & D fittings)
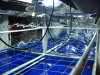
Select where you want your fittings to go. Make sure their placement will not interfere with your netpot placement like I use for my SOG op. When you install them, it's best to counter sink them a little bit. This will insure that your table will drain as completely as possible.
Step 4 (Water proofing your table)
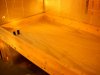
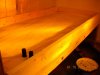
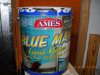
In the past I used rubber or plastic sheeting or pond liners to hold in the water and keep it from leaking. But I still had a few leaks now and then. But now I coat the inside of my new tables with a liquid rubber I found called "BLUE MAX" from a company called "Ames Research". It can be ordered from them at amesresearch.com or at any paticipating Ace Hdwe store. This is a liquid rubber that is waterproof and can be applied with a roller,brush or an airless sprayer. It is non-toxic to all animals and plants and is safe enough to coat the inside of a water tank for drinking water.
I just applied it on with a brush and a roller. I applied 3 coats and went heavier in the corner and the seams. It will dry in a few hours and will take up to 2 weeks to fully cure. It is also a good idea to put some sorta seam tape where the 2x6's meet the plywood and in the corners where the 2x6's come together.
Step 4 (finishing touches)
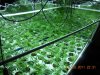
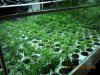
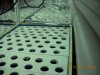
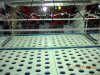
The way you will use your flood table will determine how you will finish it off. In my case, I am using them for a 104 plant SOG table. I attached 2 pieces of aluminum "L" angle to each side of my box. This will support and suspend 8 pieces of 1x12's that are 4 feet long
over the table. Ea piece has thirteen 3.75 inch holes cut in them for netpots. Also I built a pvc frame over the table to secure a net for the plants. Building it this way will allow me to raise or lower my net depending on my needs and plant growth. I am also going to attach a couple of metal handles to the front of the box so if needed, I can slide the box forward a couple of feet and crawl underneath and then I can pop up on the back side the do any trimming, pruning etc that I can't reach from the front.
Tomorrow I will have this table loaded up with AK48 and Wonder Woman clones from Nirvana. I'll post those pics in a day or two.
In closing, The table works great, No leaks, No mess
Build a solid strong base in which to put your table on top of. I can't stress enough how important it is to get this supporting frame as level as possible. If it's not level, instead of draining completely...the results will be pooling water in different spots on your table which could lead to root rot. I used concrete cinder blocks as a guide and to support the frame as I built it. Once complete, I used door shims at key spots to level it out and then attached it to the surrounding walls using 3" drywall screws.
Step 2 (Building the table)
I used a 4x8 sheet of 3/4 inch cabinet grade plywood for the bottom and 2x6's for the sides. Attach the 2x6's to the plywood using inch and 3/4 course thread drywall screws. Once attached, use 3" drywall screws with washers to attach the 2x6's together at the corners. Make sure your cuts are straight so that when screwed together, they will make a very tight corner with "NO" gaps.
Step 3 (placement of F & D fittings)
Select where you want your fittings to go. Make sure their placement will not interfere with your netpot placement like I use for my SOG op. When you install them, it's best to counter sink them a little bit. This will insure that your table will drain as completely as possible.
Step 4 (Water proofing your table)
In the past I used rubber or plastic sheeting or pond liners to hold in the water and keep it from leaking. But I still had a few leaks now and then. But now I coat the inside of my new tables with a liquid rubber I found called "BLUE MAX" from a company called "Ames Research". It can be ordered from them at amesresearch.com or at any paticipating Ace Hdwe store. This is a liquid rubber that is waterproof and can be applied with a roller,brush or an airless sprayer. It is non-toxic to all animals and plants and is safe enough to coat the inside of a water tank for drinking water.
I just applied it on with a brush and a roller. I applied 3 coats and went heavier in the corner and the seams. It will dry in a few hours and will take up to 2 weeks to fully cure. It is also a good idea to put some sorta seam tape where the 2x6's meet the plywood and in the corners where the 2x6's come together.
Step 4 (finishing touches)
The way you will use your flood table will determine how you will finish it off. In my case, I am using them for a 104 plant SOG table. I attached 2 pieces of aluminum "L" angle to each side of my box. This will support and suspend 8 pieces of 1x12's that are 4 feet long
over the table. Ea piece has thirteen 3.75 inch holes cut in them for netpots. Also I built a pvc frame over the table to secure a net for the plants. Building it this way will allow me to raise or lower my net depending on my needs and plant growth. I am also going to attach a couple of metal handles to the front of the box so if needed, I can slide the box forward a couple of feet and crawl underneath and then I can pop up on the back side the do any trimming, pruning etc that I can't reach from the front.
Tomorrow I will have this table loaded up with AK48 and Wonder Woman clones from Nirvana. I'll post those pics in a day or two.
In closing, The table works great, No leaks, No mess
Attachments
-
 49.5 KB Views: 1,174
 -
 51.5 KB Views: 995
 -
 43.2 KB Views: 1,089
 -
 43.2 KB Views: 959
 -
 40.6 KB Views: 976
 -
 82.5 KB Views: 1,134
 -
 44.5 KB Views: 1,975
 -
 41.6 KB Views: 1,184
 -
 64.4 KB Views: 1,300
 -
 95.2 KB Views: 1,189
 -
 98.7 KB Views: 2,010