rollandtoke
Active Member
Introduction
OK, so I decided to build myself an air filter today as my ladies are starting to stink in all the right ways...hope this is the right place for it. And I apologize ahead of time if I explain some things way too detailed..but Ive been a newb before myself and know sometimes you just need that extra explanation to understand things....
To give you a little background...Im a computer nerd and have a ton of extra hardware laying around...I also have 4 different aquariums running, so have miscellaneous accessories (like carbon-based filters) available for usage...and as such, I managed to build this Air Filter for absolutely free...however, cost can differ for each person (obviously)...either way...it's cheap an easy.
Anywho....here's my step by step guide on building a (free) carbon-based air filter for any-sized grow room...
Item Checklist
First, gather your materials, you're going to need (most) of the following....
- Small cardboard box (or a shoebox works)
- Sharp Razor blade
- Wire Cutters/Strippers
- Wire Nuts or Splice Connectors
- Electrical Tape
- At least 1 Computer fan
- Old household charger (for an old dust vac, or phone, or ipod, anything with a positive/negative pushin 12V)
- At least 1 (preferably 2) aquarium filters (obviously the ones with carbon in it, can be new or used...i went used)
- Extra cardboard
- Dryer Sheets (fabric softener sheets/lint screens...w/e you call them)
- Packaging Tape (or duct)


Filter Installation
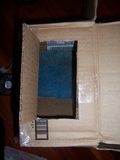
Ok....now...onto the actual build...first thing is to install the filter in 1 side of the box...the side that will be our "IN" flow....What I do is place the filter on the box, trace it out with pencil, then cut inside the trace by about 1/2 centimeter (to insure a tight fit) then force the filter into the hole...in this instance I added an extra piece of tape on the outside, to hold the filter in place.
This time, I installed the filter with the plastic outside, sheerly for aesthetic purposes...it really wont make a difference as the carbon is trapped between the black plastic and the blue fibers...


and if you had more than 1 filter (like me), install it (them) proportionally in the box (so if you have one extra filter, set it up halfway through the box, if two erxtra filters, then split the box into 3rds)...

As you can see in the picture, I took 1 extra step that is completely optional...I used extra small pieces of cardboard (cut to fit) to create a small zig-zag shape in the box for the airflow path... the difference isnt huge, but I have found that creating a sort-of "Trap" for the air results in better filtering, at least it smells better, and hides the stink quicker...
Installing Fans
Ok, next step is to cut the holes for an install the fan(s) into the system...easiest way is to follow the same procedure as the filter...put the fans on the box. trace an outline, then undercut the outline and force fit the fans into the space (its only cardboard, very flexible...plus the tighter the fit, the more pressurized/sealed a system you have).


One important thing to pay attention to is the direction of the airflow...providing you are just using standard 80mm or 120mm fans with no LEDs, the direction of rotation and airflow should be on the side of the fan (I tried to take a picture but my camera sux at close-up). Just make sure when you mount the fan the airflow is OUT of the box. One easy way to tell if you cant find the directional arrows is look for the side of the fan that has the name on the center...that is almost always the outflow....


Closing Up
OK...almost done...next step is to take the Dryer sheets and just place them in the box in between the filters (if just using 1 filter, then use staples/tape to attatch sheets to the cardboard....you do not want them getting sucked into the fan. This is where the "Trap" I built in the box earlier is very helpful as I just fold the dryer sheets over the extra cardboard...nothing else needed.....

I also take an extra step here and cut a piece of cardboard to fit ontop of the whole assembly, tape it on the edges (to create a seal) and then close the top pieces of the box and seal it all shut...


Power Wiring
Ok...now the last step....POWER!!! You can do this many ways...I came up with 2 while doing it...the one I have picutres of works if you do it right (and have the connections on the fan to make it happen), but if not the second way is way easier....
But First...a small tutorial on neg/pos wiring...
If you are unsure of which wires to connect...black is negative always and goes with black, nothing else. The other colors go together (you should either have red, blue, or white, or possibly black with a white/grey stripe....all are positive)
If you use a computer fan, you should have 2 or 3 wires
...if 2 wires...most likely black and red, and if 3 wires a black, red and blue wire...
FOR THE NEGATIVE
- connect the black wire from the computer fan to the black wire from the Power Charger (after stripping both wires at the tip, approx 1cm) using either wire nuts or splice connectors
FOR THE POSITIVE
- connect the red (and blue/white wire(s) if more than 2 wires) of the fan to the Available wire of the charger (should just be one wire left either red, blue, white, or black with a stripe on it)
- If you have 2 wires left on the power side, you are using a cable that is used to more power than necessary for this....which I do not recommend or adhere to, but you can just connect all the positive wires together, make sure to wrap in electrical tape tho, and keep an eye out for any burns, in case its overloading the cable.
and now that ive finished my necessary safety disclaimer...onto the methods...
Method One
What I did was take an old power supply from a computer and cut off one of the hard drive power connectors, doesnt matter if the computer works or not...the wiring is always good (unless completely rusted/corroded), it just needs a current to go through it....


The picture is of an male ATA cable, but a male SATA cable works just as well (as long as the fan's cable is a female SATA)....if you are unsure of what (S)ATA means...skip to Method 2
What you need to do next is cut the Household charger's cable to expose wiring...strip both the wires to expose about 1cm of wire....then take the wires from the hard drive connector you cut off, remove the plastics of each wire and again expose 1cm of copper/silver wire. Once stripped, connect them. You can either use wire nuts to just "screw" the wires together, but I prefer to "Splice" them together using "splice connectors". and then throw electrical tape over the connection....this is a more permanent way and I recommend testing with wire nuts first to make sure the connection works...then splice together. If not you might end up wasting a bunch of splice connectors...
If you are unsure of how to connect the wires...you either didnt read everything or just was scrolling through...either way...scroll back up (above the two previous pics) and look for "But First...a small tutorial on neg/pos wiring..."
Once you have the household charger's wires changed to the hard drive adapter, simply connect it to the fan's female end....


Method Two
if you dont have an (s)ATA female to connect to on your fan, then you will need to just remove the adapter from the equation...instead of taking the HDD connector and "splicing" or "screwing" it into the house-hold charger's neg/pos ends...just cut the end of the plug from the fan...remove approx 1cm of plastic to expose the wire and just "splice" or "screw" the wires directly....this is the natural way to do it, the only reason I personally went with Method 1 was so the fans are easily interchangeable if one craps out.
Conclusion
In the end, you should have a 95% airtight, carbon-based Air Filter that is not only cheap, its very small, light and convienent...I just put the box right infront of my girls...with the back filter facing them, to pull the stink from them, filter it, and pump clean air out the front, towards the rest of the house...


I know there are other guides out there for Do-It-Yourself Air Filters, but I figured since I was setting up my own filter for free, I had to document it and share it with everybody else, to spread the knowledge.
Questions are more than welcome!!!
* If, when working/testing this setup, you short out any power...First...determine which areas of the house lost power....Second...go to your circuit breaker in your residence and turn off the associated room's switches...wait 10 seconds, throw them back on. If you lost power in more than just the room you are working in...YOU ARE PULLING TOO MUCH POWER!!! (or else the wiring sux at your place)...either way...stop and respond to my post with pics so we can assess the situation...Im no electrician but ive fucked up enough to learn from past mistakes...and sub-sequentially taught myself how to wire properly
** If, at any point, you are confused/lost/stupefied/befuddled/flabbergasted/overwhelmed/Inebriated or just plain have a question, I welcome replies as well as PMs, so dont hesitate
OK, so I decided to build myself an air filter today as my ladies are starting to stink in all the right ways...hope this is the right place for it. And I apologize ahead of time if I explain some things way too detailed..but Ive been a newb before myself and know sometimes you just need that extra explanation to understand things....
To give you a little background...Im a computer nerd and have a ton of extra hardware laying around...I also have 4 different aquariums running, so have miscellaneous accessories (like carbon-based filters) available for usage...and as such, I managed to build this Air Filter for absolutely free...however, cost can differ for each person (obviously)...either way...it's cheap an easy.
Anywho....here's my step by step guide on building a (free) carbon-based air filter for any-sized grow room...
Item Checklist
First, gather your materials, you're going to need (most) of the following....
- Small cardboard box (or a shoebox works)
- Sharp Razor blade
- Wire Cutters/Strippers
- Wire Nuts or Splice Connectors
- Electrical Tape
- At least 1 Computer fan
- Old household charger (for an old dust vac, or phone, or ipod, anything with a positive/negative pushin 12V)
- At least 1 (preferably 2) aquarium filters (obviously the ones with carbon in it, can be new or used...i went used)
- Extra cardboard
- Dryer Sheets (fabric softener sheets/lint screens...w/e you call them)
- Packaging Tape (or duct)
Filter Installation
Ok....now...onto the actual build...first thing is to install the filter in 1 side of the box...the side that will be our "IN" flow....What I do is place the filter on the box, trace it out with pencil, then cut inside the trace by about 1/2 centimeter (to insure a tight fit) then force the filter into the hole...in this instance I added an extra piece of tape on the outside, to hold the filter in place.
This time, I installed the filter with the plastic outside, sheerly for aesthetic purposes...it really wont make a difference as the carbon is trapped between the black plastic and the blue fibers...
and if you had more than 1 filter (like me), install it (them) proportionally in the box (so if you have one extra filter, set it up halfway through the box, if two erxtra filters, then split the box into 3rds)...
As you can see in the picture, I took 1 extra step that is completely optional...I used extra small pieces of cardboard (cut to fit) to create a small zig-zag shape in the box for the airflow path... the difference isnt huge, but I have found that creating a sort-of "Trap" for the air results in better filtering, at least it smells better, and hides the stink quicker...
Installing Fans
Ok, next step is to cut the holes for an install the fan(s) into the system...easiest way is to follow the same procedure as the filter...put the fans on the box. trace an outline, then undercut the outline and force fit the fans into the space (its only cardboard, very flexible...plus the tighter the fit, the more pressurized/sealed a system you have).
One important thing to pay attention to is the direction of the airflow...providing you are just using standard 80mm or 120mm fans with no LEDs, the direction of rotation and airflow should be on the side of the fan (I tried to take a picture but my camera sux at close-up). Just make sure when you mount the fan the airflow is OUT of the box. One easy way to tell if you cant find the directional arrows is look for the side of the fan that has the name on the center...that is almost always the outflow....
Closing Up
OK...almost done...next step is to take the Dryer sheets and just place them in the box in between the filters (if just using 1 filter, then use staples/tape to attatch sheets to the cardboard....you do not want them getting sucked into the fan. This is where the "Trap" I built in the box earlier is very helpful as I just fold the dryer sheets over the extra cardboard...nothing else needed.....
I also take an extra step here and cut a piece of cardboard to fit ontop of the whole assembly, tape it on the edges (to create a seal) and then close the top pieces of the box and seal it all shut...
Power Wiring
Ok...now the last step....POWER!!! You can do this many ways...I came up with 2 while doing it...the one I have picutres of works if you do it right (and have the connections on the fan to make it happen), but if not the second way is way easier....
But First...a small tutorial on neg/pos wiring...
If you are unsure of which wires to connect...black is negative always and goes with black, nothing else. The other colors go together (you should either have red, blue, or white, or possibly black with a white/grey stripe....all are positive)
If you use a computer fan, you should have 2 or 3 wires
...if 2 wires...most likely black and red, and if 3 wires a black, red and blue wire...
FOR THE NEGATIVE
- connect the black wire from the computer fan to the black wire from the Power Charger (after stripping both wires at the tip, approx 1cm) using either wire nuts or splice connectors
FOR THE POSITIVE
- connect the red (and blue/white wire(s) if more than 2 wires) of the fan to the Available wire of the charger (should just be one wire left either red, blue, white, or black with a stripe on it)
- If you have 2 wires left on the power side, you are using a cable that is used to more power than necessary for this....which I do not recommend or adhere to, but you can just connect all the positive wires together, make sure to wrap in electrical tape tho, and keep an eye out for any burns, in case its overloading the cable.
and now that ive finished my necessary safety disclaimer...onto the methods...
Method One
What I did was take an old power supply from a computer and cut off one of the hard drive power connectors, doesnt matter if the computer works or not...the wiring is always good (unless completely rusted/corroded), it just needs a current to go through it....
The picture is of an male ATA cable, but a male SATA cable works just as well (as long as the fan's cable is a female SATA)....if you are unsure of what (S)ATA means...skip to Method 2
What you need to do next is cut the Household charger's cable to expose wiring...strip both the wires to expose about 1cm of wire....then take the wires from the hard drive connector you cut off, remove the plastics of each wire and again expose 1cm of copper/silver wire. Once stripped, connect them. You can either use wire nuts to just "screw" the wires together, but I prefer to "Splice" them together using "splice connectors". and then throw electrical tape over the connection....this is a more permanent way and I recommend testing with wire nuts first to make sure the connection works...then splice together. If not you might end up wasting a bunch of splice connectors...
If you are unsure of how to connect the wires...you either didnt read everything or just was scrolling through...either way...scroll back up (above the two previous pics) and look for "But First...a small tutorial on neg/pos wiring..."
Once you have the household charger's wires changed to the hard drive adapter, simply connect it to the fan's female end....
Method Two
if you dont have an (s)ATA female to connect to on your fan, then you will need to just remove the adapter from the equation...instead of taking the HDD connector and "splicing" or "screwing" it into the house-hold charger's neg/pos ends...just cut the end of the plug from the fan...remove approx 1cm of plastic to expose the wire and just "splice" or "screw" the wires directly....this is the natural way to do it, the only reason I personally went with Method 1 was so the fans are easily interchangeable if one craps out.
Conclusion
In the end, you should have a 95% airtight, carbon-based Air Filter that is not only cheap, its very small, light and convienent...I just put the box right infront of my girls...with the back filter facing them, to pull the stink from them, filter it, and pump clean air out the front, towards the rest of the house...
I know there are other guides out there for Do-It-Yourself Air Filters, but I figured since I was setting up my own filter for free, I had to document it and share it with everybody else, to spread the knowledge.
Questions are more than welcome!!!
* If, when working/testing this setup, you short out any power...First...determine which areas of the house lost power....Second...go to your circuit breaker in your residence and turn off the associated room's switches...wait 10 seconds, throw them back on. If you lost power in more than just the room you are working in...YOU ARE PULLING TOO MUCH POWER!!! (or else the wiring sux at your place)...either way...stop and respond to my post with pics so we can assess the situation...Im no electrician but ive fucked up enough to learn from past mistakes...and sub-sequentially taught myself how to wire properly
** If, at any point, you are confused/lost/stupefied/befuddled/flabbergasted/overwhelmed/Inebriated or just plain have a question, I welcome replies as well as PMs, so dont hesitate
