Kalashnikush
New Member
Hi this is my first post on this site. I recently started a small indoor project and wanted to share a little light rig I made for my plant. The idea came from various posts that I read on this site and this post:
https://www.rollitup.org/led-other-lighting/644336-leds-stripping-back-bs-vegging.html
and also: https://www.rollitup.org/led-other-lighting/656542-flowering-cree-bulbs.html
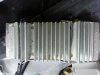
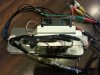
Basically Some growers on this site claimed that store-bought Cree LED light bulbs(9 Watt 5000 K, and 9.5 Watt 2700 K ) are sufficient to grow a plant from start to finish. Also by removing the glass bulb, the light intensity is supposed to increase (though I don't know how that might it effect the spectrum of the light). So I just gutted 2 Cree light bulbs, which were meant for the grow room and flattened their LED array, stuck it on the first cooling surface i could find, which happened to be a CPU heat sink. I figured that since the manufacturers of this bulb didn't use any thermal compound for the LED and its metal contact assembly, I shouldn't be a stickler about that stuff either, so I just used super glue.
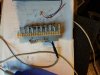
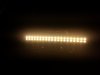
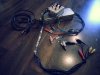
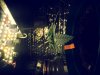
That is supposed to be the blooming side light for my, as of now, a 15 day old plant. It is made of 2 LED strips from a Cree (9.5 Watt 2700 k). This should at least in theory be more efficient then the stock omni -directional bulbs, since all the LEDs are facing the same way less light scatter should happen. Since I only have this one bloom light, Figured in the future I could stick it to a wall vertically and start some sort of a rig to spin the plant slowly around it, a La Rotisserie.
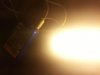
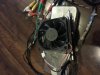
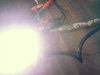
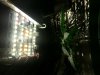
A rather lethargic, slow and quiet pc fan was enough to cool the entire thing to almost room temperature. If nothing else this little strip looks like a little sun when its on.
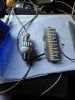
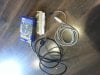
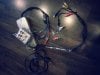
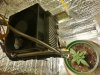
As for the "ballast" portion of the LED bulbs, I put them in a plastic box and wired a PS/2 connector, which I gouged out of an obsolete motherboard, and a computer power cord on the other end.
Total project cost: ~30 dollars + some heat-sink + old computer parts.
Results: 2 LED strips at 9.5W a piece=~19W, 2700 K.
Losses:- One LED ballast, which gave it's life in teaching me the errors of bad use of alligator clips.
-The instant loss of warranty on those lamps ( and 10 years is pretty lofty indeed).
I am working on a bigger version of this light that uses 5 LED strips now. gonna try to post some pictures
Alright here is the new version of the grow light. Now with 5 strips of LED from Cree "60W" off the shelf lightbulbs.
Based on the success of the first model( not catching on fire or breaking after a quick 12 hour stress test) I decided to use all the LED light bulbs I had around and came up with this design:
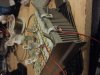
This is basically 4 strips of 5000k 9.0 Watt LED lights and 1 strip in the middle of 2700k 9.5Watt( they are almost the same wattage, yet the middle strip has double the diodes???). It was a bit of a gamble since the light-bulbs actually cost around 15 dollars a pop, and worked just fine. The metal heating fins would get scalding hot, but other then that significantly cooler the CFL of that wattage. So to break perfectly good lights for some project would better result in equal or better light!!
after using much heat shrink tubing and super glue to hold the wires down and organize the mess of wires I put some shrink tubing around the tabs that were sticking out( I couldn't come up with a better way to soldier the wires without the risk of harming the LEDs in the process).
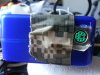
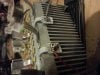
Next was the "Ballast Box": I had to find a case to house the driver circuits of 5, 9W LED strips. I decided to leave the drivers in their original plastic enclosures, since I don't know how hot they get and their native housing is purpose- built for their containment.
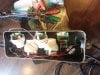
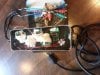
The "output" wires I chose were old television cables, since analog cables are rapidly becoming antiques. It was hard to find 5 connectors for both female and male types, so I settled for the above.
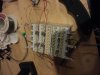
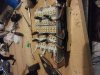
There is the wiring, right before I popped on the hood and taped it.
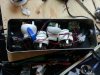
This portion was painstaking and took a long time, since I didn't want to destroy any precious driver boards. In the end The results looked like these:
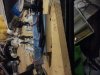
I then found a small CPU fan that fit perfectly with the heat-sink, and connected that to an adapter of 6V output from a cellphone charger or something even though the fan is rated at 12V ( previous attempt at LED grow light showed that only a light airflow was needed to keep temperatures low).
As with the previous version it glows like a small sun when it turned on. There is a warmer yellow LED strip in the middle, but you wouldn't know about that when its on, its so damn blinding.
ok so..
Results: 4 LED Strips of 9W 5000K LED, and 1 9.5W strip of 2700K LED= ~45.5 Watt of light directed in one direction.
cost: ~75 dollars + a heat-sink + some junk.
The best part: the package of the light bulbs says that these are dimmable, and since I haven't changed the circuits in any way, I could control the lighting levels with a dimmer.
The way it is now its actually too bright for my baby plant, I have to get a dimmer!
https://www.rollitup.org/led-other-lighting/644336-leds-stripping-back-bs-vegging.html
and also: https://www.rollitup.org/led-other-lighting/656542-flowering-cree-bulbs.html
Basically Some growers on this site claimed that store-bought Cree LED light bulbs(9 Watt 5000 K, and 9.5 Watt 2700 K ) are sufficient to grow a plant from start to finish. Also by removing the glass bulb, the light intensity is supposed to increase (though I don't know how that might it effect the spectrum of the light). So I just gutted 2 Cree light bulbs, which were meant for the grow room and flattened their LED array, stuck it on the first cooling surface i could find, which happened to be a CPU heat sink. I figured that since the manufacturers of this bulb didn't use any thermal compound for the LED and its metal contact assembly, I shouldn't be a stickler about that stuff either, so I just used super glue.
That is supposed to be the blooming side light for my, as of now, a 15 day old plant. It is made of 2 LED strips from a Cree (9.5 Watt 2700 k). This should at least in theory be more efficient then the stock omni -directional bulbs, since all the LEDs are facing the same way less light scatter should happen. Since I only have this one bloom light, Figured in the future I could stick it to a wall vertically and start some sort of a rig to spin the plant slowly around it, a La Rotisserie.
A rather lethargic, slow and quiet pc fan was enough to cool the entire thing to almost room temperature. If nothing else this little strip looks like a little sun when its on.
As for the "ballast" portion of the LED bulbs, I put them in a plastic box and wired a PS/2 connector, which I gouged out of an obsolete motherboard, and a computer power cord on the other end.
Total project cost: ~30 dollars + some heat-sink + old computer parts.
Results: 2 LED strips at 9.5W a piece=~19W, 2700 K.
Losses:- One LED ballast, which gave it's life in teaching me the errors of bad use of alligator clips.
-The instant loss of warranty on those lamps ( and 10 years is pretty lofty indeed).
I am working on a bigger version of this light that uses 5 LED strips now. gonna try to post some pictures
Alright here is the new version of the grow light. Now with 5 strips of LED from Cree "60W" off the shelf lightbulbs.
Based on the success of the first model( not catching on fire or breaking after a quick 12 hour stress test) I decided to use all the LED light bulbs I had around and came up with this design:
This is basically 4 strips of 5000k 9.0 Watt LED lights and 1 strip in the middle of 2700k 9.5Watt( they are almost the same wattage, yet the middle strip has double the diodes???). It was a bit of a gamble since the light-bulbs actually cost around 15 dollars a pop, and worked just fine. The metal heating fins would get scalding hot, but other then that significantly cooler the CFL of that wattage. So to break perfectly good lights for some project would better result in equal or better light!!
after using much heat shrink tubing and super glue to hold the wires down and organize the mess of wires I put some shrink tubing around the tabs that were sticking out( I couldn't come up with a better way to soldier the wires without the risk of harming the LEDs in the process).
Next was the "Ballast Box": I had to find a case to house the driver circuits of 5, 9W LED strips. I decided to leave the drivers in their original plastic enclosures, since I don't know how hot they get and their native housing is purpose- built for their containment.
The "output" wires I chose were old television cables, since analog cables are rapidly becoming antiques. It was hard to find 5 connectors for both female and male types, so I settled for the above.
There is the wiring, right before I popped on the hood and taped it.
This portion was painstaking and took a long time, since I didn't want to destroy any precious driver boards. In the end The results looked like these:
I then found a small CPU fan that fit perfectly with the heat-sink, and connected that to an adapter of 6V output from a cellphone charger or something even though the fan is rated at 12V ( previous attempt at LED grow light showed that only a light airflow was needed to keep temperatures low).
As with the previous version it glows like a small sun when it turned on. There is a warmer yellow LED strip in the middle, but you wouldn't know about that when its on, its so damn blinding.
ok so..
Results: 4 LED Strips of 9W 5000K LED, and 1 9.5W strip of 2700K LED= ~45.5 Watt of light directed in one direction.
cost: ~75 dollars + a heat-sink + some junk.
The best part: the package of the light bulbs says that these are dimmable, and since I haven't changed the circuits in any way, I could control the lighting levels with a dimmer.
The way it is now its actually too bright for my baby plant, I have to get a dimmer!

