Ballast wiring and lamp setup, HELP!

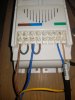
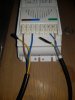
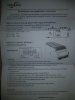
Hello, I recently bought a 600W grow-kit from hempatia.si. The ballast came with no wires but I found the exact model and how to do wire it properly ( https://www.alchimiaweb.com/blogen/install-eti-ballast/ ) and it's pretty simple and straightforward so I do not know why my lamp isnt working. The ballast is making the usual buzzing sound when I plug it in but the lamp isnt working at all.
I triple checked all the wire colors, i tried different brown and blue slots on the ballast, changed all cables including the one from the wall socket.
I'm really out of my element here and have no idea what to do next and time is of the essence as my outdoor plants are starting to enter flower stage due to shorter days but they are still babies.
Any assistance and advice will be greatly appreciated,

thank you !
 

Attachments

Last edited:

J232

Well-Known Member
I got distracted with “please operation with rules”

I would try tying them together as well.
 
It seems they used google translate or something because the language used barely makes sense..
I'm from Europe so 230V is what im using.
 
according to the schematic on page 2, 1 and 2 and 3 and 4 should be tied together.
Im sorry I tried understanding what that means but I'm so out of my element with this, I dont even know what to google to get what youre explaining to me haha
Did you mean I should put the blue wires from both cables (wall outlet and the one that goes into the lamp) in the same slot on the ballast? And the same for brown?
If you can dumb it down for me, that'd be great.
 
I tried powering a small ventilator with this ballast and it gave it power, not sure if that indicated an issue with the lamp. (I did try a different bulb which also didnt work)
 

rkymtnman

Well-Known Member
If you can dumb it down for me, that'd be great
you need to make a small jumper wire (2 actually) and put it between 1 & 2. do the same between 3 & 4. then run your L In to either 1 or 2 and your N in to 3 or 4.

the way you have it now is Voltage is only on terminals 1 and 3.
 
you need to make a small jumper wire (2 actually) and put it between 1 & 2. do the same between 3 & 4. then run your L In to either 1 or 2 and your N in to 3 or 4.

the way you have it now is Voltage is only on terminals 1 and 3.
So is this guide here : https://www.alchimiaweb.com/blogen/install-eti-ballast/
Is it just invalid then?

Sadly I dont feel like I can handle all the fancy stuff you said here without burning the whole thing
 
yeah makes sense, could be a different thing even tho it looks the same. I will try to do what you said and will report if I'm alive after
 

rkymtnman

Well-Known Member
Sadly I dont feel like I can handle all the fancy stuff you said here without burning the whole thing
think of it this way: looking at your 1st picture.

somehow ( a jumper wire) you need the brown wire to occupy terminal 1 and 2 at the same time.
same with the blue. you need the blue on terminal 3 and 4 at the same time.

don't kill yourself plz.
 
you need to make a small jumper wire (2 actually) and put it between 1 & 2. do the same between 3 & 4. then run your L In to either 1 or 2 and your N in to 3 or 4.

the way you have it now is Voltage is only on terminals 1 and 3.
BTW when you say to run the L in to 1 or 2, which L is that, LR or LA?
 

rkymtnman

Well-Known Member
BTW when you say to run the L in to 1 or 2, which L is that, LR or LA?
L is line voltage
N is the neutral leg

these would come from your wall socket

these are very important that you get correct so you probably need a multimeter or find a buddy that has one
 
Top