3000 lumens, Low heat CFL reflector, £10 including bulbs!!!

Hettyman

Well-Known Member
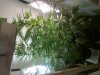
I have been using these as "side" or "additional" lighting, but due to an over abundance of surviving clones, I will be attempting a mini-grow using 2 of these, just for fun.

I bought all my bits in general house hold stores while out doing my normal shopping, except the cable which I always have knocking about, so estimated a price.

You will need:
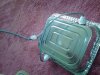
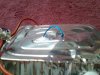
£ 0.50 - Aluminium Disposable Baking tray
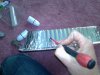
£ 2.00 - lamp holders (£1 each), I use B22, but country specific
£ 0.10 - "Chop Block" Screw terminal connectors (£1 per strip)
£ 1.00 - Fused plug
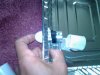
£ 2.00 - Suitable electrical cable
£ 5.00 - 2 x 23w 1500 lumens bulb £2.50 each
----------
£10.60 - shop around online or buy bulbs in multi packs to get it even cheaper.

I've never done a guide like this, so i'll do it post by post... bare with me :lol:
Oh yes and excuse the pics too
 

Attachments

Hettyman

Well-Known Member
Stage 1:
Puncture holes in the side of the baking tray. There are a variety of different bulb positions you could use, take your time, look at the bulbs and size tray you have, and figure out what will give the best/most even light reflection. I always mount my bulbs horizontally as most reflectors you buy are like this, and I trust the hundreds of manufacturers have done some research at least over the years.
Use the corner of a small flat ended screw driver blade, and gently push it through the foil tray, then gently wiggle it about to open the whole up untill you can get a finger in and shape the hole to the size of the thread on the light fitting. Do this gently, and start small... its easier to make it bigger then try and pull it closed again!!
Next unscrew the "neck" of the light fitting, poke the thread through, and then replace the neck.... if you made the whole just the right size, this will be enough to hold the bulb in place once tightened.

NOTE: IT IS EASIER TO WIRE UP THE LIGHT FITTING BEFORE ATTACHING IT TO THE TRAY, I WILL NOT BE GIVING DETAILS OF THIS!!! ASK YOURSELF RIGHT NOW "CAN I CONFIDENTLY MAKE THIS A SAFE LIGHT FITTING?"... IF NOT, ENLIST THE HELP OF A FRIEND WHO CAN... SERIOUSLY THERE ISN'T GOING TO BE MUCH POWER GOING THROUGH IT, BUT I'M NOT TAKING THEM BLAME FOR ANY SCORCHED PLANTS!!! :lol:
 

Attachments

Hettyman

Well-Known Member
Stage 2

You should now be able to see where your bulbs will hang inside the reflector. With this in mind, puncture a few air holes to allow the heat to rise off of the bulbs and out of the reflector. Again use the corner of a small flat head screw driver for this, start gently, make the holes small,, and enlarge slowly if necessary.

Depending on the size of your baking tray (mine is 32cm x 26cm) you will need about 20cm of cable coming out of each light fitting. Connect these together into one side of screw connectors, and then 2 metres of cable out of the other side and attach a suitably fused plug (again length dependent on your grow set up, but always allow a little more then you need, for flexibilty in use)
REFER TO MY COMMENT ABOUT CABLING AND GOOD CONNECTIONS IN THE PREVIOUS POST :wall: :lol:
 

Attachments

Hettyman

Well-Known Member
Stage 3

Depending on your grow room, and needs there are several ways to mount your light fitting, use your imagination. For example I have some hanging, using nylon washing line, and some on wooden stands for side-lighting, see what you can come up with.

FINAL SAFETY NOTE: HOWEVER YOU SET UP YOUR REFLECTOR, MAKE SURE THE BULBS ARE CLEAN AND GREASE FREE AND NOT IN CONTACT WITH ANYTHING... AND IF NECESSARY GET AN ADULT TO HELP WITH ANY CUTTING OR "SHARP WORK" :lol:

Feel free to ask any questions, but I might take a while to reply
 

Attachments

Top