1000W of Timber 4-COB 3590 Kits

Nu-Be

Well-Known Member
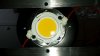
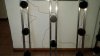
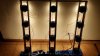
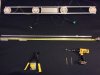
A few weeks back, I ordered 5x of the 4-cob CREE CXB3590 3500k CD bin kits from Timber Grow Lights.

03 Timber 4-cob Kit.jpg

I wanted to create a build thread to explain why I decided on these kits, plus show a few pics to help other newbies dive into the world of cob lighting. :)

So, why did I choose to buy these Timber kits over other options? There are two big reasons:

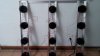
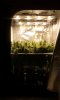
1) The Timber kits are plug and play. They come with all components pre-assembled, with the strings of cobs and drivers pre-wired and burned in (tested) before shipping. All you have to do is mount them on a frame and plug them in. I spent a couple hours building frames and installing the cobs + drivers. I'm fairly meticulous, and I'm sure I saved 3-4hrs of my precious weekend (per frame) by not having to assemble, seat, mount, and wire the cobs.

2) Even though Timber does all of the assembly and wiring for you, the Timber kits cost less than all other available kits (and possibly by a lot based on exchange rates), even after coupon.

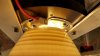
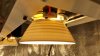
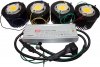
The components Timber uses are top notch. Their kits offer a Meanwell dimmable driver

01-Driver.jpg

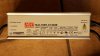
and Cooliance 100x70mm heatsinks. They have waterproof 10A fuses built in

07-Fuse.jpg

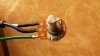
they use top of the line thermal interface material (Arctic Silver - it can make a 2-3°C difference over TIMs), and are pre-wired with quality power cabling that includes a green ground wire per driver to mount to your frame

03-Plug2.jpg

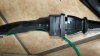
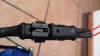
and a potentiometer that dims from 10-100%

04-100kPot.jpg

(you can clip the green ground wire on the dimmers if yours have it - they're an unnecessary extra).

Anyway, let's get to some build info.
 
Last edited:

Nu-Be

Well-Known Member
How’d I build them? I’ll give a little info, but this won’t be a tutorial. Essentially, I calculated the rough spacing I wanted inside my 4x4 tents. A 3x3 light frame seemed optimal in both veg and flower.

I built two assemblies. One 600W for flower, and one 400W for veg. Construction of the frames included the following items:
  • 16x 36”long pieces of 1”x1”x1/8” angle t6-6061 aluminum, 8 per light, cut locally - $50 total
  • A drill + 1/8”, 1/4”, and 3/8” drill bits
  • 6/32 nuts and bolts .75 long (thanks growmau5)
  • 4 pair of 1/8” hangers
  • Some heavy 100grit or larger all-purpose sandpaper to deburr
  • Mechanics gloves
Each frame consisted of three light rail assemblies (using 2x 36” angle each) with cob assemblies bolted on

08-CobAssembly.jpg

with each of those light rails mounted at either end to another 36” angle. The holes for the cobs were measured 3/8” from the edge of the angle, and drilled using 1/8” bits.

The holes to mount angles to angles at the ends are 1/4”

05 Frame Construction.jpg

and the holes to mount the hangers are 3/8”.

02 Hangers.jpg

Flower = 3 kits, or 12x 3590s at 1400ma in an equidistant 4 – 4 – 4 config.

06-Off.jpg

Veg = 2 kits, or 8x 3590s at 1400ma in a 3 – 2 – 3 config.

09-VegSystem.jpg

The spacing is as follows:

Flower 4-4-4: 9” spacing between cobs, with cobs on individual bars placed at 4.5”-13.5”-22.5”-31.5” on each bar.

Veg 3-2-3: 15” spacing between cobs, with cobs placed at the following intervals: 3”-18”-33” x 10.5”-25.5” x 3”-18”-33”

Measure twice; drill once - can’t stress that enough. I was lucky enough to avoid any issues other than the drill bit walking a little on me if I wasn’t careful. Turns out, you don’t have to be TOO accurate with your spacing, but probably within 2-3mm per hole.

For each drilled hole, I deburred with a file and sandpaper. I recommend leather gloves for the drilling and deburring so you don’t have to worry about the hot bit or the sharp metal shavings.

Once assembled, I plugged them all in, dialed them to low on the pot, and turned them on. Success!

05-Low.jpg

TIP: The ground wire on the dimmer is not necessary (accidentally included on some kits). If connected while the driver ground wire is also connected, it increases the resistance and decreases the wattage to 165W per 4cob kit. Just don’t connect it, but do connect the driver ground, and you’re at the expected ~212W per kit
 
Last edited:

Nu-Be

Well-Known Member
Here's a pic of them with the Angelina reflectors

04 Adapters Lenses and Mounting.jpg

and the diffusers (click to increase size)

03 Diffuser.jpg

which will help a lot when I foliar feed and preventative spray Spinosad + neem.

Here's a row of them running in the tent:

06 Walk The Line.jpg

Now, to wrap it all up, I'd like to go over the Pros and Cons of these Timber 4-cob kits:

Pros:
  • Least expensive kits available on the market
  • Pre-wired
  • Pre-assembled
  • Highest quality components
  • Tested
  • Waterproof in-line fuse
  • Dimmer Pot
  • Inexpensive Reflectors + diffuser options
Meh/Indifferent:
  • Heatsinks could be bigger (I recommend Cooliance CPL14070-XXX for a small upcharge)
  • When shipping multiple kits, even if packed well, it would be nice if they put each kit in its own box within the larger shipping box. It’s a little easier to take them all out and test them that way.
Cons:
  • Requires some assembly? (Not a complete light.)
  • Around $30 more expensive than complete DIY option per 4x cob kit if you buy all components separately (PLC + coupon + Mouser + Amazon/local).
To conclude, Timber offers an arguably better kit, cheaper, and it's pre-wired and pre-assembled and tested. Oh, and at the time I purchased, they were the only pin heatsink kits in stock (all DIY heatsink options were out of stock, too).

Win + Win + Win + Win + Win + Win = Wins.

This is just my take. I don't have any financial or other type of incentive to post. Timber didn't ask me to write a review, and they're not "sponsoring" anything of mine. I just had a good experience with their products and services, and their prices made me not want to spend valuable time doing all of the assembly and wiring, especially considering the competitor's options.

I honestly don’t even know why someone would want to assemble and wire their own, when it’s only $30 per 4x cob kit to have Timber do it for you. To me, with the time saved, it’s a no-brainer.

I’m happy to answer questions if I forgot to cover something.
 
Last edited:

Airwalker16

Well-Known Member
I can only hope you have 2 different CCT's on each fixture otherwise, the flower light could have just been your veg light, dimmed. But im now realizing you have a perpetual grow.
 
Last edited:

Airwalker16

Well-Known Member
The very first sentence says it. I was gonna post on this but it's so awesome I didn't want to fuck with the vibe this awesome post has.

I will delete my post tho. Many will read this and these first replies of ours detract from the quality of this
Oh snap my bad! Shit man I would have definitely done 5k for veg and a mix of 3k, 3500, & 4k for flowering. I seriously didn't see that first sentence so I apologize. But damn man. I would just bought the flower light components and just dimmed for veg, but to each their own!
 

tstick

Well-Known Member
@Nu-Be
Thanks for the great thread and detailed posts. I have been 100% behind the Timber company from the beginning. They were great then and they are only getting better as time goes on.

The kits look great! Nice build and thanks again for sharing!
 

Corso312

Well-Known Member
Very nice...been eye balling these kits for a week now. Is there a price break on big orders? I agree, each kit in it's own box would be most helpful. Congrats man..look great
 

Nu-Be

Well-Known Member
@Airwalker16 with the 3590, the Kelvin temps aren't nearly as important as simply having the PPFD and general spectrum covered. The 3500k is pretty much perfect according to everything I've found, from anecdotal to supported claims. In this case, it gives me the flexibility to have another flowering chamber if needed. Think about it - 400w of 3590 COB LED in a 4x4 with this config is still pretty good compared to what many people grow with.

@tstick Yeah, I totally agree that he's willing to take feedback and immediately make modifications to the product to improve it. Since I ordered, Dan's done the following in direct response to our communication:

1) Changed the mounting hole placement
2) Implemented free shipping

Recently, I emailed to recommend he increase the size of the heatsinks to the 140mm ones because they do a better job cooling for over 1400ma. Here's some real world heatsink testing that Greengenes707 posted containing the Cooliance 100, 120, and 140mm sizes (the top 3 listed):

06 Heatsink Testing Comparison.jpg

The 100mm heatsink that Timber uses is totally fine for the 1400ma 3590. However, if he bumps it up in size, there will be no reason to go DIY over his kits when the costs are so similar. Everything else is better on the Timber kits.

@Corso312 Yeah, you might just reach out to him. @RainDan worked with me on the price (and tossed in reflectors + dimmers for free), so I'd shoot him an email, PM, or phone call.
 

IFARTED

Well-Known Member
Nice build! I like the cob covers I may have to try those out as I do spray as well. Do you think there may be a issue with the alum angle and the cob holder? They seem close and I'm not sure if they would distort how flat the holder is sitting? It probably is not a issue but I thought I would point it out
 

Nu-Be

Well-Known Member
@IFARTED Yeah, the diffusers are cheap, apparently help diffuse the light (surprise), but don't have much negative impact on the output. They snap right into the Angelina reflectors. Can't beat it for protecting the COB surface.

Regarding the angle placement, none of them are distorting the cob holders, but your concern was the same as mine. That's why Dan had the subsequent shipments drilled and tapped farther out towards the edge of the heatsink.

On mine, I took rudimentary but careful measurements, so the angles are either just on the edge or barely sitting overtop the lip of the cob holder, which is pretty much flat against the heatsink (or close enough to have no impact). At least I hope. :) So far so good.
 

Airwalker16

Well-Known Member
@IFARTED Yeah, the diffusers are cheap, apparently help diffuse the light (surprise), but don't have much negative impact on the output. They snap right into the Angelina reflectors. Can't beat it for protecting the COB surface.

Regarding the angle placement, none of them are distorting the cob holders, but your concern was the same as mine. That's why Dan had the subsequent shipments drilled and tapped farther out towards the edge of the heatsink.

On mine, I took rudimentary but careful measurements, so the angles are either just on the edge or barely sitting overtop the lip of the cob holder, which is pretty much flat against the heatsink (or close enough to have no impact). At least I hope. :) So far so good.
I would use 3/4" angle alum to avoid that overlapping on the ideal holder.
 

Nu-Be

Well-Known Member
@soymilk As BM9AGS said. :)

@Airwalker16 A smaller size angle wouldn't have worked - see how far in on the heatsinks the mounting holes are drilled? Look at all the pics again. The heatsink sits right next to the radiused corner. Since Timber changed the position of the mounting holes to farther out on the heatsinks, this is a moot point.

Had I gone smaller on the metal, there would have been no place to put the mounting hole. The issue for mounting the cobs in my case was about getting enough meat to hold the screws if they experience any stress at all, which you know they will. There's less than 1/4" on mine. See for yourself that it worked out just fine - barely, and with careful measurement. Capeesh??
 

goodro wilson

Well-Known Member
Really wanting to order at least a 200 w kit but have very limited height
Maybe I can pull it off with a screen or two screen scrog
So my question is how close can I keep these things to rooted clones
 
Top