Hiya everyone,
I thought I'd share some of my information on electrical wiring. Cause the safer everyone is, the better.
First off, I am going to preface by saying that if you're at all uncomfortable with electricity, don't do it. Plain and simple. But, chances are, you're a reader who does...
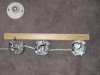
For my demonstration, I will be wiring 3 light sockets together, and connecting all three to a plug.
-Grounding is a must. This protects you, your home, and your plants .
.
-Use only proper AWG wire. Don't be an ass and use lamp cord you found under some magazines
-Make sure that fixtures are mounted in a way that provides clearance from both eachother, and any surrounding area. It is not advisable to mount a fixture directly to the roof, top of your cabinet, or something else. Make sure adequate clearance allows for air movement.
- Use commercial grade plugs.
- Do not chain too many devices off of the same plug.
- Electrical tape is a no-no for house voltage (120V). Use proper merrets (twisty deals to bring 2 wires together).
- When you use merrets, make sure that the wires you are splicing together are of an approved material. Sometimes you can find aluminum wiring, and you need special merrets to join to other aluminum wire or copper wire.
-Keep polarity in mind.
- When you attach a wire to a commercial-grade plug, be mindful of polarity. Best to test.
Here's how to test for which plug-hole is the HOT wire. Get a multimeter and run both leads to the vertical slots in the plug. You will see voltage. Now, put one of the leads in the ground hole (the roundish one), and take turns touching the other multimeter lead to the vertical slot. You should see voltage flowing to ground on only one of the vertical slots. If both are running to ground DANGER! Get someone qualified to inspect and fix. If only one vertical slot runs power to the ground, congratulations, you've found the HOT wire.
Make sure that when a plug is plugged into this 3-prong socket, that the wire follows through to the HOT connection point on whatever you are connecting. Typically, black is reserved for this.
More about Polarity. AC power always has 1 lead that is considered the "HOT" wire, or the wire with "potential". Typically, this is the black wire. In an electrical light bulb socket, the HOT lead should always be where the tip of the bulb touches the electrical contact. Caution! Screwing this up (no pun intended) can be dangerous. If the screw part of the socket is HOT, you can shock yourself by touching it, as it is more exposed than the other contact surface. Also, unconfirmed, but the CFL and floro type lights may not function if the polarity they are expecting is reversed. They may even blow up!
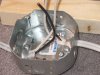
-Make sure you leave enough wire hanging out of the electric box to connect the fixture.
- Make sure that only 1/4 inch (1.5cm) of cable sheathing is left exposed inside the box.
- Use the electric box clamps to clamp down on the electric cable. Not too tight or you will pierce the copper and short out the circuit.
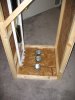
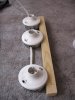
-there are some metal prongs on the side of the electric box to help position the vertical clearance from your mount point. See how my electric boxes rest on top of it? This provides room above for air space and below for the fixture.
Photos attached.
I thought I'd share some of my information on electrical wiring. Cause the safer everyone is, the better.
First off, I am going to preface by saying that if you're at all uncomfortable with electricity, don't do it. Plain and simple. But, chances are, you're a reader who does...
For my demonstration, I will be wiring 3 light sockets together, and connecting all three to a plug.
-Grounding is a must. This protects you, your home, and your plants
.-Use only proper AWG wire. Don't be an ass and use lamp cord you found under some magazines
-Make sure that fixtures are mounted in a way that provides clearance from both eachother, and any surrounding area. It is not advisable to mount a fixture directly to the roof, top of your cabinet, or something else. Make sure adequate clearance allows for air movement.
- Use commercial grade plugs.
- Do not chain too many devices off of the same plug.
- Electrical tape is a no-no for house voltage (120V). Use proper merrets (twisty deals to bring 2 wires together).
- When you use merrets, make sure that the wires you are splicing together are of an approved material. Sometimes you can find aluminum wiring, and you need special merrets to join to other aluminum wire or copper wire.
-Keep polarity in mind.
- When you attach a wire to a commercial-grade plug, be mindful of polarity. Best to test.
Here's how to test for which plug-hole is the HOT wire. Get a multimeter and run both leads to the vertical slots in the plug. You will see voltage. Now, put one of the leads in the ground hole (the roundish one), and take turns touching the other multimeter lead to the vertical slot. You should see voltage flowing to ground on only one of the vertical slots. If both are running to ground DANGER! Get someone qualified to inspect and fix. If only one vertical slot runs power to the ground, congratulations, you've found the HOT wire.
Make sure that when a plug is plugged into this 3-prong socket, that the wire follows through to the HOT connection point on whatever you are connecting. Typically, black is reserved for this.
More about Polarity. AC power always has 1 lead that is considered the "HOT" wire, or the wire with "potential". Typically, this is the black wire. In an electrical light bulb socket, the HOT lead should always be where the tip of the bulb touches the electrical contact. Caution! Screwing this up (no pun intended) can be dangerous. If the screw part of the socket is HOT, you can shock yourself by touching it, as it is more exposed than the other contact surface. Also, unconfirmed, but the CFL and floro type lights may not function if the polarity they are expecting is reversed. They may even blow up!
-Make sure you leave enough wire hanging out of the electric box to connect the fixture.
- Make sure that only 1/4 inch (1.5cm) of cable sheathing is left exposed inside the box.
- Use the electric box clamps to clamp down on the electric cable. Not too tight or you will pierce the copper and short out the circuit.
-there are some metal prongs on the side of the electric box to help position the vertical clearance from your mount point. See how my electric boxes rest on top of it? This provides room above for air space and below for the fixture.
Photos attached.