Mother box design and setup

jondamon

Well-Known Member
Hey there everyone.

Well i have been growing since Xmas09 and have had 3 total grows so far.

Twice from seed and once from some donated clones.

My latest grow which i harvest over the last 2weeks was from seed and with a total grow and harvest/Dry time of 140days i figured this was far too long. So since i started the grow i have been scribbling in my note book about possible designs etc that i can use to have a perpetual grow going on.

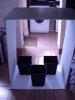
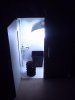
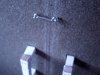
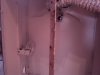
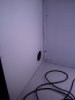
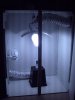
Now i currently use a closet located in a spare bedroom to do all my growing.

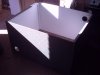
Its dimensions are 7ft wide x 8ft tall x 3.5ft deep.

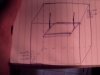
As you can see from some of the drawings below i have even contemplated sectioning the closet in half horizontally due to the stairwell being cut into it somewhat.

After much contemplation and design processes i decided that it would not be a good thing to seperate this closet due to light tighting each section from the other.

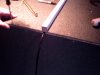
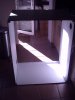
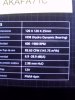
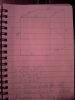
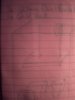
So i began designing and measuring how much space i would need to keep some mothers in a box that i construct myself.

Here are some of the designs and measurements that i have been working with.

Over the next few days you will see me build and test my motherbox and make any other alterations that maybe needed.

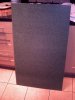
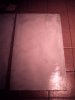
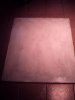
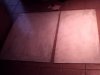
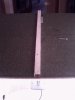
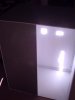
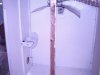
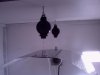
I have included pictures of the dimensions of the box.

Just so that everyone can see how to put together a cheap mother box!


Any comments or suggestions are always welcome and if i can use some of your ideas in my box then i will.

Many thanks


JonDamon (J)
 

Attachments

  • dimensions.JPG
    dimensions.JPG
    18.3 KB · Views: 150
  • sides.JPG
    sides.JPG
    18.2 KB · Views: 99
  • PICT0680.jpg
    PICT0680.jpg
    40.5 KB · Views: 145
  • PICT0682.jpg
    PICT0682.jpg
    29 KB · Views: 89
  • PICT0678.jpg
    PICT0678.jpg
    38.9 KB · Views: 167
  • PICT0683.jpg
    PICT0683.jpg
    24.5 KB · Views: 77
  • PICT0684.jpg
    PICT0684.jpg
    27.2 KB · Views: 81
  • PICT0681.jpg
    PICT0681.jpg
    25.4 KB · Views: 90
  • PICT0685.jpg
    PICT0685.jpg
    22.2 KB · Views: 74
  • PICT0679.jpg
    PICT0679.jpg
    49.7 KB · Views: 151
Now luckily i work somewhere that has a bench saw for me to run pieces of wood through.

So i made all my pieces according to the dimensions in the diagram above.

I then set about painting them all flat white. For this i am just using undercoat for wood.

I am using undercoat due to the fact that the boards that i am using are water resistant boarding, so therefor have a green coating on them which is the moisture barier. I figured this wood would come in handy when building a motherbox due to humidity etc.


J
 

Attachments

  • PICT0670.jpg
    PICT0670.jpg
    43.5 KB · Views: 49
  • PICT0674.jpg
    PICT0674.jpg
    53.4 KB · Views: 46
  • PICT0675.jpg
    PICT0675.jpg
    32.1 KB · Views: 35
  • PICT0671.jpg
    PICT0671.jpg
    26.1 KB · Views: 39
  • PICT0676.jpg
    PICT0676.jpg
    25.5 KB · Views: 35
  • PICT0672.jpg
    PICT0672.jpg
    48 KB · Views: 39
  • PICT0673.jpg
    PICT0673.jpg
    45.8 KB · Views: 38
Now i am still painting these boards so you can see how far along i am with this lol..

I literally started this project yesterday but have been buying various bits and pieces for the last few months once i was decided that i was going to go perpetual.

I mocked up 4 sides of the box and placed 3 11litre plant pots inside it to make sure they would fit with enough space around them for clones etc.

I do plan on making some stands for the plants to sit on so that i can get drip trays underneath them to catch runoff etc and then just empty the drip tray.


J


P.s Im now off to finish painting the panels. lol
 

Attachments

  • PICT0677.jpg
    PICT0677.jpg
    40.1 KB · Views: 280
Looks great so far mate.....

If you haven't considered building a cloning station box to sit on top of that box then its just a thought from me. It may take up some more head room but your only going to need an extra 1.5 foot above and by building another box for the top you would be able to have more room to maybe keep another mother and a bonus would be the heat from the mother box would heat the bottom of the clone box.... It is just a thought tho bro. im sure ya got things planned out..


Dan:leaf::leaf::leaf::leaf::leaf:
 
Hey Danny boy

Thanks for stopping by bro!

As it happens i have thought about it! But then you know me lol i think of alot of things lol.

I do have the 24w T5 6400k just incase i decide to make the cloning station.

My initial idea was to build a stand to elevate the clones which i take and keep them in the mother box along with the mothers.
If i have to go down the seperate prop box then this idea will be something which i more than likely will use. Maybe even make a box big enough to house a propagator lol!

But as always thanks for your ideas!

J
 
Hey Folks

Well here is the update that you've all been waiting patiently for.

The completion of the mother box....(well almost completed)

I would like to add that a friend of mine did the whole construction being assisted by me. lol. Im no joiner but he is.

So first of all my friend, we'll call him Mr P Downward, placed the bottom panel on the floor and began to mount the beading along the outside edge allowing for the sides to be mounted as you can see from the pictures below.

We then placed all the beading on the necesarry panels to piece it together.

If you look through all of the pictures you will get the idea of how it went together.

The only modifications that were made were an extra piece of beading along the top of the outside of the box in order to mount my hooks for the EZ Rollers and a piece of beading along the inside to mount my clip on fan.


Enjoy the pics folks any questions i will answer if you have them.


J
 

Attachments

  • PICT0739.jpg
    PICT0739.jpg
    26.1 KB · Views: 147
  • PICT0731.jpg
    PICT0731.jpg
    40.4 KB · Views: 79
  • PICT0708.jpg
    PICT0708.jpg
    16.9 KB · Views: 83
  • PICT0737.jpg
    PICT0737.jpg
    29.3 KB · Views: 232
  • PICT0718.jpg
    PICT0718.jpg
    36.7 KB · Views: 85
  • PICT0707.jpg
    PICT0707.jpg
    19.5 KB · Views: 94
  • PICT0726.jpg
    PICT0726.jpg
    40.8 KB · Views: 97
  • PICT0722.jpg
    PICT0722.jpg
    26 KB · Views: 77
  • PICT0699.jpg
    PICT0699.jpg
    44.7 KB · Views: 122
  • PICT0735.jpg
    PICT0735.jpg
    28.8 KB · Views: 103
  • PICT0725.jpg
    PICT0725.jpg
    51.3 KB · Views: 108
  • PICT0706.jpg
    PICT0706.jpg
    37.4 KB · Views: 87
  • PICT0712.jpg
    PICT0712.jpg
    32.7 KB · Views: 83
  • PICT0736.jpg
    PICT0736.jpg
    33.2 KB · Views: 108
  • PICT0730.jpg
    PICT0730.jpg
    31.5 KB · Views: 98
  • PICT0728.jpg
    PICT0728.jpg
    32 KB · Views: 106
  • PICT0717.jpg
    PICT0717.jpg
    27.5 KB · Views: 122
  • PICT0721.jpg
    PICT0721.jpg
    20.7 KB · Views: 82
  • PICT0729.jpg
    PICT0729.jpg
    30 KB · Views: 93
  • PICT0738.jpg
    PICT0738.jpg
    25.7 KB · Views: 146
  • PICT0715.jpg
    PICT0715.jpg
    33.3 KB · Views: 77
  • PICT0711.jpg
    PICT0711.jpg
    32.6 KB · Views: 87
  • PICT0703.jpg
    PICT0703.jpg
    33.3 KB · Views: 99
  • PICT0705.jpg
    PICT0705.jpg
    41.9 KB · Views: 86
  • PICT0716.jpg
    PICT0716.jpg
    23.2 KB · Views: 83
  • PICT0732.jpg
    PICT0732.jpg
    18.4 KB · Views: 84
  • PICT0720.jpg
    PICT0720.jpg
    20.3 KB · Views: 89
  • PICT0734.jpg
    PICT0734.jpg
    32.4 KB · Views: 116
  • PICT0710.jpg
    PICT0710.jpg
    19.5 KB · Views: 80
  • PICT0724.jpg
    PICT0724.jpg
    25.9 KB · Views: 98
  • PICT0704.jpg
    PICT0704.jpg
    31.7 KB · Views: 82
  • PICT0727.jpg
    PICT0727.jpg
    34.8 KB · Views: 88
  • PICT0702.jpg
    PICT0702.jpg
    30.4 KB · Views: 99
  • PICT0723.jpg
    PICT0723.jpg
    44.5 KB · Views: 79
  • PICT0700.jpg
    PICT0700.jpg
    50.6 KB · Views: 106
  • PICT0709.jpg
    PICT0709.jpg
    19.6 KB · Views: 83
  • PICT0714.jpg
    PICT0714.jpg
    33.5 KB · Views: 75
  • PICT0701.jpg
    PICT0701.jpg
    39.8 KB · Views: 107
  • PICT0713.jpg
    PICT0713.jpg
    33.3 KB · Views: 80
  • PICT0719.jpg
    PICT0719.jpg
    22.4 KB · Views: 90
Class job big lad, looks good. Givin me a good few ideas for mine now!!!! Just finished my drip tray system, am going to install after i drop my first crop.

S
 
Another little update with all the exhaust and intake working.

Check out the temp people!

You can see the distance between the lamp and the Temp/Hydro Gauge.

I have the AKASA VIPER as an Exhaust which is a 84CFM fan
And i have the AKASA APACHE PWM BLACK as a powered intake which is a 54CFM fan
Each of these fans as you can see are attached to the outside of the box with a ducting bracket and some ducting inside.


Enjoy the pics


J
 

Attachments

  • PICT0750.jpg
    PICT0750.jpg
    59.6 KB · Views: 141
  • PICT0747.jpg
    PICT0747.jpg
    33.6 KB · Views: 187
  • PICT0749.jpg
    PICT0749.jpg
    35 KB · Views: 98
  • PICT0748.jpg
    PICT0748.jpg
    32 KB · Views: 89
  • PICT0413.jpg
    PICT0413.jpg
    38.3 KB · Views: 113
  • PICT0746.jpg
    PICT0746.jpg
    31.7 KB · Views: 96
  • PICT0415.jpg
    PICT0415.jpg
    46.6 KB · Views: 105
  • PICT0021.jpg
    PICT0021.jpg
    32 KB · Views: 97
  • PICT0022.jpg
    PICT0022.jpg
    33.6 KB · Views: 93
Back
Top