Luger187
Well-Known Member
Hey!
I just got done makin my first SCROG for my closet grow(more info in sig). I live in Cali and this IS a medical grow for personal use. I took some pictures along the way. Heres the link to another thread where i got the idea. His name is LBH. Link
Here we go.............
In the end, it is about 30"x28", but u can easily change measurements to suit your needs.
Materials:
*2 - Wood boards 1"x3"x8'
*Box of screws - 1-5/8" long gold ones
*Box of 40 and 3 5-packs of eye screws- 210 x 1-3/16" not too sure what the 210 means. See Picture 17
*String - I got some mason line. 800ft for like 5 bucks at lowes.
*Drill and bits
*Screwdrivers
*C-clamps
*Square - u can see it in the bottom left of picture 2
*Wood pencil
Step 1:
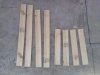
I went to Lowes and got 2 pieces of lumber, each 1in x 3in x 8ft. From one board i cut four 16" pieces, and one 28" piece. From the other board, i cut another 28" piece, and two 26" pieces. So you should have 2-26", 2-28", and 4-16" pieces.
(See Picture 1)
Step 2:
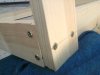
Take one 26" piece and one 28" piece. Put the very end of the 26" one up against the side of the 28" piece,on the end.
(See Picture 2) The vertical one is the 26", horizontal is 28".
*also, if u look at picture 3, the board with the screw heads in it is the 28". to help u see how they fit together*
Take a drill, and drill a hole(use a bit thats a little smaller than your screws) about 1/2" from the end of the 28" board.
Use a square to make sure the boards are at 90 degrees, and put 2 screws in the holes. U should have an L shape like in picture 2.
Make another L shaped thing just like the first, so u have 2 of them.
Step 3:
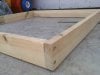
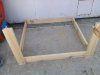
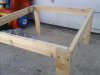
Put the two L shaped pieces together, so that the ends of the 28" boards are exposed, but the ends of the 26" boards are not.
(See Pictures 4 and 5)
Drill your holes for screws, then make sure its square. U want them all to be 90 degree corners. Put the screws in the holes.
Now u have a square!!! well, almost
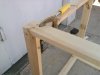
Step 4:
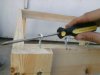
(See Pictures 6 and 7)
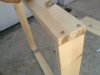
Put a 16" piece against the end of a 28" board so it sticks up, as shown. Where the 16" leg is sticking out will be the bottom. Draw a straight line on the 16" board right in between the screws on the 28" board(picture 6). Drill holes and put screws on that line, making sure one goes into the end of the 28" board. I found it a lot easier to use a small C clamp to hold them tight while screwing(picture") .
.
Do this on all four corners, making sure to cover the end of the 28" boards with the legs.
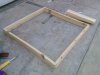
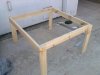
After all four legs are done, stand her up and see how good she stands(Picture 9). I got lucky and all mine were flush with the ground.
Step 6:
Dont forget the puppy!(Picture 10)
Step 7:
Put a measuring tape ontop of one of the 26" boards. Put a mark right in the middle(13" from either end). Every 2" down the board, put a dot mark on it. Do this both to the left and right of that center mark. This makes sure that all the dots are centered.
Do this again on the other 26" board.
Put a measuring tape ontop of one of the 28" boards. Put a mark right in the middle(14" from either end). Every 2" down the board, put a dot mark on it. Do this both to left and right of that center mark. Just like u did with the 26" ones.
Do this again on the other 28" board.
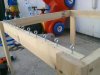
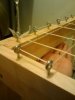
Look at pictures 11 and 12. They will show u how the marks/holes should be. Right in the middle of the 1" side of each board, all the way down.In the pictures, the board with the eye screws in it is a 26" board.
Step 8:
For each mark u made, drill a small hole for an eye screw. Make sure the bit is a little smaller than the eye screws, and the holes are in the middle of the board(Picture 13).
After all holes are drilled, put an eye screw in each hole. Screw them tight enough to stay in, then use a small screwdriver to screw them in the rest of the way. Put it in the hole, and spin it.
They should all be in a pretty straight line, like in picture 15.
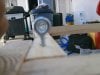
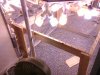
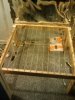
See Picture 16. I decided to put it in to see if it fits in the closet. It was kind of a pain, because i have lockers that take up space. Anyways, from now on it will be in here.
Step 9:
Take the string/wire your using. i used Mason Line. Put a ruler/measuring tape down on something. Grab the string and measure a foot. Dont cut it yet. With your left hand, grab the string that your right hand's holding. Pull the string to the left, and measure another foot. Repeat this process till u get to about 33 feet of string. I used math to figure out how long i needed, and it was about 30ft. Gave myself some extra.
I also melted a candle and dipped the new ends of string in it, then after 5 or so seconds i rolled it in my fingers to make a nice tip. This helps to get through the eye screws.
from now eye screws will be called screw
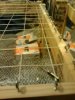
Tie one end of the string to the top of a leg. Feed the end through the closest screw, on either corner. Then take the string all the way across to the first screw on the other side. It should be on the other board of the same size. See Pictures 18 and 19 for help.
Then, the end of the string goes through the screw RIGHT NEXT TO IT, so it runs down the board for 2". Then across the whole thing again to the second screw on the other side. Right next to the original place we started. After this, go to the screw right next to this one, across, up, across, up, across, etc. till u reach the end of the screws on the boards. Now, since you cant go across or up, we gotta tie it off.
MAKE SURE U TIGHTEN ALL THE STRINGS
go back to the beginning and tug on the first ones, then make your way back up it. this ensures they stay tight. Then u can tie it off onto the leg.
See Picture 20
Step 10:
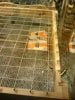
Repeat the process you did to measure and cut the string, this time go with 34 feet. The math says 32.5. Again, use candle wax on the tips if u want.
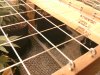
Tie one end to a leg. The other end is going through the unused screw right next to it. This time, we want to weave with the strings going the other way while going across. First go under, then above, under, above, etc. Continue till u get to the first screw on the other side. Put the string through the screw next to it, then go across, weaving while u go. Continue to go up and across, till you get to the end again, just like last time. Except this time your weaving. When u get to the end, tie it to the leg.
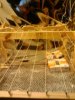
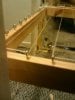
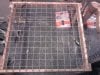
YOU'RE DONE!!!
spark a bowl and look at Pictures 21-26 to see if it looks like mine
peace
I just got done makin my first SCROG for my closet grow(more info in sig). I live in Cali and this IS a medical grow for personal use. I took some pictures along the way. Heres the link to another thread where i got the idea. His name is LBH. Link
Here we go.............
In the end, it is about 30"x28", but u can easily change measurements to suit your needs.
Materials:
*2 - Wood boards 1"x3"x8'
*Box of screws - 1-5/8" long gold ones
*Box of 40 and 3 5-packs of eye screws- 210 x 1-3/16" not too sure what the 210 means. See Picture 17
*String - I got some mason line. 800ft for like 5 bucks at lowes.
*Drill and bits
*Screwdrivers
*C-clamps
*Square - u can see it in the bottom left of picture 2
*Wood pencil
Step 1:
I went to Lowes and got 2 pieces of lumber, each 1in x 3in x 8ft. From one board i cut four 16" pieces, and one 28" piece. From the other board, i cut another 28" piece, and two 26" pieces. So you should have 2-26", 2-28", and 4-16" pieces.
(See Picture 1)
Step 2:
Take one 26" piece and one 28" piece. Put the very end of the 26" one up against the side of the 28" piece,on the end.
(See Picture 2) The vertical one is the 26", horizontal is 28".
*also, if u look at picture 3, the board with the screw heads in it is the 28". to help u see how they fit together*
Take a drill, and drill a hole(use a bit thats a little smaller than your screws) about 1/2" from the end of the 28" board.
Use a square to make sure the boards are at 90 degrees, and put 2 screws in the holes. U should have an L shape like in picture 2.
Make another L shaped thing just like the first, so u have 2 of them.
Step 3:
Put the two L shaped pieces together, so that the ends of the 28" boards are exposed, but the ends of the 26" boards are not.
(See Pictures 4 and 5)
Drill your holes for screws, then make sure its square. U want them all to be 90 degree corners. Put the screws in the holes.
Now u have a square!!! well, almost
Step 4:
(See Pictures 6 and 7)
Put a 16" piece against the end of a 28" board so it sticks up, as shown. Where the 16" leg is sticking out will be the bottom. Draw a straight line on the 16" board right in between the screws on the 28" board(picture 6). Drill holes and put screws on that line, making sure one goes into the end of the 28" board. I found it a lot easier to use a small C clamp to hold them tight while screwing(picture
Do this on all four corners, making sure to cover the end of the 28" boards with the legs.
After all four legs are done, stand her up and see how good she stands(Picture 9). I got lucky and all mine were flush with the ground.
Step 6:
Dont forget the puppy!(Picture 10)
Step 7:
Put a measuring tape ontop of one of the 26" boards. Put a mark right in the middle(13" from either end). Every 2" down the board, put a dot mark on it. Do this both to the left and right of that center mark. This makes sure that all the dots are centered.
Do this again on the other 26" board.
Put a measuring tape ontop of one of the 28" boards. Put a mark right in the middle(14" from either end). Every 2" down the board, put a dot mark on it. Do this both to left and right of that center mark. Just like u did with the 26" ones.
Do this again on the other 28" board.
Look at pictures 11 and 12. They will show u how the marks/holes should be. Right in the middle of the 1" side of each board, all the way down.In the pictures, the board with the eye screws in it is a 26" board.
Step 8:
For each mark u made, drill a small hole for an eye screw. Make sure the bit is a little smaller than the eye screws, and the holes are in the middle of the board(Picture 13).
After all holes are drilled, put an eye screw in each hole. Screw them tight enough to stay in, then use a small screwdriver to screw them in the rest of the way. Put it in the hole, and spin it.
They should all be in a pretty straight line, like in picture 15.
See Picture 16. I decided to put it in to see if it fits in the closet. It was kind of a pain, because i have lockers that take up space. Anyways, from now on it will be in here.
Step 9:
Take the string/wire your using. i used Mason Line. Put a ruler/measuring tape down on something. Grab the string and measure a foot. Dont cut it yet. With your left hand, grab the string that your right hand's holding. Pull the string to the left, and measure another foot. Repeat this process till u get to about 33 feet of string. I used math to figure out how long i needed, and it was about 30ft. Gave myself some extra.
I also melted a candle and dipped the new ends of string in it, then after 5 or so seconds i rolled it in my fingers to make a nice tip. This helps to get through the eye screws.
from now eye screws will be called screw
Tie one end of the string to the top of a leg. Feed the end through the closest screw, on either corner. Then take the string all the way across to the first screw on the other side. It should be on the other board of the same size. See Pictures 18 and 19 for help.
Then, the end of the string goes through the screw RIGHT NEXT TO IT, so it runs down the board for 2". Then across the whole thing again to the second screw on the other side. Right next to the original place we started. After this, go to the screw right next to this one, across, up, across, up, across, etc. till u reach the end of the screws on the boards. Now, since you cant go across or up, we gotta tie it off.
MAKE SURE U TIGHTEN ALL THE STRINGS
go back to the beginning and tug on the first ones, then make your way back up it. this ensures they stay tight. Then u can tie it off onto the leg.
See Picture 20
Step 10:
Repeat the process you did to measure and cut the string, this time go with 34 feet. The math says 32.5. Again, use candle wax on the tips if u want.
Tie one end to a leg. The other end is going through the unused screw right next to it. This time, we want to weave with the strings going the other way while going across. First go under, then above, under, above, etc. Continue till u get to the first screw on the other side. Put the string through the screw next to it, then go across, weaving while u go. Continue to go up and across, till you get to the end again, just like last time. Except this time your weaving. When u get to the end, tie it to the leg.
YOU'RE DONE!!!
spark a bowl and look at Pictures 21-26 to see if it looks like mine
peace
Attachments
-
 1.jpg142.7 KB · Views: 289
 -
 2.jpg149.9 KB · Views: 232
 -
 3.jpg123.9 KB · Views: 215
 -
 4.jpg114.8 KB · Views: 210
 -
 5.jpg54.2 KB · Views: 205
 -
 6.jpg94 KB · Views: 221
 -
 7.jpg130.5 KB · Views: 209
 -
 8.jpg120.3 KB · Views: 210
 -
 9.jpg135.9 KB · Views: 243
 -
 10.jpg100.1 KB · Views: 271
 -
 11.jpg131.8 KB · Views: 218
 -
 12.jpg134.2 KB · Views: 238
 -
 13.jpg111.2 KB · Views: 207
 -
 14.jpg98 KB · Views: 227
 -
 15.jpg111 KB · Views: 231
 -
 16.jpg191.8 KB · Views: 270
 -
 17.jpg48.3 KB · Views: 255
 -
 18.jpg14.1 KB · Views: 261
 -
 19.jpg9.4 KB · Views: 226
 -
 20.jpg13.5 KB · Views: 301
 -
 21.jpg8.3 KB · Views: 260
 -
 22.jpg13.2 KB · Views: 271
 -
 23.jpg14.6 KB · Views: 264
 -
 24.jpg136 KB · Views: 286
 -
 25.jpg166.3 KB · Views: 410
 -
 26.jpg168.4 KB · Views: 307