customcloset
Well-Known Member
So let me first give you some insight as to what I am trying to achieve.
My objective is to supply myself with QUALITY bud on a consistent basis, however I have some limitations. I live smack in the middle of a 14 story building in a very urban area, and my apartment (although plenty expensive) is only 380 sq feet. My living room doubles as a bedroom which has a nice queen size Murphy bed in there. That is connected to the kitchen which leads to the bathroom NOT MUCH ROOM. I entertain occasionally before hitting the clubs so I need an extremely stealth grow. Whatever I build will be seen by everybody who comes into my apartment.
So Im looking for an actual piece of furniture that wont stand out in my place (ie matches shit to a degree) but large enough for the 400 watt setup.
I know it is long but it is informative if you are considering building a truly stealth grow cabinet than it is a must read!!. Happy reading and ALL FEEDBACK IS WELCOME!!
CustomClosets guide to Building a Custom Stealth Grow Closet
By CustomCabinet
(Dont forget to ++Rep me it this helps you!!)
Cabinet building
I didnt want to start from scratch thats just to difficult to make it not stand out, and those cabinets most people here (the 7ft by 3ft garage cabinets) HaH not quite stealthy enough for a 380 sq foot pad.. know what I mean
Here is how it went for me
Saturday September 12
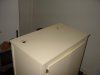
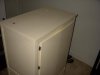
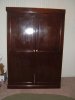
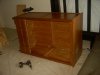
I found this cabinet on craigslist it is a maple sliding door wardrobe 3ft wide x 2ft Deep x 5ft high. PERFECT! (besides the sliding part but Im handy I can fix that) $62 (negotiated from 75)
Shity pic I know but it is a scanned copy of a print out from craigslist (forgot to get a pic of the empty pallet)
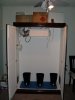
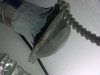
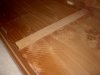
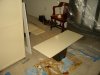
Because the cabinets base was only quarter inch veneer, I ripped that out and built a rectangular base out of 2x4s and screwed them into the sides of the cabinet (and themselves). I then cut a piece of 7/16 OSB to fit for the bottom.
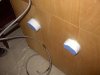
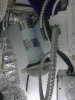
I also realized that the wardrobe walls were only a quarter inch thick not cool considering I need the unit to be as inaudible as possible.
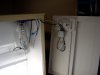
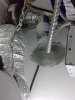
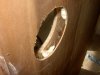
To remedy this I bought two sheets of 7/16 OSB, liquid nails and foam insulation. I put thin strips of wood on the inside of the wardrobe so there would be a half inch gap between the CFB and the maple side. You can see how this turned out in the picture with the hole cut out for the ductwork I wish I would have bought 2 cans of foam insulation or three but what can you do
I then used a shit tone of liquid nails and then sprayed the area with the foam insulation and quickly screwed the wafer board on. This left me with maple cabinetàfoam insulationàOSBàGrow Area should be soundproof (to a degree)
Sunday September 13
Got locked out of my apartment while cutting a board in the stairwell had to wait 5 hr for the night watchman to show up and let me in.. FUCK LIFE. (note I was in ripped and painted on jeans, scrubby t shirt and no shoes, no socks, no wallet, no cell, no keys. I had a receipt from lowes, 49 cents, my circular saw and the board I was cutting!!!!! )
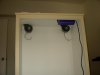
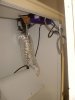
I did manage to use 2.5 tubes of ultra white calk though and some strip molding to air tight the grow cabinet the passive air intakes will have filters this should reduce the chance of my girls getting infested with bugs, but Ill be building them on wed.
Monday September 15
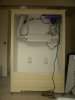
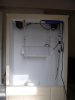
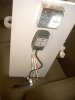
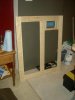
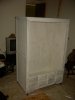
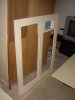
Today I spent a lot of time on the front face of the cabinet I have designed the cabinet so that the left hand door will be the only access to the plants, while the right hand door will be sealed to the plants and present all knobs, switches, timer faces, and fan speed adjustments
For the outside I chose Churchill hotel Ivory (it is yellowish but it matches the tile in the bathroom and it is a nice bright color and that will make it seem smaller to the eye think stealth haha
Pic
The face plate of the unit was a bit tricky to make, you will need some advanced tools to get this done. I used half in x 4in pine although I ised an edger a miter box saw as well as a table saw let me know if you want more details here!!
My objective is to supply myself with QUALITY bud on a consistent basis, however I have some limitations. I live smack in the middle of a 14 story building in a very urban area, and my apartment (although plenty expensive) is only 380 sq feet. My living room doubles as a bedroom which has a nice queen size Murphy bed in there. That is connected to the kitchen which leads to the bathroom NOT MUCH ROOM. I entertain occasionally before hitting the clubs so I need an extremely stealth grow. Whatever I build will be seen by everybody who comes into my apartment.
So Im looking for an actual piece of furniture that wont stand out in my place (ie matches shit to a degree) but large enough for the 400 watt setup.
I know it is long but it is informative if you are considering building a truly stealth grow cabinet than it is a must read!!. Happy reading and ALL FEEDBACK IS WELCOME!!
CustomClosets guide to Building a Custom Stealth Grow Closet
By CustomCabinet
(Dont forget to ++Rep me it this helps you!!)
Cabinet building
I didnt want to start from scratch thats just to difficult to make it not stand out, and those cabinets most people here (the 7ft by 3ft garage cabinets) HaH not quite stealthy enough for a 380 sq foot pad.. know what I mean
Here is how it went for me
Saturday September 12
I found this cabinet on craigslist it is a maple sliding door wardrobe 3ft wide x 2ft Deep x 5ft high. PERFECT! (besides the sliding part but Im handy I can fix that) $62 (negotiated from 75)
Shity pic I know but it is a scanned copy of a print out from craigslist (forgot to get a pic of the empty pallet)
Because the cabinets base was only quarter inch veneer, I ripped that out and built a rectangular base out of 2x4s and screwed them into the sides of the cabinet (and themselves). I then cut a piece of 7/16 OSB to fit for the bottom.
I also realized that the wardrobe walls were only a quarter inch thick not cool considering I need the unit to be as inaudible as possible.
To remedy this I bought two sheets of 7/16 OSB, liquid nails and foam insulation. I put thin strips of wood on the inside of the wardrobe so there would be a half inch gap between the CFB and the maple side. You can see how this turned out in the picture with the hole cut out for the ductwork I wish I would have bought 2 cans of foam insulation or three but what can you do
I then used a shit tone of liquid nails and then sprayed the area with the foam insulation and quickly screwed the wafer board on. This left me with maple cabinetàfoam insulationàOSBàGrow Area should be soundproof (to a degree)
Sunday September 13
Got locked out of my apartment while cutting a board in the stairwell had to wait 5 hr for the night watchman to show up and let me in.. FUCK LIFE. (note I was in ripped and painted on jeans, scrubby t shirt and no shoes, no socks, no wallet, no cell, no keys. I had a receipt from lowes, 49 cents, my circular saw and the board I was cutting!!!!! )
I did manage to use 2.5 tubes of ultra white calk though and some strip molding to air tight the grow cabinet the passive air intakes will have filters this should reduce the chance of my girls getting infested with bugs, but Ill be building them on wed.
Monday September 15
Today I spent a lot of time on the front face of the cabinet I have designed the cabinet so that the left hand door will be the only access to the plants, while the right hand door will be sealed to the plants and present all knobs, switches, timer faces, and fan speed adjustments
For the outside I chose Churchill hotel Ivory (it is yellowish but it matches the tile in the bathroom and it is a nice bright color and that will make it seem smaller to the eye think stealth haha
Pic
The face plate of the unit was a bit tricky to make, you will need some advanced tools to get this done. I used half in x 4in pine although I ised an edger a miter box saw as well as a table saw let me know if you want more details here!!
Attachments
-
 Bottom 001.jpg46.4 KB · Views: 781
 -
 Bottom 002.jpg41.1 KB · Views: 743
 -
 Bottom 003.jpg45.8 KB · Views: 574
 -
 Bottom 005.jpg41.9 KB · Views: 559
 -
 Bottom 012.jpg44.1 KB · Views: 617
 -
 Bottom 008.jpg34.6 KB · Views: 693
 -
 Bottom 007.jpg52.1 KB · Views: 558
 -
 Bottom 006.jpg69.2 KB · Views: 609
 -
 Bottom 021.jpg29.1 KB · Views: 481
 -
 Bottom 015.jpg48 KB · Views: 519
 -
 Bottom 014.jpg35.8 KB · Views: 540
 -
 Bottom 013.jpg32.2 KB · Views: 593
 -
 Bottom 022.jpg41 KB · Views: 511
 -
 Bottom 028.jpg58.2 KB · Views: 545