ICE WAX (bubble hash) with Matt Rize

Matt Rize

Hashmaster
2012 POST EDIT: I started this thread a long time ago, before there was a hash sub-forum, and before anyone knew who I was. Most of the basic information is near the beginning, the video and a guide on how to break-up and dry ice water extract (bubble hash). The finer details on making ice-water extracted wax (ice wax) come out later as we water-hashmakers start to become water-hashmasters. We will not be answering repeat questions so please take the time to read and learn from our collective experiences. Thank you. Matt Rize

To begin, I love concentrates, especially the highest quality bubble hashes. I also spend a large part of my time making bubble, and have tested many techniques and strains over the years.

I don't know where I am supposed to post this thread, but as a life long member of the organic community, I feel at home here.

There are some tips that I have come up with or learned about along the way, and some good times that I want to share. I'll start with the fun part.

GOOD TIMES:

Have you ever played hash hockey?

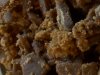
It is so much fun, especially when turned into a form of gambling. The idea is simple really. Get yourself one of those old school electric hockey games. You know what I am talking about...the little guys that spin and move back/forth on the field. Old School baby. Then make a puck out of some hash, consistency is CRUCIAL and you will learn what kinds of hash make a perfect puck. The winner takes the puck in a game to 11 or whatever. Enjoy! And watch out, that puck will FLY!
 

Matt Rize

Hashmaster
BUBBLE HASH MAKING TIPS:

First: It is all about the quality of the trichomes. Properly grown Cannabis flowers yield quality hash.

Second: Do not use infected/damaged materials to make hash (IMO).

Third: Is the debate on using fresh (still wet) trim versus using dried (and cured) trim. We'll get to that later. For now, use dried/cured trim, and let it soak for a good twenty minutes before beginning agitation.

Fourth: Is a slew of tricks I've learned for using the BubbleNowXL, more later: insulating the unit+

Fifth: Is the debate on which bags to use. It depends on strain and trichome size, but for now I'll say use the 45 micron as a catcher, the 120 (160 depending) as your second (cooking), and a 190 as your third to catch the garbage.

Sixth: get a quality pump sprayer that you will only use for water. Fill it full of ice water and use it to collect your trichomes.
 

Matt Rize

Hashmaster
Making a simple unit to use in conjunction with your bubblemachine is easy.

You will need:
Two 5 gallon buckets
Drill with a large bit
One hydro table drain, 3/4" or bigger needed.
Hose to match your hydro drain, length depends on how far you far from the door.
One Crate

Directions:
1) Drill many holes in the bottom of one bucket.
2) Drill a hole in the bottom of the other bucket to insert the hydro table drain. I use a 1 7/16" hole saw. They usually sell conical drill bits just for this purpose at grow stores.
3) Sand the rough edges of the large hole, then insert the hydro drain and twist until tight.
4) Hook up your tubing to your hyrdo drain. Circle clamps make sure no leaks, if you bubble indoors like I do!
5) Send the tubing down through the top of the crate, then out the side. The 5 gallon bucket should sit right in the middle of the crate for safety.
6) You are done, congrats, wasn't that simple?

The bucket full of holes sits in the drain bucket. The bags go inside, small to large. The water drains away, making the whole process, when coupled with the XL, super easy.
 

Attachments

Matt Rize

Hashmaster
Pictured below is my full melt hash bowl. There are three holes around the top inside of the bowl that allow the smoke to be pulled into your bong/chalice. The bottom of the bowl is solid, like a dish. A glass rod is heated and then inserted into the bowl. The hash melts and turns to smoke, but the oily mess has nowhere to go because the bowl's holes are at the top. This allows smoking full melt hash with no metal screens or flowers in the mix. Pure and clean.
 

Attachments

threefiftyse7en

Active Member
mmm... veganic full melt bubble... I'm jealous :)

I'm gearing up right now for my vegan organic run using BioTerra plus soil and the bio canna line. Do you have any tips you're willing to share?
 

Matt Rize

Hashmaster

threefiftyse7en

Active Member
haha I wasn't even thinking about which thread this was. my bad. I'm a bit stoned at the moment. but I was referring to the BioCanna products and veganics. go ahead and answer it in the other thread. But I'm definitely gonna keep my eye on this one too. I love bubble especially some ooey gooey sticky full melt bubble. I'm always open to hearing new more efficient ways to make it.
 

Matt Rize

Hashmaster
I'm always open to hearing new more efficient ways to make it.
Great.

I'll start with tips for using the BubbleNowXL:
-Wrap that b*tch with some kind of insulation. Crucial design flaw. An easy fix is to wrap your machine with one of those car window sun blocks, the shiny 'metal' looking ones.
-Temperature of tap water varies greatly, as I learned from a brewer. Something to keep in mind for several reasons.
-Store bought ice sucks. I have a whole article on that, soon to be posted.
-Temperature of the air affects the overall efficiency. Bubble early or late when it is hot out. Or bubble indoors and keep it cool.
-NEVER overfill the work bag, worst move ever. 3/4 full or less.
-The goal is to perform the spinning agitation at as cold of a temperature as possible. Start with ice in the machine, fill the bag with layers of ice/trim, zip and double knot, more ice. Now add water, but only about half way up. Next, turn the machine on, then slowly add more water until the contents barely begin to spin. You can help the bag find it's home in the ice/water mixture and the machine does the rest.
-Don't be afraid to take the screw out that holds the spinning disk in place. Clean down there once and a while.
 

threefiftyse7en

Active Member
awesome tips, Matt! I will be putting your tips and advice into action in the upcoming weeks.

earlier in the thread you stated something about using dried/cured trim vs fresh. I was always under the impression that to make the full melt gooey bubble you had to use fresh trimmings. I ask because I have seen people use dried material and the end product was garbage - more like kief than bubble.
 

Matt Rize

Hashmaster
awesome tips, Matt! I will be putting your tips and advice into action in the upcoming weeks.

earlier in the thread you stated something about using dried/cured trim vs fresh. I was always under the impression that to make the full melt gooey bubble you had to use fresh trimmings. I ask because I have seen people use dried material and the end product was garbage - more like kief than bubble.
And this is the debate. The dispensary peeps I'm down with tell me that fresh is common these days. I've actually just finished a huge run of fresh/frozen trim. But, in all honesty, I still prefer to work with dry trim. The part about dry trim hash equaling garbage: A) their herb could be mediocre B) they could be impatient, working with dry trim requires more patience. C) they could be amateurs.

The quality of the bubble depends on: the quality of the trim, the patience exhibited while separating(waiting), the lack of greed (less agitation), the screens used, and the final rinsing stage.

Full melt bubble can be made from wet or dry trim. The BBK bubble pictured is from dry trim.

More tips to come. Trimming all day, then going up to Kushland to be in the movie. Matt Rize shows his face to the world!
 

Matt Rize

Hashmaster
Yes, I have finally got both my flowers and bubble hash submitted for analysis. While submitting my samples I got to check out some of subcool's ganja. By which I mean GROWN BY THE SUB AND MZ JILL THEMSELVES! Greenhouse style! Very interesting assortment of flavors, I can't remember which one smelled like cream soda, but that was really cool. Uh...still my indoor veganic Blackberry Kush looks and smells better, but I may be biased :) and I spent way more to grow way less. Update on the results asap. Peas.
 

Matt Rize

Hashmaster
Bubble Hash: Hand mixing vs. Drill vs. Machine
I began my ice-water hash making 12 years ago, with big jars full of ice-water and shake. This worked, to my surprise, although getting the water/plant matter off the top without also loosing the hash was hard. High school adventures at its best.

Fast forward to college, and I was really into making kif, on account of the numerous pounds that came and went. I had my mom's silk screen that I found at my grandma's. With that I was making blonde kif, melt depended on quality of bud, of course.

Fast forward again and I got a few bubblebags. At first we agitated our bubble by hand. I say "we" because it took two people to keep the agitation going how we wanted. We used big wooded spoons. The hash was amazing. SUBCOOL uses a silver spoon and hand mixes for only three minutes to make his highest grade "keeper only" bubble.

Then I was using the drill/5 gallon bucket method. When using the drill method you have one major option, and that is the attachment. Many prefer to use paint mixers, but I have always found those to chop up the plant way too much. I prefer extra large wooden spoons. These spoons fit right into the end of power drills. Although they are not as long as paint mixers (still have to keep the drill dry) they are much more gentle on the trim, resulting in higher quality bubble.

The machine has allowed me to step it up a whole level in terms of productions. I also find they perform the perfect kind of agitation for a clean yet efficient separation. The HUGE benefit is that you don't have to do the work. Once you get used to loading the machine and bag you will make hash without much effort at all.

TO LOAD THE MACHINE:
-I load the machine with 20 lbs of ice to begin.
-Then I place the work bag on top of that.
-In the work bag goes the trim and ice.
-Layered ice/trim/ice. I like to run about half and half, and would love to hear what you guys do for this step.
-Fill the work bag 3/4 or less. And about half full if using dry trim, as it will expand when rehydrated.
-Double knot the bag closed, or more, worst mess ever if it opens.
-Add more ice, on top and the sides of the work bag.
-Do not fill the machine too miuch or the separation will not be efficient. Leave at least 6 inches at the top.
-Sometimes I let it sit at this point, if the trim is not frozen.
-Then add water, not enough to see it, that is the trick. You will have enough water just before you see it Rize up through the ice.
-Let it soak, just a little if wet/frozen trim. 20+ minutes for dry trim.
-Agitate 20-30 minutes, depends on many factors. I usually just watch an episode of the Simpsons and call it good.
-Drain... see: Draining the Machine post tba
 
Top