Yet another B3590 build; 180w UFO KILLER! ;)

vahpor

Well-Known Member
where is your exhaust? I don't see it in the pic, even though I think I can see the top of the tent.

edit: oh nvm...i think i see it in the album...what size is it?
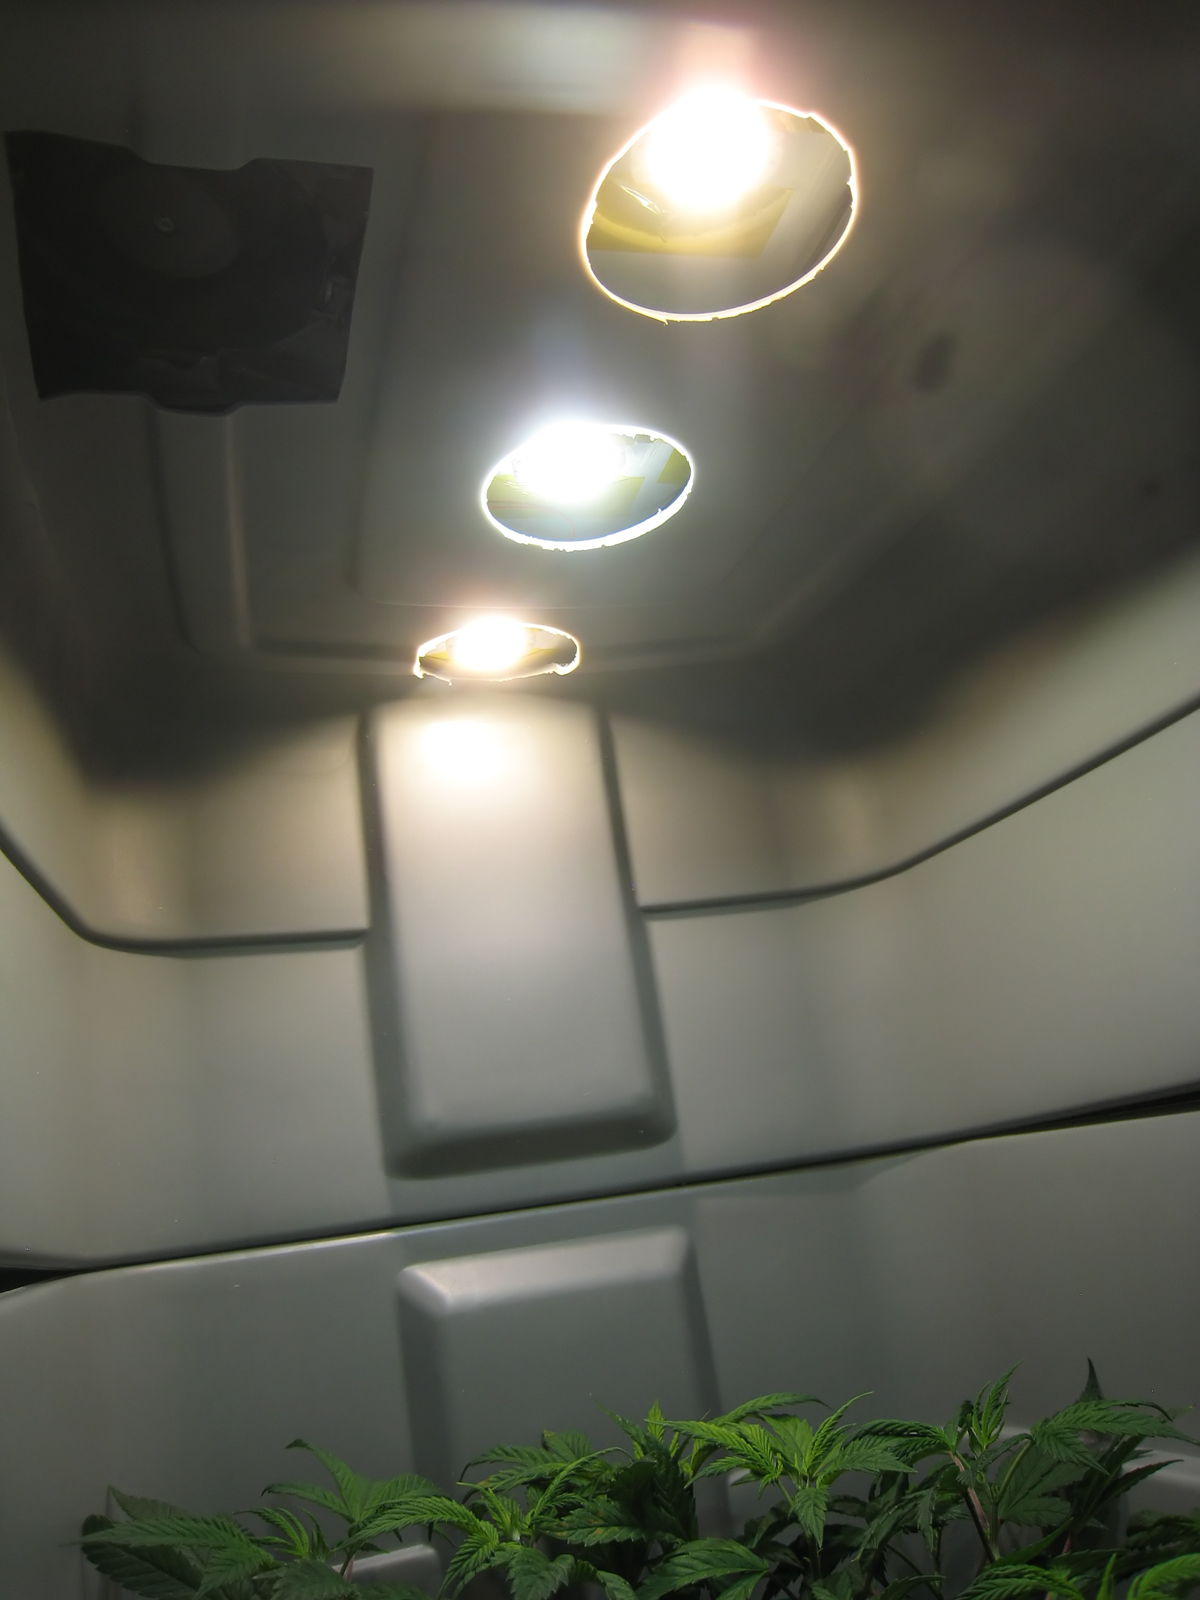
I have a 5" elbow out the top hole, with 6" ducting connected to it. A 120mm PC fan (95 CFM) is fit inside of the 5" elbow.

Lots of ways to add some humidity. You could hang some damp towels, that will help. I've found that blasting the exhaust fan generally isn't the solution.
I could try puting the humidifier in the tent..but afraid of it misting the lights with too much moisture, or the plant itself. It does have a humidistat, so I can set it from 40-90% and it will maintain the setting i choose. Again, just worried about misting things I don't want misted. :P I'll have to experiment with it some.

Also considering a micro swamp cooler like linked above. Have some extra fans and some tupperware around, just need a chunk of that evap material.
 

vahpor

Well-Known Member
Picked up a 100k pot. Tested at 84,300 ohm at max. Wired it up to a switch so I can open the circuit and have FULL power (~200w) OR close the circuit and use the pot (resistance) for intensity control.


So I should have a max of ~170 watts with the resistance maxed @ ~84k ohm. This is acceptable. I'd like a tighter tolerance, but, thats just me liking to use a product to its full potential as need be.

Will update after lights come on with temperature changes.
 

vahpor

Well-Known Member
Potentiometer testing results:
Min-9 watts (very dim, but lights functional)
Max-182w (89+*F hs temps)
Switch Off/full power mode-232w (96-105*F)

I have it dialed in to 101 watts (including driver). Temps are great! Canopy and upper canopy is now 74-77*F. Running a humidi outside the intake, exhaust fan is now on Low pulling in a nice cool humid vapor! Heat sink temps are ~83-85*F. Driver temps 87-90*F, no longer have a fan blowing on it.

Will let it run this way a couple days, and likely lower the light closer to canopy. Currently have a ~18" distance to canopy.
 
Last edited:

vahpor

Well-Known Member
Began work on a PVC scrog insert today. >> Album <<


Designed to fit within a 2x2 ft tent. ~4" squares. ~21.5" elbow corner to corner. I plan to tie it off to the side poles and/or suspend from the ceiling poles. I'll have to see what works.

I've learned for my own needs, that to keep plants short enough in my limited vertical space that LST and scrog are pretty key. And, it seems these muli-COB leds also prefer that, taking advantage of that light spread. I'm hoping I have the coverage/power now to fill a plant out wall to wall. :)

Update: Test fit the scrog in the tent. It went in w/o a hitch, no need to move fans, lights, or hygros out of the way; just the plant. Its maybe slightly too small, but I'm hoping to make up a 1/2" - 1" by adjusting the elbows some. I'm considering hanging it with ratchet light hangers from the ceiling.


12/5-D26F (since 12/12) Now, this is not a representation of a start to finish under Cree cobs, I had problems with this plant prior to it going under the B3590s. However, since removing the cheap UFO LED the plant has been recovering. And, to my eyes, growing in size very quickly in just ~48 hr. (But I'm likely just trying to justify the cost of this build a bit.) >> Album <<
 
Last edited:

bassman999

Well-Known Member
The plant looks healthy for the most part. What have you done to help her?
I like the light and am glad the pot helped you get temps in control.

I bought a 10pk of 100K dimmers with knob on them for about $9 Amazon prime. They will be here Tuesday along with new drivers.
 

vahpor

Well-Known Member
The plant looks healthy for the most part. What have you done to help her?
I like the light and am glad the pot helped you get temps in control.

I bought a 10pk of 100K dimmers with knob on them for about $9 Amazon prime. They will be here Tuesday along with new drivers.
Removing the UFO lowered temps drastically, and soon after I transitioned to the Cree setup. Also sorting out some pH issues, and making sure all feedings/waterings are ph checked prior. Background is I had trouble with low ph through most of veg (peat based soil lacking perlite), trying to increase it with added dolomite lime in some feedings and as top dress. But, the growth looked great and green, healthy. It wasn't until about d8f that some negative signs began to manifest; the discoloration in some leaves, mostly older, but some near top, and burnt tips. The UFO had been turned on a day or two prior, and likely at not a far enough distance, causing some intensity issues. Had similar issues when trying to ween other/younger plants onto it in the past. I've given up on and am done with this cheap UFO in confined spaces.

I ordered a 5x pots off Ama as well, didn't realize they were 'from CN' and the wait so long. 3.49 for a dimmer from R.Shack, but on the plus side, it was nice to actually communicate with someone who knew what a 100k ohm linear taper pot was, and exactly what drawer to find it in. Of course I had the sku to make it even quicker.
 

bassman999

Well-Known Member
Removing the UFO lowered temps drastically, and soon after I transitioned to the Cree setup. Also sorting out some pH issues, and making sure all feedings/waterings are ph checked prior. Background is I had trouble with low ph through most of veg (peat based soil lacking perlite), trying to increase it with added dolomite lime in some feedings and as top dress. But, the growth looked great and green, healthy. It wasn't until about d8f that some negative signs began to manifest; the discoloration in some leaves, mostly older, but some near top, and burnt tips. The UFO had been turned on a day or two prior, and likely at not a far enough distance, causing some intensity issues. Had similar issues when trying to ween other/younger plants onto it in the past. I've given up on and am done with this cheap UFO in confined spaces.

I ordered a 5x pots off Ama as well, didn't realize they were 'from CN' and the wait so long. 3.49 for a dimmer from R.Shack, but on the plus side, it was nice to actually communicate with someone who knew what a 100k ohm linear taper pot was, and exactly what drawer to find it in. Of course I had the sku to make it even quicker.
Radio Shack closed all their doors around here. All the mom and pop electronic stores closed in the past 5 yrs actually as well.

I have ph issues sometimes. I use the drops but its not the most accurate.
 

bassman999

Well-Known Member
Two hundred bones buys you a Bluelab combo meter. Accurate pH, EC and temperature is worth its weight in chronic.
I havent bought that one, but have been through at least or 6 meters in last few years.
They all break.
I cant believe any can last more than a yr at this point
 

ttystikk

Well-Known Member
I havent bought that one, but have been through at least or 6 meters in last few years.
They all break.
I cant believe any can last more than a yr at this point
My 'old' one was used when I got it and lasted over three years. My 'new' one is a year old next week and just got its first replacement probe, cuz I broke the first one. I use it at least a dozen times a day, every day.

I don't tend to trash my electronics, however. I'm writing this on a Samsung Note 2, it's already three years old.
 

bassman999

Well-Known Member
Another benefit I see with with that scrog net is that twith airflow negative tent pressure it shouldnt squeeze in as much
 

vahpor

Well-Known Member
Two hundred bones buys you a Bluelab combo meter. Accurate pH, EC and temperature is worth its weight in chronic.
I've looked into that Blue labs ph/EC/temp meter. If/when my current meters fail (or even just one of them), i'll likely go that route. But I've had great success with these cheapo Amazon units. Used over a year now, no issues. Just got calibration solution for them the other day, they were with in 10ppm and .03 ph. With the fluid at 25*C. That seems pretty darn close/accurate for no special treatment/storage solution/etc. I do rinse them after every test w/ tap water. They get used 5-20x a week, depending on what I have going. They have been dropped a few times from counter height.

that pc fan isn't strong enough and is not designed for ducted air ventilation.
a 4" s+p will push more air than that.
Yeah, I didn't want to get into the power consumption of an inline (likely 30-110w+ depending on size/fan/cfm/dimmer setting). But, when I get to scrubbing its likely the route I'll have to take. Space and noise is also a consideration for my location. I understand a PC case fan is not designed for ducting, but it was available, cheap, easy to implement, low power consumption, and quiet'ish. It does OK for now, I've no plans to run anything less efficient, unless deodorizing is required.

I've been trying to figure out a way to run a filter/fan outside of the tent, maybe inside of a sealed 5g bucket attached to the exhaust ducting. Filter on the inside of the bucket, fan mounted on top of a lid? Pulling air from the tent via duct, into the 5gal bucket, through the filter. Still not a requirement/priority, so I have some time to decide on a build/design.
 

vahpor

Well-Known Member
Just an update. 7-8d since adding the Cree COBs. I have them dialed down to ~90w of actual consumption (including driver loss). Currently have about ~12" from light to the top cola. HS temps in the upper 80s, running fans at 12v. In-tent temp max has been between 81-84*F (~3-6* above ambient), normal temps while lights on w/ humidi running are in the 74-79 range. Running a humidi outside the tent near the intake vent to help keep humidity up some, sharing space with a heater and in CO...its dry..
>> Album <<


The sick plant is showing some signs of recovery now I think, a couple days after the first Recharge application/innoculation. The new growth looks better, and shes slowed down/stopped eating her old leaves some I think. The pot is finally starting to dry out a bit too, as if nutes are being taken up? I watered early to get the Recharge into the soil asap, so she'll dry out good before next feeding. I also recharged my veg plants/solo cup size, and they are looking/growing better than ever as well.
 
Last edited:

vahpor

Well-Known Member
Been a while since last update. I've since turned the light down further, ~80w total consumption range now. I have temps in check for the last few weeks, peaks in the low 80s *F, normally day-time temps in mid to upper 70s.

The plant has shed/lost most of its fan leaves now, but the flowers are still putting on bulk and density. Overall, happy with the results for the issues I had early flower, including the stress from doing a light switch 1/2 way through. Pruned a few more dead leaf matter after the pics. Tric scoped and still not seeing any amber, majority are milky. I've been flushing for the last week or so. Another week to 10/12? days is what I'm shooting for, or as soon as I see some tric degradation begin.

Day 60 flower:


I also began design on a veg-tote (ala Spacetote/bucket style). I have a ways to go, and I'm waiting on mylar and glue to cover the insides. The current light top is very temporary, just removed the light top from my 5 gal spacebucket and set it on top of the tote lid with a couple holes cut out for the COB and exhaust fan. Hacked a quick intake hole in the bottom. I needed to get one of my solo-cup plants out of my 'propogation bucket' to make room. And my space cheese plant in 2gal smart pot has been needing a new home so that I could apply proper LST to her.


The plan is to run some Vero 13s or 18s, or some cheap CXA2530s? Whatever is most cost effective when I get into pricing chips/drivers. I want to run ~4-6 lower power chips total, on a dimmer capable of ~45% or better efficiency. 60-100ish watts?
Here are some diagrams I made up a while back when trying to figure something out. I'm leaning V18 due to availability and color options, and fewer parts/simpler build.

 
Last edited:

Fastslappy

Well-Known Member
get a cheap Harbor freight chop saw makes doing the frame work easy peasy
SPRAY WD40 before any cutting then cut slow & you'll get a very clean cut (way less clean up )
Use a carbide tipped blade muti-use blade with med sized tooth gap they uasully come with a cheap one
don't use compostit grinding disks , cement disks to cut AL they react with AL & will fly apart violently
(that & the melted AL gums up the grit )
again cut slowly , clamp your pieces well , wear eye protection , I wear a fullface sheild as AL chips will fly
I've cut thick walled AL tubing with no issues as long was you slow go down with e blade
 

Fastslappy

Well-Known Member
Nice looks great ! them labels on that AL stock is bitch to get off , heat gun/scraper them before you cut it up
 

lumen-geek

Well-Known Member
Been a while since last update. I've since turned the light down further, ~80w total consumption range now. I have temps in check for the last few weeks, peaks in the low 80s *F, normally day-time temps in mid to upper 70s.

The plant has shed/lost most of its fan leaves now, but the flowers are still putting on bulk and density. Overall, happy with the results for the issues I had early flower, including the stress from doing a light switch 1/2 way through. Pruned a few more dead leaf matter after the pics. Tric scoped and still not seeing any amber, majority are milky. I've been flushing for the last week or so. Another week to 10/12? days is what I'm shooting for, or as soon as I see some tric degradation begin.

Day 60 flower:


I also began design on a veg-tote (ala Spacetote/bucket style). I have a ways to go, and I'm waiting on mylar and glue to cover the insides. The current light top is very temporary, just removed the light top from my 5 gal spacebucket and set it on top of the tote lid with a couple holes cut out for the COB and exhaust fan. Hacked a quick intake hole in the bottom. I needed to get one of my solo-cup plants out of my 'propogation bucket' to make room. And my space cheese plant in 2gal smart pot has been needing a new home so that I could apply proper LST to her.


The plan is to run some Vero 13s or 18s, or some cheap CXA2530s? Whatever is most cost effective when I get into pricing chips/drivers. I want to run ~4-6 lower power chips total, on a dimmer capable of ~45% or better efficiency. 60-100ish watts?
Here are some diagrams I made up a while back when trying to figure something out. I'm leaning V18 due to availability and color options, and fewer parts/simpler build.

Hey man, I have 16x 4000k 70cri cxa2530 chips that I won't be using after all. They're still new in anti-static bags plus I have the Molex solder-less chip holders for them. PM me if interested!
 

vahpor

Well-Known Member
Some updates from Plink D67F. Trics are mostly milky now, still not seeing amber yet, but i'm still struggling to get a clear view from my scope a majority of the time.. Still seeing run-off ppm in the 1000s+, so she will continue to get flushed until I start to see some amber.


Used the WD40 for cutting angle al and for cutting the holes in the heatsink. Worked ok, just a bit messy with the spray, a cutting oil will be nice for next run.

The label looks bad in pics, but it doesn't bother me much. I should have removed it prior to install.

Thanks on the cxa2530 heads up. I think I'm pretty set on trying out some Bridgelux chips, and familiarizing myself with their offerings.

I'm going to try (4) V18s on a 5.886 x 20" hsusa design. Driven by a HLG-120H-C700B (107-215v). ~20w per chip @ 700ma (~43% eff), ~9.5w @ 350ma (~46-47%). ~29v @ 700ma, ~27v @ 350ma. 29*4 = 116 volts total, 27*4 = 108 volts. If my numbers are close, it looks like the 4 should fit well on the 120H-C700 series, and still allow me a good amount of dimming. Total array will draw ~38-81 watts. Working with a 2.6 sq ft space (2'w x 1.3'd x 2.1't). I currently have a single cheap cn 100w cob with reflector @ ~20-30w and the plants are loving it. Just need a few more lights for better coverage and intensity as they fill in.

Space Cheese veggin'
 
Last edited:

Budzbuddha

Well-Known Member
Definitley liking your build - im doing something similar in a 3x3x6 tent.
I plan to use either 4) cxb3070 or cxb3590 ( depending on BIN i can find )
And a center cob at 5000k.

I like the lattice type framing for the cobs - my question is what have you found to be a good PWR supply for the fans ? Was it able to run them in parrallel efficiently. Is it fan speed controllable or at max speed. ?

Thanks

Hoping to see more of your updates
 

vahpor

Well-Known Member
Definitley liking your build - im doing something similar in a 3x3x6 tent.
I plan to use either 4) cxb3070 or cxb3590 ( depending on BIN i can find )
And a center cob at 5000k.

I like the lattice type framing for the cobs - my question is what have you found to be a good PWR supply for the fans ? Was it able to run them in parrallel efficiently. Is it fan speed controllable or at max speed. ?

Thanks

Hoping to see more of your updates
Thank you! I think this design/setup would fit a 3x3 well, its a lot of light at 1400ma. I think the 5 chip 240 setup would be awesome, that is exactly what I considered as well (with the 5000k center). The fans worked on a 6v blackberry charger, but I run it now on a 12v source. All 4 in parallel. No controller, most fan controllers will just dissipate more heat into the environment I've noticed. They are not louder than my exhaust fan at 12v, so I'd rather they just move more air and run cooler. Current heatsink temps are in the ~80-85F range. On that note, if your in a larger space (vertical being my largest limitation), with some air movement, I think you'd be fine @ 6v.

And for updates. The Plink flower plant was cut 3 days ago. This pic was after the first day, it has now shrunk quite a bit since.


The Vero 18 @ 700ma veg tote is now under way. :)

Still needs mylar and some light leak sealing. And I think I'm going to affix the heatsink to the top, its a bit awkward and top heavy. I could put the driver on the floor too.

Plants have moved from a single cheap cn 100w COB over the bottom-base tote.

Aprox 10-13" to canopy from light source. Lux set to ~6,200 @ 8.5" from lights. Plan to ease the plants in gently. When cranked up to max power (on potenti) I saw 25,000+ lux (at 8.5"), I expect a bit more from reflective walls, we'll see.

4 chips provides great coverage from corner to corner! See my mangled Plink in solo cup, practicing some super cropping branch management. :D
 
Last edited:

Budzbuddha

Well-Known Member
Thank you! I think this design/setup would fit a 3x3 well, its a lot of light at 1400ma. I think the 5 chip 240 setup would be awesome, that is exactly what I considered as well (with the 5000k center). The fans worked on a 6v blackberry charger, but I run it now on a 12v source. All 4 in parallel. No controller, most fan controllers will just dissipate more heat into the environment I've noticed. They are not louder than my exhaust fan at 12v, so I'd rather they just move more air and run cooler. Current heatsink temps are in the ~80-85F range. On that note, if your in a larger space (vertical being my largest limitation), with some air movement, I think you'd be fine @ 6v.
Thanks for keeping thread alive -
I have most of the basics outlined for my build

4) CXB 3070 / 3590 COB { 3000k }
1 ) CXB 3070
or VERO 18 { 5000k }
Meanwell 185h 1400b
Meanwell LDM300 or ? ( center cob driver )
5) ARTIC 64 Heatsinks with Fans
12v pwr supply (2)
2) 100k linear pots with knobs
2) Rocker Switches
Aluminum Lattice air frame
Reflector mount for center cob
Ideal mounts
Thermal Mat or Artic 5 thermal paste
Carabiner mounts for Ratchet Straps

image.jpg

I will probably do a DIY thread when all of my components are together and on hand.
Thanks for your help
 

vahpor

Well-Known Member
I will probably do a DIY thread when all of my components are together and on hand.
Thanks for your help
I like it a lot! And after seeing/running these Vero 18 5000k @ 700, I think it'd work great to provide some of that Blue spectrum punch that the Cree 3000ks really do lack. I wish I had some blue[-white] in my flower tent just for my human eyes, but I suspect it'd help a bunch with stretch as well.

I still have a 'royal blue' cheap cn cob I need to play around with. I've read they are mostly worthless for growing on there own, but as supplement may be advantageous.
 
Top