SotaFats
Active Member
First and Foremost I want to Thank RIU for all the info that I have gleaned/studied from this web site. I would +Rep everyone if I could. I hope that this journal might help some another grower in their endeavors, well DUH.
Background / History.
Had a couple grows in the past but nothing thats worth bragging about. Hopefully this grow will turn out better. Trying to produce enough for my Girlfriend and I. Girlfriend has a serious medical condition that keeps her appetite at an alarming low and she endures constant pain. The doctors have her hooked on the Percocets which drops her appetite even more. Unfortunately we cant afford the good smoke around here at $50 a 1/8. The mexi regulars help her a little bit, but she can smoke at least a quarter of schwag in 5 days, not to mention my recreational use.
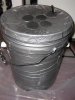
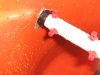
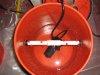
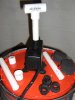
Current grow attempt led from conversations this winter with a friend about a gorilla grow somewhere around here Spring 2010. As the Fates would have it, said friend adopted some nice plants that his friend couldnt take care of anymore. So he sets up his first grow and is going DIY all the way, he is quite the MacGuyver and made the prototype for the aeroponics that Im using to (TRY TO!) clone. I helped him out a little with some miscellaneous equipment and information. We had discussed using my basement for a Mother/Clone cabinet for spring gorilla plantings. In the mean time his friend orders Femmed Wonder Woman seeds from Nirvana and germs all 6, which I guess was 1 to many for his grow space. So he gives a sprout to my said friend who gives it to me. So I got the WW (Wonder Woman, not White Widow) sprout in a coffee mug the day before Thanksgiving Nov 23th 2009. She was germed maybe 4-5 days earlier. She has been nothing short of extraordinary in growth and vigor, until recently, more on that later. After getting this wonderful little sprout and seeing how fast she was growing, it really motivated my efforts in building a mother/clone cab. Which in-turn led me to going all the way and setting up a flower cab as well.
The Plan.
Grow mother and clones to keep 6-8 plants flowering. As well as Produce seeds. Grow area needs to be semi-mobile so that in case of emergency it can be evacuated and clean of any immediate visual modifications or signs of growing.
Soil, Scotts and Perilite
2gal 8.5 Square Pots for flowering.
FoxFarm Nutes & Solubles, Hygozyme, CloneX
Tap water aprox 7.2ph hits 8-8.2 after 24hr airing.
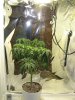
Flower Box
72 H X 46 W X 23 L.
600W HPS.
20 lbs CO2 tank.
Exhaust, 4 scrubber and 4 170 CFM inline fan.
Intake passive, upgrading to a muffin fan or 2.
Mother/Veg Box
36 H X 46 W X 23 L half as tall as flower box.
1-2 mothers, 4-6 clones, 4-6 veggies.
600W MH
Exhaust, 4 muffin fan
Intake passive, upgrading to a muffin fan.
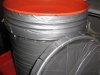
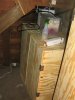
First, electricity, didnt want extension cords running in and out of the coal chamber. Home Depot for romex, breakers and receptacles. Put a 15A and a 20A receptacle in the Chamber. Ventilation: Flower cab will exhaust through a Y at the dryer venting Using these really Cool Tamarak Dampers. The Veg box will exhaust directly into the immediate area. When $$$ permits, upgrading to 6 fan/scrubber combo for Flower box and installing current 4 fan/scrubber in Veg Box. Budgeting for a portable AC unit and dehumidifier for the summer months. Put a Pad lock on the chamber door, more for the curious then to really keep anyone out, wish I hadda couple Rottweilers.
Cabinets
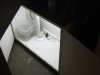
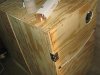
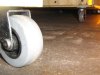
Due to the size of the door that leads to the grow space there was a 23 size constraint. Need to be able to wheel out the cabs for cleaning, maintenance reasons and be able to remove them from the premises for whatever emergency reasons. Planned out dimensions for the cabs and then used Google Sketch to build a mock up. Now if youre planning to do something like this I highly suggest you take the time to become somewhat familiar with Google sketch as it will take the guess work out of sizes, space and dimensions. I am not a carpenter, dont have carpenter tools. Had to round up a circular saw from a friend. Oh and I had the large plywood pieces cut at Home Depot. So it was 12 cuts at 25 cents a cut, no big deal. However the guy doing the cutting wasnt real precise. So once construction begins there were quite a few discrepancies on the plywood cuts. Nothing the circular and grinder couldnt fix. Next step was to figure out how to get the flower cab sealed for darkness. I used ¼ sanded pine and that shits not to rigid, so theres still some tweaking to do to get it totally light tight. Im thinking a drop down tarp on the outside and foam beading on the inside of the door. Still working out the kinks that pop up here and there.
Installation
SO far so good everything seems to be coming together according to plan MUAHAHA. Except my clones.
Current Plants and genetics:
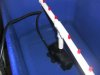
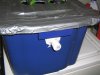
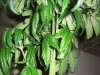
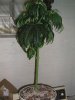
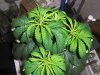
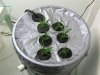
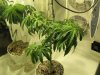
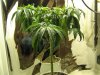
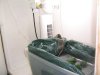
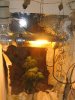
1, 2 month Wonder Woman Mother, grown from seed. Shes been through it all. Transplanting out of the coffee mug she came in was traumatic for the both of us. I put 9 tiny little MG time release fert pellets on the top soil at about week 3 and me thinks its been giving her talons ever since. Through my recent failed cloning attempts,12 cuttings total. I Uber lollipopd her, was cutting to much off the lower branches, should have left more fan leaves on. First attempt of 6 clones, gelled the cutting and placed them directly into little dirt cups FAIL. Then the 6 cuttings for the prototype DIY aeroponics cloning tote FAIL. Didnt seal the tote for light, those 6 clones wanted to grow but they just didnt make it. Shes been a good mother so far but I did something recently and shes not to happy right now. We are still trouble shooting.
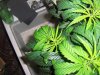
4 Northern Lights Nirvana seeds germinating. 4 popped in under 12 hrs germination, now theyre in the party cups. Still have 6 NL seeds left.
Background / History.
Had a couple grows in the past but nothing thats worth bragging about. Hopefully this grow will turn out better. Trying to produce enough for my Girlfriend and I. Girlfriend has a serious medical condition that keeps her appetite at an alarming low and she endures constant pain. The doctors have her hooked on the Percocets which drops her appetite even more. Unfortunately we cant afford the good smoke around here at $50 a 1/8. The mexi regulars help her a little bit, but she can smoke at least a quarter of schwag in 5 days, not to mention my recreational use.
Current grow attempt led from conversations this winter with a friend about a gorilla grow somewhere around here Spring 2010. As the Fates would have it, said friend adopted some nice plants that his friend couldnt take care of anymore. So he sets up his first grow and is going DIY all the way, he is quite the MacGuyver and made the prototype for the aeroponics that Im using to (TRY TO!) clone. I helped him out a little with some miscellaneous equipment and information. We had discussed using my basement for a Mother/Clone cabinet for spring gorilla plantings. In the mean time his friend orders Femmed Wonder Woman seeds from Nirvana and germs all 6, which I guess was 1 to many for his grow space. So he gives a sprout to my said friend who gives it to me. So I got the WW (Wonder Woman, not White Widow) sprout in a coffee mug the day before Thanksgiving Nov 23th 2009. She was germed maybe 4-5 days earlier. She has been nothing short of extraordinary in growth and vigor, until recently, more on that later. After getting this wonderful little sprout and seeing how fast she was growing, it really motivated my efforts in building a mother/clone cab. Which in-turn led me to going all the way and setting up a flower cab as well.
The Plan.
Grow mother and clones to keep 6-8 plants flowering. As well as Produce seeds. Grow area needs to be semi-mobile so that in case of emergency it can be evacuated and clean of any immediate visual modifications or signs of growing.
Soil, Scotts and Perilite
2gal 8.5 Square Pots for flowering.
FoxFarm Nutes & Solubles, Hygozyme, CloneX
Tap water aprox 7.2ph hits 8-8.2 after 24hr airing.
Flower Box
72 H X 46 W X 23 L.
600W HPS.
20 lbs CO2 tank.
Exhaust, 4 scrubber and 4 170 CFM inline fan.
Intake passive, upgrading to a muffin fan or 2.
Mother/Veg Box
36 H X 46 W X 23 L half as tall as flower box.
1-2 mothers, 4-6 clones, 4-6 veggies.
600W MH
Exhaust, 4 muffin fan
Intake passive, upgrading to a muffin fan.
First, electricity, didnt want extension cords running in and out of the coal chamber. Home Depot for romex, breakers and receptacles. Put a 15A and a 20A receptacle in the Chamber. Ventilation: Flower cab will exhaust through a Y at the dryer venting Using these really Cool Tamarak Dampers. The Veg box will exhaust directly into the immediate area. When $$$ permits, upgrading to 6 fan/scrubber combo for Flower box and installing current 4 fan/scrubber in Veg Box. Budgeting for a portable AC unit and dehumidifier for the summer months. Put a Pad lock on the chamber door, more for the curious then to really keep anyone out, wish I hadda couple Rottweilers.
Cabinets
Due to the size of the door that leads to the grow space there was a 23 size constraint. Need to be able to wheel out the cabs for cleaning, maintenance reasons and be able to remove them from the premises for whatever emergency reasons. Planned out dimensions for the cabs and then used Google Sketch to build a mock up. Now if youre planning to do something like this I highly suggest you take the time to become somewhat familiar with Google sketch as it will take the guess work out of sizes, space and dimensions. I am not a carpenter, dont have carpenter tools. Had to round up a circular saw from a friend. Oh and I had the large plywood pieces cut at Home Depot. So it was 12 cuts at 25 cents a cut, no big deal. However the guy doing the cutting wasnt real precise. So once construction begins there were quite a few discrepancies on the plywood cuts. Nothing the circular and grinder couldnt fix. Next step was to figure out how to get the flower cab sealed for darkness. I used ¼ sanded pine and that shits not to rigid, so theres still some tweaking to do to get it totally light tight. Im thinking a drop down tarp on the outside and foam beading on the inside of the door. Still working out the kinks that pop up here and there.
Installation
SO far so good everything seems to be coming together according to plan MUAHAHA. Except my clones.
Current Plants and genetics:
1, 2 month Wonder Woman Mother, grown from seed. Shes been through it all. Transplanting out of the coffee mug she came in was traumatic for the both of us. I put 9 tiny little MG time release fert pellets on the top soil at about week 3 and me thinks its been giving her talons ever since. Through my recent failed cloning attempts,12 cuttings total. I Uber lollipopd her, was cutting to much off the lower branches, should have left more fan leaves on. First attempt of 6 clones, gelled the cutting and placed them directly into little dirt cups FAIL. Then the 6 cuttings for the prototype DIY aeroponics cloning tote FAIL. Didnt seal the tote for light, those 6 clones wanted to grow but they just didnt make it. Shes been a good mother so far but I did something recently and shes not to happy right now. We are still trouble shooting.
4 Northern Lights Nirvana seeds germinating. 4 popped in under 12 hrs germination, now theyre in the party cups. Still have 6 NL seeds left.
Attachments
-
 42.1 KB Views: 121
 -
 66.7 KB Views: 110
 -
 59.9 KB Views: 121
 -
 43.5 KB Views: 117
 -
 35.5 KB Views: 82
 -
 25 KB Views: 83
 -
 49.8 KB Views: 110
 -
 67.7 KB Views: 103
 -
 82.9 KB Views: 93
 -
 44.3 KB Views: 80
 -
 57.9 KB Views: 61
 -
 56.3 KB Views: 153