Green Troll
Active Member
Hey guys.
Some of you may remember me when i first started out, my first grow journal and all the problems/mistakes i encountered. I have learned a fair bit since then! Check out my sig to catch up if you didn't see that.
So anyway, here i am, on grow #3 and i am stepping up since grow #2 was pretty damn successful. Time for vertical growing! The set up hasn't been built yet, but i have nearly all the bits i need.
The vertical set up will be as follows:
5'x5'x6.5' Tent
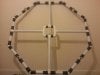
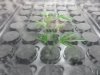
16 x 1m rockwool slabs (designed for vertical use so the grain in the rockwool is different, if anyone wants to use the same idea, make sure you get these) set up in an 8 sided frame
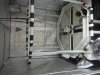
1 x 600w HPS in a 5" custom cool tube (perspex, i hope this doesn't melt!)
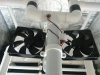
6" inline fan and ducting sucking right from the bulb, connected to an automatic fan controller
8" carbon double length filter for exhaust to go into
80L tank, pump, timer, 16 drippers
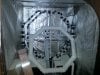
Frame is made from 2" PVC tubing, set up in an octagon shape, guttering around the bottom
The Build:
Skip this bit if you like, it is a long read.
The slabs will be placed vertically on the frame and held in place with velcro. The ends will have the plastic removed, the drippers will feed from the top, and drain out to the guttering below. The gutter will drain back into the tank. An 18" floor fan will be placed face up under the frame with a fan controller so it beats a slow breeze up the plants from below. The bulb will be suspended inside the 1m long cool tube, wire "butterfly" ties to keep the bulb from touching the sides of the tube.
The tank will be under the frame (the frame will be sat on 4 small side tables) and will pump up a half inch pipe to the top of the tent, away from the electrics, where it will split into 8 x 4mm feeder pipes, then a splitter and 2 x dripper spikes. The manifold will be sealed in a big ball of silicone once it is connected so no leaks occur, as will each splitter.
I would like to take this time to point out suspended water fixtures above electricity is incredibly dangerous. In this set up i would like to point out that all electric components will be secured away from any possible leaks or failures. Even then, all care is taken to seal any connections to protect against pressurized leaks which may cause spray. Be safe, where possible keep water below waist height and electricity above waist height.
The 16 feeding tubes will be of suitable length to allow the frame to be turned 180 degrees in each direction without causing the tubes to be pulled tight. This is very important for access to the slabs, as this will all be in a 5'x5' tent and i can only get to it from one side. I will use air hose for this, as it is a lot more flexible than standard micro irrigation lines. This will save me pulling out all the spikes just to get access.
The cool tube will be held in place within the frame at the top, and secured with something at the bottom. I have some pip clips that could hold it into place. When i make it and get photos, you will see how i will do this, it is difficult to explain. At the top of the cool tube, the bulb will be suspended mid way down. This will be secured with wire ties so it doesn't touch the sides of the tube and the cable folded over the top and secured with a bit of tape for the moment. Then the 6" duct will be split up the side by about 3 inches, and this duct taped over the top of the cool tube with the cable coming through the split. Secure and make as airtight as possible with half a roll of duct tape, put a secure clip on the cable so it doesn't slip through the hole, and we have the cool tube done. When i need to change the bulb, i release the clip, slide the bulb to the bottom open end of the cool tube, change, pull back up into position, and re-secure the clip.
This duct gets connected to a 6" inline fan with temp controller which then feeds into an 8" carbon filter via a reducer coupling. I know a 6" fan is a little oversized, as the CFM rating is huge, but the controller should keep it at a sensible level with scope to pump that heat out if needed. This will hopefully keep things at a nice steady temp.
The Grow:
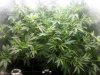
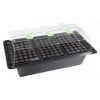
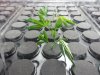
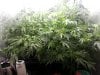
So once this monster has been put together, i will be able to put a minimum of 64 plants inside (4 each slab) as rooted cuttings (i have a 120 site X-Stream propagator for this) and prop them up inside the frame, surrounding the tube. This will give me about 20" from the face of the slab to the edge of the tube as growing space. The plants are not intended to be vegged, they will get flowered right from the get go. I will veg them in propagation to the right size of about 4-5". After about 2-3 weeks in the frame, these should have stretched out and produced an additional node. The lower stems get removed and these get used for cuttings. Two cuttings from each young plant, then the best 64 get picked from these in the next cycle.
The idea is i produce only a single cola from each of these 64 plants. Now some of you are starting to think about Heath Robinson and his flooded pipe vertical grow. That is what inspired me to do it, i just don't have the room for that size of grow. So stealing other ideas from various sources, i have come up with this. None of it is particularly original, but that is kind of the point. I want to use methods that have worked for other people") From these single colas, Heath gained about 1/2 oz per plant. I am expecting to get half of that, and if i get more, bonus. But i am not nearly as experienced as him or many of you, so i like to keep it real.
From these single colas, Heath gained about 1/2 oz per plant. I am expecting to get half of that, and if i get more, bonus. But i am not nearly as experienced as him or many of you, so i like to keep it real.
16 oz from 64 plants should be perfectly doable, so about 450 grams, giving me 0.75 grams per watt. Not bad for reasonable expectation. Now if i do indeed get the same sort of results as Heath, i will be looking at 900 grams, so 1.5 grams per watt. Now wouldn't that be just lovely?
So this is what is to come. I shall post some photos when it is all built up and empty, then show you the progress of the plants week by week for you all to comment. It may work, it may fail miserably, it is a first for me growing like this so i am not expecting much.
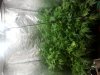
I will be planting mostly Blue Cheese with some Critical Kush as well, then i have some seeds of my own hermy accident which is Critical Kush crossed with some unknown strain. That should be an interesting cross as they were both completely different but equally lovely smokes. Cannot wait! I am, however, expecting some trouble with the Blue Cheese. It seems to be a very weak and stringy plant, and growing it out horizontally may require a lot of support, which will be difficult. I plan to have a lot of those little green canes handy to shove in the slab to try and support them. Also the Critical Kush is a freaking overachiever when it grows, so those bad boys will need strategic placing. Probably put them near the top so they don't block the fan at the bottom.
Please feel free to post your comments, ideas, criticisms and support below.
Green Troll
Some of you may remember me when i first started out, my first grow journal and all the problems/mistakes i encountered. I have learned a fair bit since then! Check out my sig to catch up if you didn't see that.
So anyway, here i am, on grow #3 and i am stepping up since grow #2 was pretty damn successful. Time for vertical growing! The set up hasn't been built yet, but i have nearly all the bits i need.
The vertical set up will be as follows:
5'x5'x6.5' Tent
16 x 1m rockwool slabs (designed for vertical use so the grain in the rockwool is different, if anyone wants to use the same idea, make sure you get these) set up in an 8 sided frame
1 x 600w HPS in a 5" custom cool tube (perspex, i hope this doesn't melt!)
6" inline fan and ducting sucking right from the bulb, connected to an automatic fan controller
8" carbon double length filter for exhaust to go into
80L tank, pump, timer, 16 drippers
Frame is made from 2" PVC tubing, set up in an octagon shape, guttering around the bottom
The Build:
Skip this bit if you like, it is a long read.
The slabs will be placed vertically on the frame and held in place with velcro. The ends will have the plastic removed, the drippers will feed from the top, and drain out to the guttering below. The gutter will drain back into the tank. An 18" floor fan will be placed face up under the frame with a fan controller so it beats a slow breeze up the plants from below. The bulb will be suspended inside the 1m long cool tube, wire "butterfly" ties to keep the bulb from touching the sides of the tube.
The tank will be under the frame (the frame will be sat on 4 small side tables) and will pump up a half inch pipe to the top of the tent, away from the electrics, where it will split into 8 x 4mm feeder pipes, then a splitter and 2 x dripper spikes. The manifold will be sealed in a big ball of silicone once it is connected so no leaks occur, as will each splitter.
I would like to take this time to point out suspended water fixtures above electricity is incredibly dangerous. In this set up i would like to point out that all electric components will be secured away from any possible leaks or failures. Even then, all care is taken to seal any connections to protect against pressurized leaks which may cause spray. Be safe, where possible keep water below waist height and electricity above waist height.
The 16 feeding tubes will be of suitable length to allow the frame to be turned 180 degrees in each direction without causing the tubes to be pulled tight. This is very important for access to the slabs, as this will all be in a 5'x5' tent and i can only get to it from one side. I will use air hose for this, as it is a lot more flexible than standard micro irrigation lines. This will save me pulling out all the spikes just to get access.
The cool tube will be held in place within the frame at the top, and secured with something at the bottom. I have some pip clips that could hold it into place. When i make it and get photos, you will see how i will do this, it is difficult to explain. At the top of the cool tube, the bulb will be suspended mid way down. This will be secured with wire ties so it doesn't touch the sides of the tube and the cable folded over the top and secured with a bit of tape for the moment. Then the 6" duct will be split up the side by about 3 inches, and this duct taped over the top of the cool tube with the cable coming through the split. Secure and make as airtight as possible with half a roll of duct tape, put a secure clip on the cable so it doesn't slip through the hole, and we have the cool tube done. When i need to change the bulb, i release the clip, slide the bulb to the bottom open end of the cool tube, change, pull back up into position, and re-secure the clip.
This duct gets connected to a 6" inline fan with temp controller which then feeds into an 8" carbon filter via a reducer coupling. I know a 6" fan is a little oversized, as the CFM rating is huge, but the controller should keep it at a sensible level with scope to pump that heat out if needed. This will hopefully keep things at a nice steady temp.
The Grow:
So once this monster has been put together, i will be able to put a minimum of 64 plants inside (4 each slab) as rooted cuttings (i have a 120 site X-Stream propagator for this) and prop them up inside the frame, surrounding the tube. This will give me about 20" from the face of the slab to the edge of the tube as growing space. The plants are not intended to be vegged, they will get flowered right from the get go. I will veg them in propagation to the right size of about 4-5". After about 2-3 weeks in the frame, these should have stretched out and produced an additional node. The lower stems get removed and these get used for cuttings. Two cuttings from each young plant, then the best 64 get picked from these in the next cycle.
The idea is i produce only a single cola from each of these 64 plants. Now some of you are starting to think about Heath Robinson and his flooded pipe vertical grow. That is what inspired me to do it, i just don't have the room for that size of grow. So stealing other ideas from various sources, i have come up with this. None of it is particularly original, but that is kind of the point. I want to use methods that have worked for other people
16 oz from 64 plants should be perfectly doable, so about 450 grams, giving me 0.75 grams per watt. Not bad for reasonable expectation. Now if i do indeed get the same sort of results as Heath, i will be looking at 900 grams, so 1.5 grams per watt. Now wouldn't that be just lovely?
So this is what is to come. I shall post some photos when it is all built up and empty, then show you the progress of the plants week by week for you all to comment. It may work, it may fail miserably, it is a first for me growing like this so i am not expecting much.
I will be planting mostly Blue Cheese with some Critical Kush as well, then i have some seeds of my own hermy accident which is Critical Kush crossed with some unknown strain. That should be an interesting cross as they were both completely different but equally lovely smokes. Cannot wait! I am, however, expecting some trouble with the Blue Cheese. It seems to be a very weak and stringy plant, and growing it out horizontally may require a lot of support, which will be difficult. I plan to have a lot of those little green canes handy to shove in the slab to try and support them. Also the Critical Kush is a freaking overachiever when it grows, so those bad boys will need strategic placing. Probably put them near the top so they don't block the fan at the bottom.
Please feel free to post your comments, ideas, criticisms and support below.
Green Troll