The Membrane Meniscus System
- Thread starter Dreddd
- Start date
-
- Tags
- experiment membrane meniscus test
ANC
Well-Known Member

Lol, so they only got watered once this week... I moved the plug and didn't see that it was not seating well.
This after they only had water on Wednesday after being watered on Sunday. One plant in the back was hanging quite limp by the time I saw them this weekend. But looking better now.
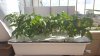
LOL I am curious about your grow too, so thanks for the up-date! I was meaning to ask Dreddd about his grow thoughView attachment 4173383 View attachment 4173384
Lol, so they only got watered once this week... I moved the plug and didn't see that it was not seating well.
This after they only had water on Wednesday after being watered on Sunday. One plant in the back was hanging quite limp by the time I saw them this weekend. But looking better now.
ANC
Well-Known Member
You can follow along in the other thread....
https://www.rollitup.org/t/first-time-hydro-going-to-try-ebb-flow-is-this-a-reasonable-plan.958244/page-11
https://www.rollitup.org/t/first-time-hydro-going-to-try-ebb-flow-is-this-a-reasonable-plan.958244/page-11
Dreddd
Well-Known Member
yeah sorry kinda forgot about updating... life can get hectic sometimes.. thankfully the system is basically running on cruise control so i dont have to be hands on, im just about to make the third batch of nutrient solution for it since it almost finished the last one, i dont have a way to check if the fabric is holding or not since this one is pitch black, but i dont have a ph/ec shift so far...up-date? With pics? Root pics? Nice close up root pics? Maybe a wide angle root pic?

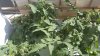

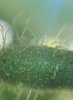
the roots are not pure white anymore and according to Andrew this is due to exudate buildup, so far it doesnt seem to be causing an issue, time will tell.
Now that we went through the good, here's the bad part, upon closer inspection i discovered my middle plant stem was turning a slight brownish color, but not from the bottom up, from top and spreading to the sides..

this can only be one thing, my old nemesis, the dreaded russet mite!
i cannot tell you how many tomato plants i've lost to these evil little creatures, i'll be spraying them tonight with a sulfur spray and hope for the best, theres very little damage done so far so i'd like to think my odds of getting this under control are good.
That sucks with the mites! Good luck with that.
My roots had that brownish tint as well. Unfortunately, I also had rot mixed in.
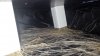
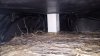
You are managing to keep the moisture level in the root zone much higher than I was able to do. You have condensation all over and I had none. Thats a good thing I think. My roots had a bad tendency to dry out - and die - as soon as they grew away from the membrane or way up the sides. Your's dont seem to have that problem.
One thing though - it looks like your paper clips are rusting/corroding. That crap will get down into your roots. Dont have any idea if it will harm the plant - or you - but it cant be all that good either.
You might try to find some plastic clips or maybe get some stainless wire and bend your own?
Looking forward to more up-dates. If this fabric keeps the roots out all the way through the grow, you need to post a link to the exact stuff you bought.
My roots had that brownish tint as well. Unfortunately, I also had rot mixed in.
You are managing to keep the moisture level in the root zone much higher than I was able to do. You have condensation all over and I had none. Thats a good thing I think. My roots had a bad tendency to dry out - and die - as soon as they grew away from the membrane or way up the sides. Your's dont seem to have that problem.
One thing though - it looks like your paper clips are rusting/corroding. That crap will get down into your roots. Dont have any idea if it will harm the plant - or you - but it cant be all that good either.
You might try to find some plastic clips or maybe get some stainless wire and bend your own?
Looking forward to more up-dates. If this fabric keeps the roots out all the way through the grow, you need to post a link to the exact stuff you bought.
Dreddd
Well-Known Member
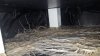
Thanks man, even if the fabric holds i dont have anything to link to as i basically went down to a hole in the wall fabric store and just bought something synthetic that looked right for the job, dont even know its name..i plan on building a bigger system soon and ordering proper ripstop this time.
about the clips, yeah getting super rusty, started seeing this happen even with the old fabric but didnt have the time to find plastic clips, hope it holds till the end without polluting my grow..
about the clips, yeah getting super rusty, started seeing this happen even with the old fabric but didnt have the time to find plastic clips, hope it holds till the end without polluting my grow..
Dreddd
Well-Known Member
Right, well overdue for an update, so, sprayed the plants with wettable sulfur, it seems to be keeping the mites in check as i dont see any progression, the plants are chugging along, tomatoes are getting bigger then i'd expect from a micro dawrf, usually the cherries are smaller then regular cherries but these are very nicely sized ones.Time for an up-date?? With pics")
I am starting to run into issues though, mainly climbing EC and dropping PH, i'd be very surprised if when this grow is over i wont find roots under the membrane as that would be the only explanation for these variables.. if roots have in fact breached the membrane then this is a construction issue and i'll have to revisit the system again, if not then the concept itself is flawed somehow, only time will tell.
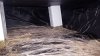


not that much to show, it feels like maybe the micro dwarf have reached their max height and are only focusing on fruit production now, seems like the roots have stopped growing as well, next run will be with a faster larger growing plant.
Last edited:
Thanks for the up-date.
Yeah, Andrew mentioned several times that finding a fabric that kept the roots out was one of the main challenges. IN my case, when I looked at the fabric closely with a USB scope, you could see flaws/gaps in the weave. My fabric has been in my junk closet for years, so its been abused to some degree, but I suspect any fabric could have flaws like that from handling and/or the mfg process.
Even if your roots have breached the membrane, the system is still pretty impressive as far as how much trouble and work to maintain it once its started.
Dreddd
Well-Known Member
Agreed, next system i plan on ordering proper ripstop fabric at the tightest weave possible, and also doing away with the plastic sub layer as Andrew implies that its unnecessary, and when i think about it, if i dont include a sub layer and just place the fabric directly on top of the felt buffer mat i can keep the nutrient solution lower then it is now, just touching the bottom of the buffer mat is enough since its basically a giant sponge, that way the wicking action can start at the buffer mat instead of at the membrane like in the current setup.Thanks for the up-date.
Yeah, Andrew mentioned several times that finding a fabric that kept the roots out was one of the main challenges. IN my case, when I looked at the fabric closely with a USB scope, you could see flaws/gaps in the weave. My fabric has been in my junk closet for years, so its been abused to some degree, but I suspect any fabric could have flaws like that from handling and/or the mfg process.
Even if your roots have breached the membrane, the system is still pretty impressive as far as how much trouble and work to maintain it once its started.

amedeo
New Member
Can you post some pics to make me figure it out better? Maybe also @Larry3215 could help me (I saw that you already grew successfully something with this method).
Thanks again, and sorry for the trouble!
Thanks again, and sorry for the trouble!
What are you using to make the holes and what type of seal are you using? Also, what type of container are you using?Can you post some pics to make me figure it out better? Maybe also @Larry3215 could help me (I saw that you already grew successfully something with this method).
Thanks again, and sorry for the trouble!
I dont do my stuff the same way most people do it. For smaller holes - 1/2" or under, I just drill a hole slightly smaller than the pipe and then forse it through the hole. Im using plastic storage totes from my local hardware supply and that works great for me.
For larger holes, I use male and female threaded plumbing fittings and metal and rubber washers. Drill the hole the correct size, then push the male fitting through the container wall, adding washers as needed. Then thread the female on from the inside - again with washers as needed.
Most people use bulkhead fittings, but you need to be able to drill nice clean holes of the exact size.
If you tried everything and it still leaks, then you're going to have to use some sort of sealant. Silicone for aquariums or a marine grade sealant like 3M 5200 will stop any leak. You have to drain and clean all surfaces though.
Attachments
-
 351.1 KB Views: 12