Still wasting money on bottled/packaged teas? Here's a simple DIY compost tea bucket

+ WitchDoctor +

Well-Known Member
When I first started growing, I was a attracted to bottled teas and dry packaged products as opposed to making my own compost tea because making my own compost sounded complicated enough, so I wasn't ready to tackle making my own system on top of that. But little did I know this was very easy and empowering to do. And so is composting. :mrgreen:

I'm not sure that this is even complicated enough to do to require a post on how to do it, and maybe it should be in the newb section....but I see so many people talking about different compost tea products that all suck, and I wasted some money on some of that garbage myself in the past, so hopefully this helps someone.

So I'm gonna break it down for you reeeallll easy-like.


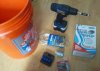
Here's what you'll need.
1 Five gallon bucket
Drill and 1/2 self drilling screws
Air Pump - https://www.htgsupply.com/Product-Single-Outlet-Air-Pump,-20-Gallon-Max.asp. I'm sure you can get one cheaper on ebay or something...
Aquarium Gang Valve - http://www.dog.com/item/accuair-gang-valve/720111/ You can buy one at any fish store.
Air Stone - from the hydro store, not the fish store
Plastic tubing - I wanna say it's 1/4"....either way, they sell that at the fish store or online aquarium supply store as well.
2012-04-24 11.40.56.jpg

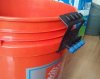
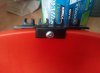
Step 1 - Use the drill to put a self-drilling screw through the gang valve and into the bucket, securing it in place.
2012-04-24 11.41.54.jpg2012-04-24 11.45.51.jpg

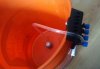
Step 2 - Cut an 18-20 inch section of tubing. Push one end onto the air stone and the other end to the output on the gang valve and secure it in place. Cut another piece of tubing to go from the input of the gang valve to the air pump. You will be able to aerate your tea this way for 24-48 hours allowing the fungi and bacteria to multiply.
2012-04-24 11.51.06.jpg2012-04-24 11.52.54.jpg

That's it. Seriously. Unless you want to make it harder somehow lol. Which could be fun.

Now as for the compost, worm-composting is super easy to do for almost anybody. You can order the worms online, as well as worm-composters. Or you can google DIY instructions on how to make your own with shit you have around the house....or you can just buy compost locally from a gardening store or farm.

Once you have your compost their are compost tea recipes all over these forums for you to try.

Right now I'm doing:
1 gal rain water
1 cup worm compost
1/2 cup Alaskan Forest Humus
1/2 cup worm castings
1/4 cup Alfalfa
1/4 cup Humic acid
1 TBSP of Organic Unsulphered Molasses or Agave Syrup

I put this together from a few other recipes I saw. I'm having good results, but I'm by no means any kind of expert about this stuff so definitely check out what other people are doing.

I also welcome anyone to contribute theirs here as well if you have a recipe you are proud of.

Thanks for reading!! :eyesmoke:
 

scroglodyte

Well-Known Member
good recipe. i use local forest humus, and homegrown castings. i find, what you put into your worms, is what you get out(no pun). the commercial worm guys feed the less nutritious goodies than i do.
 

+ WitchDoctor +

Well-Known Member
good recipe. i use local forest humus, and homegrown castings. i find, what you put into your worms, is what you get out(no pun). the commercial worm guys feed the less nutritious goodies than i do.
Thanks. I'm going to start using local forest humus too, what a great idea. See, it's almost impossible not to be sold on the idea that you need the stuff they sell you in bags and bottles. Here I am making AACT with bagged forest humus from Alaska when I've got forests not far from home! :-P

And what you put into the worms is definitely what you get back. I just set up a second worm-composting system specifically for high PK compost. I'm going to attempt to use this compost and it's teas as a flower booster.

looks legit, is there really a need for the gang valve tho?
Good point. No, but the one in the link I posted next to it is only a dollar something, so I think it's worth it to hold it in place. Technically the tubing doesn't really even need to be held in place. I wouldn't buy a pack of self-drilling screws just to make a bucket either if I didn't have an extra buck or two.

But then the instructions would only be one step lol.
 

+ WitchDoctor +

Well-Known Member
I imagine that a vortex brewer would perform much better, but I'm afraid I don't have an instrument to test for dissolved oxygen. There also seems to be some debate on how high to have the air pump turned up. Some people think that the more obnoxious bubbling will actually destroy some of the life in the tea.

I did find this link, however, it looks almost as if he turns off the air pump for the bucket right as he dips the instrument into the water...I could be wrong though.
http://www.progressearth.info/videos/dissolved-oxygen-do-vortex-brewer-vs-the-bucket/

Thanks for the question, sorry I don't have an answer. If you can afford a vortex brewer I'm sure the results are much better. I would buy one if I had the money and start trying to sell some tea cheap to pay for it. :lol:
 

+ WitchDoctor +

Well-Known Member
they use a vortex in my local HTG supply. sell it for a $1 a gallon or free on tuesday n thursday.
Yep, theres an HTG right by me as well. It's free if you bring your own container, $1 if you don't. But teas like that are EXACTLY why I made this post. Don't get me wrong, that tea is still good stuff, AND it's free, so you really can't beat that....unless you make your own compost tea at home which is also free and much more beneficial to your plants! :eyesmoke:

I pick up a couple gallons of their "stump tea" every couple weeks just to use something different, and it also has a myco product in it as well. I use two types of myco already, but I feel like it can't be bad to have more.

But the bottled tea products sitting on the shelves lack all the beneficial microbes that require oxygen, and that's what they use at HTG and most if not all of the other hydro stores that offer compost tea.

I promise that ANYONE can make one of these buckets for less than $20, or free if you've got the stuff lying around. And it's free and totally easy to make your own compost or worm-compost, not to mention great for the Earth.
 

TrynaGroSumShyt

Well-Known Member
i made mine with just a pump n bucket. n some casting guanos n such. i'm new at this. but they also told me in htg that there tea is not for feeding, just to add nmicrobes n such into your soil, Even said it is a good base for your own tea, its has very low NPK
and do sinclue myco like you said. i used it to make my first tea last week, now im on my second batch and i tweak my recipe and i actually got foam this time, last time i did not.
 

+ WitchDoctor +

Well-Known Member
Hell Yea, you got TONS of foam! Lol. Yea that's what's up man. I don't use any guanos though in mine, my compost has almost all of my nutrients. Have you looked into making your own worm bin for your own worm castings?? It's super fuckin' easy, and homemade worm-compost is WAAAYYYY better than the castings we buy at the hydro store. It's literally about as simple as drilling some holes in the bottom and top of a bin, throwing in some red wigglers or earthworms, and throw in some shredded paper and fruit and veg scraps. It's actually fun.

I use worm-compost 360's, which make it way easier for me to make a lot of compost fast. We juice everyday as well, so we have TONS of fruit and veg scraps. So every two weeks my worms turn about 20 lbs or so of food scraps into organic nutrient-rich compost, ALIVE with all kinds of beneficial organisms. I still use a little store bought castings in my tea as well, and I use the store bought castings in my soil mix too because I can't make enough worm compost to keep up with my soil mixes.
 

TrynaGroSumShyt

Well-Known Member
Hell Yea, you got TONS of foam! Lol. Yea that's what's up man. I don't use any guanos though in mine, my compost has almost all of my nutrients. Have you looked into making your own worm bin for your own worm castings?? It's super fuckin' easy, and homemade worm-compost is WAAAYYYY better than the castings we buy at the hydro store. It's literally about as simple as drilling some holes in the bottom and top of a bin, throwing in some red wigglers or earthworms, and throw in some shredded paper and fruit and veg scraps. It's actually fun.

I use worm-compost 360's, which make it way easier for me to make a lot of compost fast. We juice everyday as well, so we have TONS of fruit and veg scraps. So every two weeks my worms turn about 20 lbs or so of food scraps into organic nutrient-rich compost, ALIVE with all kinds of beneficial organisms. I still use a little store bought castings in my tea as well, and I use the store bought castings in my soil mix too because I can't make enough worm compost to keep up with my soil mixes.
Ive not tried making a worm bin since going organic. But i tried awhile back. I have tons of worms in my yard that are easily accesible. Is there a DIY bin?
 

+ WitchDoctor +

Well-Known Member
Ive not tried making a worm bin since going organic. But i tried awhile back. I have tons of worms in my yard that are easily accesible. Is there a DIY bin?
I just searched the site and didn't find anything. I'll just DIY it for you right now man, the first bin I made was really easy and worked fine until I switched to a stackable unit. If you try this out and find you like doing it you'll probably want to get a stackable one.

Take a plastic storage bin, preferably a shallow one, but anything is fine.

Drill some some 3/16 inch holes on the bottom of the bin. This is incase you over moisturize the bin so that the water can escape. It will also leak out compost leachate from the bottom of that, so you want to put in on top of another bin or bin lid or something to catch this liquid. You can make tea just from the liquid that's foamier than ever.

Drill some 3/16 inch holes in the lid that goes on top of the bin as well for oxygen to get in and gases to escape. (Don't worry it doesn't smell. I've around 7000 worms composting lol.)

Put a layer of newspaper on the bottom of the bin. Mist it lightly with water from a sprayer bottle.

Put a few handfuls of shredded paper or cardboard in there and moisten that as well

Now you can throw in food scraps. Pretty much anything you eat can go in there, but the worms don't like chemicals, so it takes them a longer time to break down non organic food. And don't put processed foods, meat, or dairy in there either. But fruit and veg scraps, rice, beans, all that kind of stuff is good. 1 pound of red wiggler worms can eat 3.5 lbs of food waste a week, so make sure you don't put more in there than the amount of worms you have can eat. I'm not sure how much earth worms eat.

After I put in food scraps I throw some coco coir and some more moistened newspaper shreddings on top of the food scraps, that way it doesn't stink up and the worms stay mostly hidden and work faster.

That's literally it. There's info all over the internet though about how to keep up on it and stuff, but that's basically it. Once they've composted what's in there add more. Once you get about 3 or so inches of composted castings you can scoot it to one side of the bin and then set up the other side of the bin just like you originally did. After a week or two the worms will have migrated to the new area so that you can harvest the other side.

It's pretty simple. But what's cool about stackable ones like the 360 is that the worms climb up into the next stack so that when the bottom stacks are finished you can just remove them and there's usually not much for worms to pick through.
 

bamfrivet

Well-Known Member
I saw a video a while ago where a guy made his own worm bins with 2 styrofoam ice coolers. In the bottom one he cut a hole and put a 2litter bottle sticking out of it, so he could easily drain the worm juice out.

Another way to harvest the castings is to take some of your worms and composting out on a sunny day, cover part of it with news paper to give them shade and then kinda mix the part exposed to the sunlight, so that the worms dig down in it, pushing the castings out behind them.
 

ugmjfarmer

Well-Known Member
I spent a few more bones on mine. I use two 12" eco-plus flexible air diffusers coiled in the bottom of the 5gal bucket, two 4" eco plus air stones, one for the bottom, one for the bag, and I use a 390GPH Air pump. the more air you have, the more microbes you can make.
 

+ WitchDoctor +

Well-Known Member
I saw a video a while ago where a guy made his own worm bins with 2 styrofoam ice coolers. In the bottom one he cut a hole and put a 2litter bottle sticking out of it, so he could easily drain the worm juice out.

Another way to harvest the castings is to take some of your worms and composting out on a sunny day, cover part of it with news paper to give them shade and then kinda mix the part exposed to the sunlight, so that the worms dig down in it, pushing the castings out behind them.
I like that bin idea! And do the worms move away from the castings during the same day under the sun with the bin part covered?

How will i sift the castings from everything else?
Oh, the castings and the compost are one and the same my friend. If you cut up or shred up the food into smalll pieces they can compost it super fast. The only thing you have to worry about sifting away is any worms that are still in the compost. If you have good compost they will lay eggs and you'll see teeny tiny little worms too that might have to get picked out a little.

I spent a few more bones on mine. I use two 12" eco-plus flexible air diffusers coiled in the bottom of the 5gal bucket, two 4" eco plus air stones, one for the bottom, one for the bag, and I use a 390GPH Air pump. the more air you have, the more microbes you can make.
So you don't feel like too much air from the air pump could destroy the microbes you are trying to create? I've been under the assumptions that there's a certain amount of pumped air that is probably more beneficial, but I would have no idea what amount of air that would be. I actually have a dual pump on one bucket so I turn it down halfway...so do you think I should let it go full blast?
 

FR33MASON

Active Member
Do you have a check valve on your airline? That is way more important than a gang valve IMO. You could also put 4 or 5 loops of the airline at the buckets rim or higher. I don't wanna see a grown person cry over spilled tea ;-p
 

+ WitchDoctor +

Well-Known Member
Do you have a check valve on your airline? That is way more important than a gang valve IMO. You could also put 4 or 5 loops of the airline at the buckets rim or higher. I don't wanna see a grown person cry over spilled tea ;-p
Check valve is a great idea. The gang valve is more for adding extra lines and airstones, which I assume most people would want to do after making the bucket. I just wanted to make it simple for the people that still think it's complicated.

And lol, yes, spilled tea is yucky. :spew:

By the way, I'm only recommending making 1-2 gallon batches of tea in this bucket, as that amount can be diluted with 15-30 gallons of water. If you need more than 30 gallons of water, then by all means make more than 2 gallons...but I never mix a gallon of tea with less than 5 or 6 gallons of water.
 
Top