stan'sdad
Member
here we go first diy. when I set out to make this cool tube i didnt plan on making this diy, but it went so well and was soo easy I decided I have to.
Ill start with supplies:
~tall glass tube vase from ac moore / michaels- 16$
~two 4" hose clamps- $2 (comes with some flex duct packages)
~4" flexible duct, prefereably black on the inside as to keep the light from pouring out your vents- $14
~15"x20" piece of sheet metal-$5
~1/16"x1/2"X3' flat aluminum bar (this can have substitutes i found this to work extremely well)- $2
~cord and mogul socket (or whatever you may have)
~yarn or string
~some gas, kerosene or alcohol
Tools
~Pliers
~Tin snips
~A few rags
~5/32" drill bit and drill
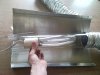
Well start with the hardest part, the tube cutting. Now, there are many ways to cut a tube including, scoring, grinding and heating. However not all of us have tile saws or tube scorers, so I went with the string / water method.
Warning!! this is dangerous and should be handled with care and patience!
Here is a much better tutorial than i can give.
[video=youtube;Y9etHD9F90E]http://www.youtube.com/watch?v=Y9etHD9F90E[/video]
Mine actually broke in two places, but turned out just fine!
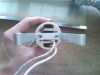
Ok, now for our socket setup!
We will begin by drilling holes in our flat aluminum bar to screw the socket to. (mine is already bent correctly in these pictures)
Next we need to determine how far down the tube we want the bulb to sit, My tube is plenty long for a 400w hps so I have some leeway to just eye it.
Once we find where we want our bulb to sit, we can make the bends in the aluminum. Using pliers or a crescent wrench will make nice creases and clean bends. NOTE: if using aluminum you will get one chance at bending, it will break if bent back.
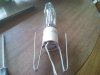
Next part to make is our hangers, or what we will suspend the light by. Once again use the flat aluminum, it works so well. Just bend about a 2" piece into a squared off "J" shape, then drill a small hole in the top of it.
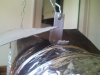
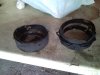
Now you can go right ahead and assemble this bad boy if you already have a reflector, if not, i made a pretty decent one with just sheet metal. For this I cut a 3/4" wide slot down 1 3/4" deep on each end of the sheet metal, then bent them in an L shape to attach under the hose clamps. The bend of the reflector is totally up to you, depending on what kind of foot print you want. This reflector will be painted white, maybe covered in mylar if the temps stay low enough. (mylar is flammable)
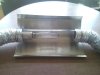
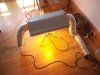
There ya have it, Assembly is as shown, just slide the flex over the tube with the socket in place, then slide the hose clamp over the light hooks/ reflector tabs and snug down, dont try and tighten too much! just enough to make it fairly solid.
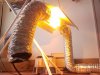
Finally you have a gorgeous lookin cool tube! Im really impressed with how solid this is and how well it works!
Any questions or comments please come forth! This is my first DIY post so feel free to let me know where I need improvement.