+ WitchDoctor +
Well-Known Member
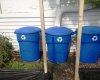
This was the first time I've ever made or used rain barrels, so I suppose this is more of a journal than a DIY, but I'm going to share it with you anyways. It took me less than 3 hours to make a 3 barrel system to collect rain. There are many benefits to using rain water in your gardens or homes, so before I start with the instructions I'm going to copy/paste a little basic info about these benefits.
Method

Rainwater is formed by the evaporation of the oceans and inland bodies of water. When the moisture condenses, it collects sulfur, which is essential to the formation of plant aminoacids.
Essential Elements

Rainwater is high in nitrogen, a key constituent in chlorophyll, the greening ingredient essential to the production of carbohydrates through photosynthesis.
Chemical Process

When lightning strikes during a rainstorm, it causes nitrogen in the atmosphere to combine with hydrogen, creating an important fertilizer for plants that is then carried by the rain into the soil.
Other Processes

Rainwater captures the dust carried on air currents and delivers it to the soil. This dust contains important minerals and microorganisms that contribute to the breakdown of organic compounds into plant nutrients.
The Alternative

Tap water contains salts, chlorine, fluoride and other chemical treatments that are harmful to plants.
So there you go. Now here's what I did with mine....These instructions are for Rubbermaid Roughneck barrels by the way, and everything I bought was from Home Depot. I don't like this store, but it's hard for me to get around and they had everything I needed. If you have access to a plastic barrel that was used for food grade materials, you are probably better off using that instead, and these instructions would apply the same way.
What you need -
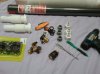
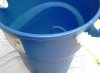
Step 1 - Use an 11/16 paddle bit to cut a hole about 3-4 inches from the bottom of the can. Do this on the opposite side of the can as well, in the same spot.

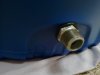
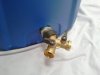
Step 2 - Take PVC 3/4" to 1/2" Female to Male adapter (I think that's what it's called..) and put a rubber hose washer on it. Thread adapter through from the inside of the can. I held a lighter at the hole for a few seconds just to soften it up a little first. You have to put a lot of pressure on it as you are turning though. I held it down with my palm and turned it to the right and used my left hand to hold it in place while I lifted my palm up for another twist. After a few turns it won't pop back out. It's important not to mess this part up though. Keep turning it until it won't turn anymore. The washer should be TIGHT against the can. Repeat this step with the hole on the other side of the can.


Step 3 - Put a rubber washer on the outside threads of PVC adapter as well. Then take 3/4" x 1/2" Hex Bushing and carefully twist that boy on. If you mess up the threads on the PVC adaper you'll have to take it out and use another one. I messed the first one up lol. Grab an adjustable wrench or pliers and tighten bushing while holding the PVC adapter from the inside. It should be tight enough that the bushing is smashing the washer against the can. Repeat this step on the other side of the can as well.

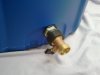
Step 4 - Put a shut off coupling on the front and a 2-way shut off coupling in the back. The one in the front will connect to your hose or run water into your can or bucket. The 2-way on the back is going to connect to the roughneck cans on either side of it. (You can use more than 2 cans or barrels if you'd like. You can use as many as you want to.)
Step 5 - Repeat steps 1-3 on the other two roughneck cans but ONLY ON THE BACKSIDES OF THE CANS! You absolutely DO NOT want to drill a hole on the front side, unless you want to have to put another shut off coupling on them. Then connect a 3 foot hose from each side of the 2-way coupling to the bushings on the other cans. If you want to use more cans in a series, just use a 2-way on the cans next to it and so on. It will create additional pressure going to the middle can anyways. Nothing wrong with that.
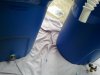
Step 6 - Using a 1 3/4" paddle bit cut a hole on both sides of the middle can, just behind the handles towards the back as in the pic, about 4 inches from the top of can. Then cut a hole in the same fashion on the other 2 cans on the sides facing the middle can, about 5 inches from the top of the can. You're going to run 1 3/4" PVC or plastic tubing of some sort from the middle can to the other two, so that when the middle can fills up with water it fills into the other cans next.

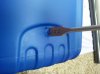
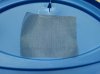
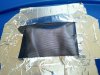
Step 7 - Trace around your piece of flexible gutter (or if draining straight into can from aluminum gutter just make a hole big enough for water to enter in from gutter). Use a razor knife to cut the shape you want out of the can. Then cut 6"x6" piece of screen (screen door replacement rolls work fine) and attach it to the inside of the can. I used HVAC tape, which seems like a great idea to me, I'll edit this post if it doesn't hold up for some reason though.


Step 8 - Make sure all the cans are clean on the inside, then put the lids on tightly. Connect your cans or barrels together at the bottom with 3' hoses and keep them shut off. Make sure the coupling on the front of the middle can is shut off as well. Now when it rains the middle can will fill up first and then fill up the cans next to it. When you are ready to use the water just open the shutoffs on the back and then the front.
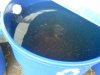
It rained for less than an hour this morning and I filled the first can completely and the other 2 cans halfway. That's 60 gallons of free water for my garden...just from the garage!!!
You should put the cans on cinder blocks or something so that they are at least a foot off the ground. I'll have to empty my cans first lol.
Have fun and SAVE THE EARTH!!
Method

Rainwater is formed by the evaporation of the oceans and inland bodies of water. When the moisture condenses, it collects sulfur, which is essential to the formation of plant aminoacids.
Essential Elements

Rainwater is high in nitrogen, a key constituent in chlorophyll, the greening ingredient essential to the production of carbohydrates through photosynthesis.
Chemical Process

When lightning strikes during a rainstorm, it causes nitrogen in the atmosphere to combine with hydrogen, creating an important fertilizer for plants that is then carried by the rain into the soil.
Other Processes

Rainwater captures the dust carried on air currents and delivers it to the soil. This dust contains important minerals and microorganisms that contribute to the breakdown of organic compounds into plant nutrients.
The Alternative

Tap water contains salts, chlorine, fluoride and other chemical treatments that are harmful to plants.
So there you go. Now here's what I did with mine....These instructions are for Rubbermaid Roughneck barrels by the way, and everything I bought was from Home Depot. I don't like this store, but it's hard for me to get around and they had everything I needed. If you have access to a plastic barrel that was used for food grade materials, you are probably better off using that instead, and these instructions would apply the same way.
What you need -
Step 1 - Use an 11/16 paddle bit to cut a hole about 3-4 inches from the bottom of the can. Do this on the opposite side of the can as well, in the same spot.
Step 2 - Take PVC 3/4" to 1/2" Female to Male adapter (I think that's what it's called..) and put a rubber hose washer on it. Thread adapter through from the inside of the can. I held a lighter at the hole for a few seconds just to soften it up a little first. You have to put a lot of pressure on it as you are turning though. I held it down with my palm and turned it to the right and used my left hand to hold it in place while I lifted my palm up for another twist. After a few turns it won't pop back out. It's important not to mess this part up though. Keep turning it until it won't turn anymore. The washer should be TIGHT against the can. Repeat this step with the hole on the other side of the can.
Step 3 - Put a rubber washer on the outside threads of PVC adapter as well. Then take 3/4" x 1/2" Hex Bushing and carefully twist that boy on. If you mess up the threads on the PVC adaper you'll have to take it out and use another one. I messed the first one up lol.
Step 4 - Put a shut off coupling on the front and a 2-way shut off coupling in the back. The one in the front will connect to your hose or run water into your can or bucket. The 2-way on the back is going to connect to the roughneck cans on either side of it. (You can use more than 2 cans or barrels if you'd like. You can use as many as you want to.)
Step 5 -
Repeat steps 1-3 on the other two roughneck cans but ONLY ON THE BACKSIDES OF THE CANS! You absolutely DO NOT want to drill a hole on the front side, unless you want to have to put another shut off coupling on them. Then connect a 3 foot hose from each side of the 2-way coupling to the bushings on the other cans. If you want to use more cans in a series, just use a 2-way on the cans next to it and so on. It will create additional pressure going to the middle can anyways. Nothing wrong with that. Step 6 - Using a 1 3/4" paddle bit cut a hole on both sides of the middle can, just behind the handles towards the back as in the pic, about 4 inches from the top of can. Then cut a hole in the same fashion on the other 2 cans on the sides facing the middle can, about 5 inches from the top of the can. You're going to run 1 3/4" PVC or plastic tubing of some sort from the middle can to the other two, so that when the middle can fills up with water it fills into the other cans next.
Step 7 - Trace around your piece of flexible gutter (or if draining straight into can from aluminum gutter just make a hole big enough for water to enter in from gutter). Use a razor knife to cut the shape you want out of the can. Then cut 6"x6" piece of screen (screen door replacement rolls work fine) and attach it to the inside of the can. I used HVAC tape, which seems like a great idea to me, I'll edit this post if it doesn't hold up for some reason though.
Step 8 - Make sure all the cans are clean on the inside, then put the lids on tightly. Connect your cans or barrels together at the bottom with 3' hoses and keep them shut off. Make sure the coupling on the front of the middle can is shut off as well. Now when it rains the middle can will fill up first and then fill up the cans next to it. When you are ready to use the water just open the shutoffs on the back and then the front.
It rained for less than an hour this morning and I filled the first can completely and the other 2 cans halfway. That's 60 gallons of free water for my garden...just from the garage!!!
You should put the cans on cinder blocks or something so that they are at least a foot off the ground. I'll have to empty my cans first lol.
Have fun and SAVE THE EARTH!!
Attachments
-
93.4 KB Views: 2
-
95.1 KB Views: 2

 That system's gonna take care of the garden all year. I'm gonna shop for a 500 gallon container next week to put on the side of the house and run into the laundry room. We use about 400 gallons of water a week for laundry...fucking crazy.