hazey grapes
Well-Known Member
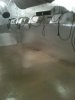
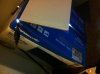
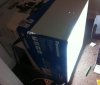
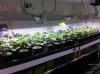
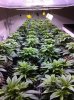
OK... i got off my lazy ass and took a quick pic of the setup before it's up and running so as not to keep anyone in suspense and maybe give someone ideas for quick setup & teardown on the cheap setups
View attachment 2047506
WARNING: the following text was copied and pasted from me sharing this same info in my grow report thread for those of you who get their panties in a bunch over re-reading copied and pasted text and you troll who you are.
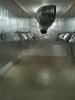
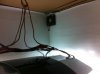
when they're up and running, the ducts will start with a DIY carbon scrubber on the intake feeding one of the lights & then the other into my soler & palau fan probably with a DIY combo muffler & light shield with cool air being drawn in at the bottom using convection.
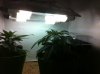
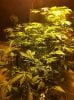
i'll be hanging the 2 SCROG screens i've started building from the frame holding the lights as well as building flat white reflectors that are flush to the edges of the screens and nearly flush with the lights for maximum reflection and diffusion and hopefully shielding some light leakage.
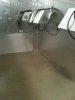
the spare room is kind of small so i'll have to squeeze past the black wire rack to get to the back side of the screen for watering and managing the SCROG. that's the best tech to use with a mixed strain grow as well as being a pretty good supercropping tech too.
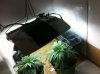
in the background you can see the mylar insulation blocking most light leakage with a cardboard frame with a foil gasket blocking some more leakage behind it. there's boxes on each side of the window there to push the mylar against the wall as well as some freestanding 2x4s in the middle. it's very low tech, but designed to be tore down quickly in an emergency as well as put up in the first place after learning how much of a pain doing it with 100 or so thumbtacks last year.
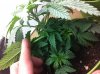
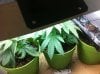
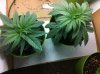
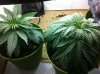
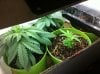
this is me talking live again... i hope the mixed lighting combo works well, particularly in the middle, but i intend to spread a couple of the strains, particularly the thai skunks of which i might have as many as 11 to see how they perform under each light and share that info. i ALMOST bought a second sodium that i was going to put on the other side of the halide, but i'm only using 3 foot squares and aiming for max efficiency which should be easy with SCROGging. i KNOW i'll get some good smoke as i've already done it under just the halide, but the sodium is clearly brighter. i've always leaned towards halides in theory for having less infrared and more near UV even if sodiums put out more lumens and i bet heat too. i think the secondary reflectors should really make the most of both lights. the screens are actually 3 feet "long" (sideways), but something like 2 3/4" wide for slightly better coverage between lights and because that's all the space i have
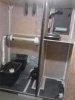
i hope you can easily figure out what's what from the pic. the vertical board on the lower right side is a 3rd bookshelf that was used in my original grow room and will now be used to elevate the fan & point it's exhaust out of the room. it's a little creaky and i didn't want to strain it even more with a second light but it wasn't as bogus as the fake ass might as well been made out of tinfoil garage shelf unit i bought at whoremart that fell apart if you looked at it suspiciously and exploded if you tried to move it. the new wire shelf units kick much ass and aren't going anywhere and were worth $50 a pop even if i couldn't get matching chrome. they aren't as sturdy as REAL restaurant shelf units, but i don't plan on putting a ton of institutional sized canned goods on them.
speaking of heavy duty... i like my heavy duty light lifts. they click like a mofo when raising your lights unlike regular ones and will let your light drop if you're not careful with the release button, but i know they aren't going to be breaking any time soon.
anyways... thanks for visiting me humble abode & remember to ducka you head on the way out (obscure bugs bunny reference)
View attachment 2047506
WARNING: the following text was copied and pasted from me sharing this same info in my grow report thread for those of you who get their panties in a bunch over re-reading copied and pasted text and you troll who you are.
when they're up and running, the ducts will start with a DIY carbon scrubber on the intake feeding one of the lights & then the other into my soler & palau fan probably with a DIY combo muffler & light shield with cool air being drawn in at the bottom using convection.
i'll be hanging the 2 SCROG screens i've started building from the frame holding the lights as well as building flat white reflectors that are flush to the edges of the screens and nearly flush with the lights for maximum reflection and diffusion and hopefully shielding some light leakage.
the spare room is kind of small so i'll have to squeeze past the black wire rack to get to the back side of the screen for watering and managing the SCROG. that's the best tech to use with a mixed strain grow as well as being a pretty good supercropping tech too.
in the background you can see the mylar insulation blocking most light leakage with a cardboard frame with a foil gasket blocking some more leakage behind it. there's boxes on each side of the window there to push the mylar against the wall as well as some freestanding 2x4s in the middle. it's very low tech, but designed to be tore down quickly in an emergency as well as put up in the first place after learning how much of a pain doing it with 100 or so thumbtacks last year.
this is me talking live again... i hope the mixed lighting combo works well, particularly in the middle, but i intend to spread a couple of the strains, particularly the thai skunks of which i might have as many as 11 to see how they perform under each light and share that info. i ALMOST bought a second sodium that i was going to put on the other side of the halide, but i'm only using 3 foot squares and aiming for max efficiency which should be easy with SCROGging. i KNOW i'll get some good smoke as i've already done it under just the halide, but the sodium is clearly brighter. i've always leaned towards halides in theory for having less infrared and more near UV even if sodiums put out more lumens and i bet heat too. i think the secondary reflectors should really make the most of both lights. the screens are actually 3 feet "long" (sideways), but something like 2 3/4" wide for slightly better coverage between lights and because that's all the space i have
i hope you can easily figure out what's what from the pic. the vertical board on the lower right side is a 3rd bookshelf that was used in my original grow room and will now be used to elevate the fan & point it's exhaust out of the room. it's a little creaky and i didn't want to strain it even more with a second light but it wasn't as bogus as the fake ass might as well been made out of tinfoil garage shelf unit i bought at whoremart that fell apart if you looked at it suspiciously and exploded if you tried to move it. the new wire shelf units kick much ass and aren't going anywhere and were worth $50 a pop even if i couldn't get matching chrome. they aren't as sturdy as REAL restaurant shelf units, but i don't plan on putting a ton of institutional sized canned goods on them.
speaking of heavy duty... i like my heavy duty light lifts. they click like a mofo when raising your lights unlike regular ones and will let your light drop if you're not careful with the release button, but i know they aren't going to be breaking any time soon.
anyways... thanks for visiting me humble abode & remember to ducka you head on the way out (obscure bugs bunny reference)