Rubbermaid Grow DIY Instructions

blueberrydreams

Well-Known Member
This is my first grow using two 22gal rubbermaid tubs. Please hold comments until i'm done explaining how to build this setup. This is just my version of this, i'm sure there are multiple ways to complete this project, but i will show you how i did it. I've decided on growing two top44 plants as i saw it is good for beginners like myself.
 

blueberrydreams

Well-Known Member
Here is a list of the items that i used for this setup, it is not quite complete. The only items left out from this list are seeds, an external fan or cooling system, and weatherstripping
The Tools that will be needed for this are as follows: Dremel, exacto knife, wire stripper and some time on your hands :) :) :)

For the list see attached word document.
 

Attachments

blueberrydreams

Well-Known Member
First we start with the light bar, y adaptors, electrical tape, 550 cord or shoelaces, power cord for electrical tools(already stripped wires, three wire) and 6 cfl lights.

take the power cord and sand down the edges of the end of the black coating the wires. You will need to sand this down to fit into the hole in the back of the bath bar as shown below.

attach wires as shown below, or follow the instructions that come with the bath bar :) :)

after all connections have been secured and wrapped in electrical tape, turn the bath bar over and attach two long pieces of 550 cord or shoelace(this will be used for the suspension of the lights)
and attach them to the holes on both ends of the light bar.

after this has been completed, put light bar together and attach y adaptors and cfl lights. Ta Da now your lights are ready to go
 

Attachments

blueberrydreams

Well-Known Member
Next up will be the carbon scrubber, i followed the instructions from this thread
https://www.rollitup.org/do-yourself/58871-2-minute-cheap-easy-carbon.html

Here are pictures of the items i used, I used a dryel sheet as a barrier instead of the bag, because i purchased a bottle of activated carbon.
Note: I have been using this to blow my smoke through the past couple weeks, and it completely masks the smell of marijuana, so i have high hopes for the grow :) :)
 

Attachments

blueberrydreams

Well-Known Member
Now for the containers, i used 22 gallon sterilite containers. They have larger sizes, but because of space i decided on the 22 gallon ones. First we line them with mylar i used an emergency blanket. I started with the bottom piece first then cut pieces for the sides. I then attached pieces of tape to the inside of the container, and pulled the mylar tight against the tape. Continue this until all sides are covered. See pics below

Now that the inside is complete we need a way for the lights to hang. To do this we have to make three holes in the top for the two pieces of 550 cord or shoelaces and the power cord of the light bar. I used a dremel with a drill bit for the 550 cord, and to make the hole for the power cord i traced the shape of the power cord on the top of the tub and cut with a dremel cutting wheel.
 

Attachments

blueberrydreams

Well-Known Member
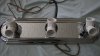
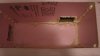
For the intake i had some problems with heat, and thanks to advice by jdub240 i decided to make a cooler based on this design.
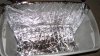
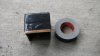
Make a well-insulated travel cooler
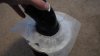
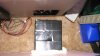
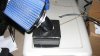
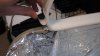
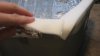
As you can see from the pic i cut out two holes in the cooler for intake into the tub and to mount the fan to push air through. I also used a water resistant foam sealer to seal all the walls and make sure it was airtight. If possible use a table saw or hot wire cutter, i used a utility knife, and it turned out looking like crap :) :) 
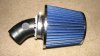
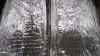
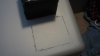
oh well it works and keeps the temp inside the cooler at 32 degrees exactly :) and it's dropped my initial temps by almost twenty degrees.

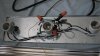
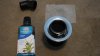
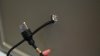
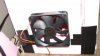
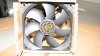
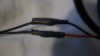
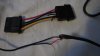
For the exhaust i had to make my own bracket to fit the computer fan into, and allow a pvc pipe to fit onto the other side for my carbon scrubber. This was achieved using cardboard and some gorilla duct tape(amazing product).
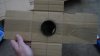
First we trace the size of the computer fan onto a piece of cardboard, after that it is important to decide on the size of the duct needed. Once the size is determined trace straight lines from each corner of the fan, there should be a pair of parallel lines on four sides of the fan. Now we cut this piece out. See Pics

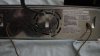
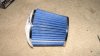
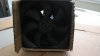
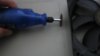
After the lines have been cut for the fan, take the piece of pvc, abs or similar piping that will be used, and trace the shape into the middle where the computer fan was just at. Proceed to cut this piece out. Test fit the piping to make sure there is a snug fit, remember it is better to cut the hole too small rather than too big. You can always sand it to a bigger size.

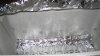
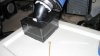
Now we fold the sides of the cardboard into a square shape, and place the computer fan at the square end and duct tape the sides tight around the fan. Ta da completed DIY Duct work, it stays very well sealed, and is easy to make.
 

Attachments

blueberrydreams

Well-Known Member
Now that the intake and exhaust fan housings have been completed, it is time to make some holes to attach them to the grow box.
For this i used a dremel with a cutting wheel attachment. I first traced the computer fan onto the outside of the container.
After that it is cutting time, make sure to cut the square smaller than needed as you can sand it to the perfect fit. After the cuts have been made a quick test fit, and some sanding for a tight snug fit and it is complete
 

Attachments

blueberrydreams

Well-Known Member
For the fans i purchased a four fan controller and mounted it to the side of the tub using double sided padded tape. Since this controller needs power, i spliced the ends of a 12v power cord to the power wires on the controller. Make sure to secure the wires with electrical tape. To allow the removal of the top tub i had to add additional length in the wire for the exhaust. I did this by purchasing RadioShack.com - Cables, Parts & Connectors: Wire: Hookup wire: 75-Ft. UL-Recognized Hookup Wire (22AWG)
from radioshack and splicing the wires to the desired length.

To make sure that the tub is sealed i used some 1 1/2 in sealed polyfoam weatherseal from a local box store. Attach pieces to the edges following the instructions on the package to each of the tubs and when the tubs are placed on top of eachother it will create a sealed chamber inside. Be sure to overlap pieces to ensure a good seal.

Now that the construction is complete please feel free to leave comments or suggestions :) :)
Peace and happy toking
BlueberryDreams
 

Attachments

blueberrydreams

Well-Known Member
Sorry for taking so long to actually post some pics, but here are some through the different stages, i am now on the third week of flowering. I burnt the shit outta the plant and made some other beginner mistakes, but i hope to pull at least a couple grams outta this grow, and the knowledge i have gained is irreplaceable. Couple more weeks and i start again :) :) :)
 

Attachments

blueberrydreams

Well-Known Member
Harvest Time, i ended up getting 31 grams exactly wet weight.
After drying for about a week the weight was at 6.3 dry. Although i probably smoked a gram or two while it was drying :) :)

Not great i know, but give me a break for my first time with only one female plant i was very happy. I didn't think they would stay as small as they did now.

I have learned a tremendous amount from this grow and next harvest will be much better.

For all those that haven't tried Top44 i must say that i was pleasantly surprised. The entire grow i didn't have to use any filtration, that's right absolutely NOTHING. The smell was Amazing it was citrusy smelling with a very slight skunky smell. And the smell wasn't very strong even during harvest.

After drying and curing the smoke was a bit harsh, but wow i got really fucked up on about a half a bowl. Even my friends said that this was some of the best shit they have smoked, and we've tried about 10 different good strains so far.
Besides being a little harsh this strain is pretty damn good. I would recommend it for new growers

I give it an 8 out of 10 overall
 

Attachments

Top