NinjaShamen
Well-Known Member
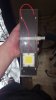
How far do you like to space your cobs? I'm running 800watts (4 200 watt timber cbc kits) 8'x3'Decent kit for the money. I prefer a little bit more spread between cobs though.
Attachments
-
 388.6 KB Views: 23
How far do you like to space your cobs? I'm running 800watts (4 200 watt timber cbc kits) 8'x3'Decent kit for the money. I prefer a little bit more spread between cobs though.
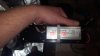
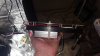

Did you use flux?The soder came undone
idk if it's me or what I mean I know I don't know how to soder I get the gist but I've never done it. Regardless of my skills though I had 1 guy who does telecom shit take a crack at it and he couldnt get the soder to stick to the cob and another who does plumbing try and he got the soder to stick to the cob but couldn't soder the wire to it.
Anyone have suggestions?
And I haven't seen the fan in the 3 cob kit move in days... I'll re check the connections I guess
I takes me about a hour to get to rapiedledYeah, I'm one of the rare, fortunate RIU members that happens to live within a 20 minute drive from Timber. Good luck with your light - it'll be a beast in a small space.


Build yourself $1.00 per wattI thought about going with timber because you can space it out better but it costs more....because you can space it out more... I haven't had much play with cobs yet but I would definitely like space these out more then 6in apart on a 20 in heatsink.
This was mearly me sticking my toe in the water. Like sixstring said im addicted now lol
Find telecom guys and plumbers that know how to solder!The soder came undone
idk if it's me or what I mean I know I don't know how to soder I get the gist but I've never done it. Regardless of my skills though I had 1 guy who does telecom shit take a crack at it and he couldnt get the soder to stick to the cob and another who does plumbing try and he got the soder to stick to the cob but couldn't soder the wire to it.
Anyone have suggestions?
Do you realize that you're responding to an almost 2 year old post?Find telecom guys and plumbers that know how to solder!")
Tinning is basically pre-coating the parts with solder. A clean, tinned tip is needed for good heat transfer.
https://www.instructables.com/id/Soldering-101:-Lesson-1:-Tin-the-Tip/
It sounds like insufficient heat, what size soldering iron?
Well the last time pockitsPM was around was Jan. 1 so you could be waiting a bit on that reply...Does that bother you? BTW, the last prior post was 5:11AM today. Have a nice day.
We were all talking amongst ourselves. Better we do it in a like minded topic rather than on something totally off the wallWell the last time pockitsPM was around was Jan. 1 so you could be waiting a bit on that reply...
I'm sure the op appreciates your help. He can finally get that soldering work done.Does that bother you? BTW, the last prior post was 5:11AM today. Have a nice day.