Puanatats' T5 Indoor Grow (Nat & White Widow Seeds) Have a Look

Puanatat

Member
Hey hey. I'm from Australia. This is my 3rd grow and I'm psyched to get started. Feel free to say or ask whatever you want.

Initial Information:
Germination Date – 28/7
Seeds – White Widow and Natural Buds (both from close friends)
Medium – Soil in 4 Main 11L pots
Lighting – T5 Globes with electronic ballasts, 7 x 22W & 4 x 40W (total power 314W)

Soil:
Mix of general garden soil, stones, volcanic rocks, vermiculite & perlite.

(Parts in Volume not Mass)
-4 Parts Organic Garden Soil produced by Brunnings
-1 Part Proganics Premium Vermiculite
-1 Part Proganics Premium Perlite
-0.125 Parts Tuscan Path
-0.125 Parts Volcanic Rock (not mixed, but placed at the bottom of the pot).

Growing Area:
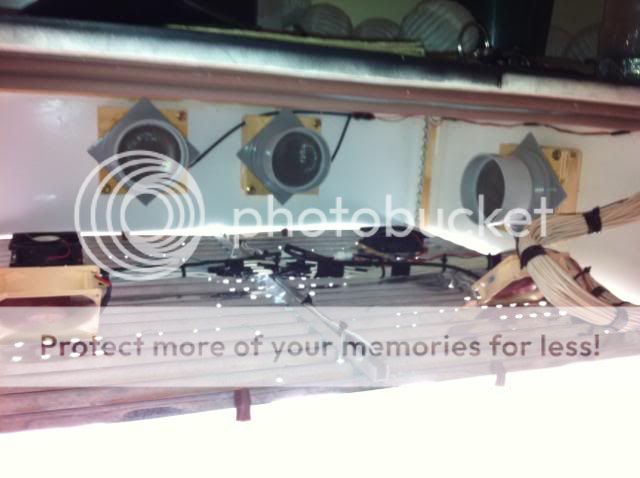
I’m growing in a Stealth Cabinet that I made from scratch. It mainly consists of chipboard, timber and some plywood. Most of the wood was already painted white by the manufacturer. I mounted 11 T5 globes to a piece of corrugated galvanized iron – if you were wondering why I chose this material it is because it has a high heat transfer coefficient and the corrugated nature gives you more surface area which allows for even more heat transfer and may possibly give better light distribution. I also installed 3 silent intake fans, 4 fans to assist heat transfer from the lights and 4 exhaust fans, 3 of which have carbon filters mounted to them – made from leaf guards for gutter down pipes. The fans are hooked up to 2 separate adjustable power supplies. One for the fans inside the cabinet and 1 for the fans that are near the exterior so I can control any noise. I thought I’d separate the electronic ballasts from the grow area to keep the electrics away from any moisture, but there’s around 60m of wiring ha.

I’ve spent a bit over a grand on it. Don’t really care and I’m not really keeping track of the price, I just love making things.


Expenditure:
Seeds – Free
Perlite - $13.98
Vermiculite - $ 13.98
Soil - $13.12 ($6.56 per bag)
Pebbles - $9.26
Nutrients - $4.80 ($47.92 at >10% per grow estimate)
- Dutch Master Original Grow A & B
- Dutch Master Original Flower A & B
pH Tester – Inexpensive
(enough soil for two similar grows)

Total $29.97 per grow (how marketable ha, ‘ it’s only $19.95’ as opposed to $20)

Now for some photos:


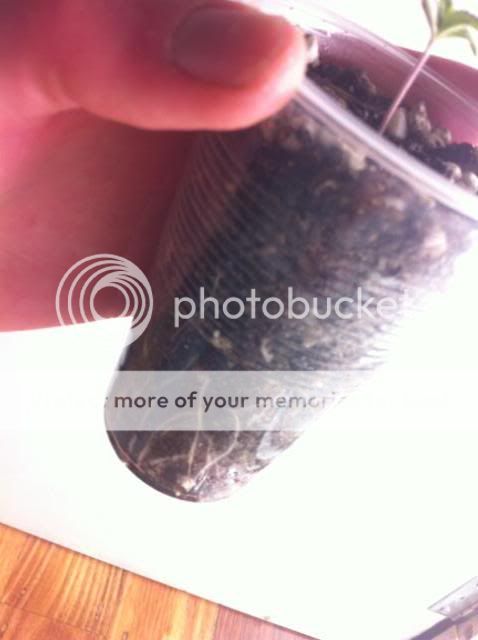
Temp is usually higher. Humidity will increase when I move to the large pots but for the moment I just give the surface of the soil a bit of a spray. Experimenting to see if the cup with the sponge is better to increase humidity (evaporates faster).


Thought I’d throw some sunnies in to give you an idea of size.


Some additional info. The seeds took a little longer than normal to germinate and the natural bud seeds are yet to open up – I’m germinating them in seal bags with some wet toilet paper ha. I cut one seed open and a root was forming so I think I just have to wait a bit longer, they’re really chunky. One of the white widow seeds has sprouted.

Over and Out, for now…
 

Puanatat

Member
Thought I'd quickly mention that my name is pronounced 'pwanatat'. It's just an amalgamation of 'perfect marijuana habitat' - p-uana-tat' :D.

Thought I'd do a quick calc for how much it's going to cost to run my lights:

Veg - 18 (hrs) x 7 (days) x 5 (or so weeks) x 0.314 (kW) x 0.18 (cents/kWhr) = $35.61
Flower - 12 (hrs) x 7 (days) x 8 (or so weeks) x 0.314 (kW) 0.18 (cents/kWhr) = $37.98

Totaling at $74.60 plus soil and what not = $104 (relatively cheap, if I had four females that would be sick but I doubt it)
 

Puanatat

Member
Really annoying - got a bit impatient and checked 2 of the white widow seeds that I had germinated successfully and placed in the small soil containers. For some reason they just closed up almost and growth had ceased. So anyway, only one successful seed left, the one that has sprouted. I'll have to call around and get seeds asap. Screw only having one plant. I may just experiment with pruning more than I previous have, if the growth of W1 exceeds any new plants that I add to the mix. Bummer....
 

Puanatat

Member
Trying to get a hold of some more seeds but W1 is going along fine.

I've been looking into giving my plants the right nutrient dose for soil. After a bit of thought, I chose to dose using dutchmasters nutrient calculator but at 2/3 the strength throughout and weeks 1 and 13 I'm using none. In addition, I'm only going to feed every second water. So we'll see how things go and I'll let you know any adjustments I make.


Puanatat

Member
I also lowered the lights today. The seedling should be able to cope with the extra light and slight increase in heat. I thought I'd check to see how the roots were going as well. They've already hit the bottom which is awesome. It seems to be going fine in my soil composition. If you were wondering why i have the plastic pot covered in a cardboard collar, it's because i don't want any light to hit the roots and damage them, plus, root growth will give me a good indication of when to transplant.

I hope that by the time I get my hands on some new seeds W1 will not have grown too much. I could get into trouble later on if W1 out grows the 11L pot before harvest.


As you can see, the cup with the sponge is evaporating much faster, it does absorb water also - so if i ringed it out it could be the same but i think it's still leading the evaporation race ha.
 

Puanatat

Member
Watering day! And the perfect time to check the pH of my soil.

To start with I tested my tap water:

As you can see it's around 7, in the photo it looks closer to eight but yeah, I'd say 7.

Next I added one drop of vinegar to a cup of water and dipped my test tube in it for a sample:

I'd say it's sitting around 6. Considering I didn't know what the pH of my soil was i felt that one drop of vinegar was enough. A pH of 6 allows for a bit of movement either way of the scale (5.8-6.5).

Then I tested the run off after watering:

The pH went up a little bit, I'd say 6-6.5- probably due to me watering with just tap water (pH of 7) up until this point.

So yeah, next time I might add a little bit more vinegar to get the pH sitting around 6. I thought I'd mention I'd use some baking soda to increase the pH. Also, it was interesting when I first tested the water without running it for a second or two, the pH was very high. So yeah, in the future I'll make sure to run the tap for a few seconds, rinse everything, then do the tests I want to perform.
 

Puanatat

Member
Thought I'd drop in and add a few things. Watered today, this time with nutes. I used a syringe to measure out 135ppm of Grow A and 135ppm of Grow B. Totaling 270ppm, or 0.27 mL of nutes into 1 litre of water. I just mixed it up in a 2 L milk container and kept the left overs for the next watering with nutes. pH'd it to around 6-6.5 with around 4 drops of vinegar (tap water at 7). Run off was a little higher, as per usual, 6.5 or so.

Root growth seems to be increasing dramatically but vegetative growth not so much. The seedling leaves (small round ones) were starting to lose some colour at the tips and the fan leaves were a lighter green shade. So i decided to and nutes at this stage.

Peace.
 

Puanatat

Member
Thanks man, i wish i had more seedling though... Are you growing anything yourself at the moment? Outdoor or indoor?
 

Puanatat

Member
After watering last night, I expected my leaves to be angled towards the lights, instead they're still keeling over a little bit. I bought a small oscillating 5inch fan to combat this. In the past I just used two stationary computer fans to create an artificial breeze, to mix the air and stregthen the stem, but it resulted in some angular growth away from the fans. Hence with the oscillating it should mix the air more. Hopefully it isn't too loud. I plan to hook it up to my variable power supply, running the interior fans. So even if it is I can just decrease the speed further than the stock slow speed. I opted for one this size becaue my cabinet isn't overly large and I don't want to stake my plants just because of some overly powerful fan ha.

Oh and after watering the small pot came in at 207.4g, it will be interesting to see how much weight is lost.
 

Puanatat

Member
Well to start with – the leaves on my plant have been wilting somewhat and I’ve been trying to figure out why for a few days. I’ve tried a number of things, starting with; waiting for the soil to dry out just in case I over watering – but I highly doubt it, considering how well my soil drains and the amount of soil conditioners I have in the mix.


Secondly I thought maybe the humidity was too low, so I added another sponge in water to the cabinet, plus some more trays filled with water.

Thirdly; it could be possible my soil drains so well it needs to be watered again. Since it had been 36 hrs since the last watering, this was a good time (last night) anyway. I watered using nutes again (run off came in with a pH of 6), I know I said that I’d use normal water every second time but just in case there were any deficiencies I thought I’d use the low ppm nute water – it wasn’t going to hurt.

Fouthly (I know, ‘fourthly’ – ha, sounds so stupid); I thought maybe the air around the plant needed to be agitated. As I previously mentioned, I bought an oscillating fan off ebay, but I didn’t want to wait so I connected two computer fans and placed them hitting the plant directly. Nothing changed.

After a lot of reading and searching I didn’t find all that much info. It almost seems White Widow is just susceptible to this sort of thing - as in; runts are more common. I guess it could be a breeding flaw. I’ve previously grown just indica so my plants’ looking sad isn’t something I’m comfortable with. Not to mention the decreased rate of growth.

Finally I’ve decided to, A – get more air to the roots and elevate them off the ground using another cup – but inverted. B – increase the height of my lights, in case W1 is getting too much light (which some people seemed to think is plausible) and considering W1 is not stretching what-so-ever. C – add CO2 to the mix.


I made the CO2 producer using a bleach bottle (rinsed of course), warm water, ¾ cup of sugar, a tsp of yeast, a tsp of milo and some hosing – plus a bubbler for a home brew kit. It gives a burst of CO2 every 10 seconds or so. I placed it above the plant because CO2 is heavier than air.


As you can see root growth is pretty good and they seem to be in good shape – they don’t look brown of anything.

I received my Warm White T5 tubes this week, after a bit of a delay – I ordered the wrong plug type. Anyway, I got 4 x 40 W and 2 x 22 W (both 3000K). My reasoning for this is I want to see how the plants cope with a mix of warm white and cool white. So I’m running 65% warm and 35% cool, for flowering that is.


I’m developing quite an arsenal haha!:


So just to wrap it all up - I’d love to hear what you have to say/any thoughts or solutions about the curling over. Plus, has anyone checked out the amount of disgusting grow videos on youtube – so many horrible, dirty, disrespectful grows?
 

Puanatat

Member
Where to start… Well I’m back in action. W1 was tossed due to ridiculously slow and runt like growth. I was given 25 seeds off a friend who was the one that supplied me with the seeds for my first ever grow. It’s a bit of a mixed bag; some are bag seeds and some are seeds from a few years ago (that have been stored properly) that my friends brother used to grow with. Anyway, I’ve just dubbed them all bag seeds and labelled them appropriately. He gave me three separate bags of seeds but has no idea which is which and from when.

So, this batch has been started a little differently than the previous one. I meant to soak the seeds overnight (12 hrs) but I didn’t really have time to sort my shit out so I left them in water (pH >6) for an entire day. By the time I got home and was ready to plant them some had already begun to open up.


28/8. I put the cups near one of my exhaust fans in the side cavity of my cabinet, where it’s nice and warm.

I was curious as to whether the seeds that opened up under water would die later or even sprout faster – who knows? So I made sure to label all the seeds (only used 10) using a simple code.

Given that I was going away this week to snow board at Falls Creek in Victoria, idk if anyone knows it, I chose to plant the seeds straight after soaking them for a day. My reasoning for doing this is that I didn’t want the little suckers to die if I left them in a plastic seal bag with wet paper towel for a few days. Plus I’d never really planted straight up before and given that some of them had opened up under water I thought they’d get their ‘grow on’ quite soon and I wouldn’t want them growing in a bag. They hit the dirt on the 29/8, I’m going to call this day one. I kept adding a small amount of water to keep the soil moist and help the seeds to germinate for the next few days.


1/9 When I left to go snowboarding I made sure to set up the cabinet in such a way that the humidity and temp would remain constant at around 24 degrees and 50 + RH, for the next 3 days. I also gave them a small amount of water once more. I had to rip my timer out before I left because when it turned on it would click heaps for a few moments then stay on – I assume the safety switch was being triggered by back emf or something, idk. So to start with the lights are staying on 24hrs until I get a new timer and at this stage I’m running 4 x 22 W tubes at a fair distance from the plants.


4/9 Much to my surprise when I came back 7 of them had sprouted and were looking pretty damn good. I’m pretty sure they’re all indica. Temps and humidity had stayed where I wanted as well.

So without delay here are the babies at day 6:


I called this one lucky because of the strange growth – 3 baby leafs and 3 potential fan leafs. I’ve never seen this before but have heard of odd growth occurring.


All tucked in with a light spray. I jacked them all up using cups with slits in them and increased the lighting to 4 x 40 W + 1 X 22W (total 182).

Bit of a downer; I broke a ballast today when I was plugging in some more tubes. I turned off the power and plugged in the 40W tubes, I think the ballasts hold some residual energy in the capacitors or whatever, because even with the power off I get a quick flash when the contacts meet for the first time. This is annoying because I think it damages the lights. Anyway, I turned the power back on and heard a crack sounds and surely enough one of the ballast smelt burnt and the 40W tube it’s connected to wasn’t working. Luckily enough I have a spare 40W ballast that I got with my order a while back, which I will connect tomorrow. A 22W tube will have to replace it for now. In the future I’m thinking of getting a dummy 22W tube and 40W tube to connect the contacts to first, just to use that extra energy in the ballast while the power’s off. Then connect the real light afterwards just to save the lights wearing prematurely.

I’d love to hear what you think about the grow, if there’s anything that springs to mind feel free to let me know. Peace.
 

Puanatat

Member
Everything is looking pretty good. I lost one more plant, it just stop growing, shrivelled up and died. I labelled all the seedlings as I’ve previously mentioned and it’s been interesting; the two seeds that had pretty much opened up under water were the ones that died off. The most recent was also one of these. So yeah, mental note – don’t soak seeds more than 12 hrs or so, or they won’t sprout/die later (ha).

I finally got around to buying a new timer and I haven’t had any issues with it, unlike my old one. I just remembered that it was a few years old, no wonder it died – it had to endure my electrical experimentation haha…


This one comes with a 5 year warranty, so I made sure to hold onto the box and receipt. :)

I’ve also been experimenting a little over the past few days with the humidity. This is my latest invention. It raises the humidity by about 20% I’d say. Without it, the RH is about 30%, with it, it seems to increase to 50% and when the lights go out the RH further increases to 60% or so. I may hook this contraption and my internal circulation fans up to the light timer later in the grow, just to avoid pm issues and it should save on refill times/power – plus the cabinet should hold its temp a wee bit longer after the lights go out/it should be quieter. I’ll let you know how it goes over the next few days.


The sponges assist in evaporating the water. I found that when a cup with water in it and a cup with water and a sponge in it, both had a slight breeze over their tops, the one with the sponge evaporated twice as fast.


I think it will help lower temps as well. Considering the container has so much water in it and is placed on the floor (where the temps are much lower than the midpoint of the cabinet).

I don’t know why it took me so long to realize but I moved the plants from a central location, to one side of the cabinet. This pretty much means the plants are getting a lot more light. In the central position I was running 4 x 40 W plus a 22 W (182) spread over the entire light fixture. Now I’m running 2 x 40W, plus 3 x 22 watts (146) in half the fixture (I’ve scratched my idea about using test lights to prevent premature wear. Now I just take everything out, lie down under the lights and plug in or pull out lights swiftly while the power is running). My reason for not running all the lights is that it is somewhat excessive, given how small the plants are and not to mention; when the light fixture is lower in the cabinet it’s lighting up a smaller volume of space, which increases temps by a few degrees.


I put my external thermometer in the cups that elevate the plants and the temps are 6 or so degrees less than the ambient temperature in the cabinet. Which is good news because I don’t want the roots getting too hot, also, the cups keep the roots well off the floor – increasing the oxygen they receive.


Nize ;)


Here’s my freak plant, Lucky. It would be amazing if it turned out to be female. I’m sure it would be a mad looking plant, with increased bud sites due to its three-way growth.

I watered today with nutes at 270-300ppm. To the water I also added Epson salt and some neem oil. The Epson salt (magnesium sulphate) was suggested to me by another member (collective gardener - check out his 20,000 watt grow if you have the time, it’s an amazing thread), it helps with photosynthesis and considering I’m using 30% soil conditioners, the magnesium and sulphur levels in my soil will be less than an outdoor grow for instance. While the neem oil is to combat gnats – it has a number of benefits, but considering I’ve had some issues with gnats before and given that I’ve seen a few floating around from time to time, I thought adding it now as a preventative measure was a good idea.

I’m still yet to get around to replacing the busted 40 W ballast – most likely tomorrow.
 

Puanatat

Member
I replaced my ballast today. While I was at it I thought I’d take a photo of the entire panel. The electronic ballasts run in parallel, much like power lines. I’ve chose not to earth the ballasts, which could become a problem but I’m yet to have any issues not running an earth wire. The extension cables (white wires) that run from the original factory plugs have a larger cross-sectional area and are made of solid copper – so I shouldn’t lose much power. I also have a surge protector inside the cabinet, it was originally for a computer. Plus a power board with a built in fuse and my timer has a solenoid that will turn the lights off should any issues arise (I think I’m pretty covered).


One thing I would like to do is install two smoke detectors. One inside the cabinet and another near the side exhaust fan – on top of the electricity panel. I think the carbon filters would filter the smoke too much if there ever was a short that caused a fire – hence why I think it would be necessary to fit one inside the grow area.

I noticed that some of the plants are starting to lose a little vigour –the ones that have a large root mass in particular – which tells me they need more nutrients. The Epson salt and nutes I added yesterday should help with this but just to stay on the safe side I’m going to increase the nutes next watering and then water with no nutes the watering after that. I previously said that I was going to water with no nutes every second water but I think every third is good enough. It shouldn’t be an issue (nute burn) especially considering at this stage I’m tapering up with the nutes and not to mention I’m only using 2/3 of the suggest feeding ppm.
 

Puanatat

Member
Really annoying - but I'll get over it. I worked out that I massively underfed my plants last watering. I came to this conclusion after looking on the back of my nutrients bottles and reading, 'add 50ml of both part A & B to 10L' of water. I pretty much watered 18 times less than this. So my plants are probably really deficient in everything right about now. Luckily I added a teaspoon of magnesium sulfate last watering as well - hopefully this has helped keep them alive ha. Anyway I'm going to feed with an organic 'power feed' tonight to boost everything back to normal, plus some more magnesium sulfate. I'm going to add 1.5 times the recommended for vegetables, which works out to 7.5 mL of the power feed (12-1.4-7) per liter of water. Hopefully they bounce back. No wonder W1 shriveled up and ate a bag of dicks...god dammit.
 

Puanatat

Member
Things are looking up since my last effort to bring my plants back to life (large dose of organic fertilizer, 12-1.4-7).

Last night I fed the plants again, after a bit less than a week, with Dutch Master Grow A & B. The A & B have a total NPK of 2.65-0.6-5.3 which isn’t too far off the supposed 3-1-2 ideal NPK. I think DM isn’t all that concentrated, so at this stage I’m not too worried about running at 2/3 of the suggest feeding program, as opposed to half or less. They suggest on the back of the packet 50 mL of both A & B per 10 L, I fed last night with 2.55 mL of both A & B (5.1 mL of nutes, total) per 1.5 L of water. I’ve also changed my feeding cycle at this stage to feed, feed, water, feed feed, etc. I think this will be fine in the early stages and I will change to feed, water, feed, water, etc. later in the grow to avoid nute build up.

Without much delay here are a few happy snaps for a change:


2 of the plants are accelerating while the other four not so much. I’m sure things would be much better if I hadn’t left them soaking so long and had started feeding with light nutes at day 7 or something (instead of day 11).


Lucky is looking good, some of the bottom leaves aren’t the healthiest from the lack of nutes but the new growth is looking solid and robust. Her/his three way growth is looking interesting.


Luckys’ roots. Most of the plants have a similar root mass but Lucky and the next plant are looking the best. I'm thinking of transplanting this weekend.


BS2 (bad seeds, seed bag 2 – I was given 3 lots of seeds)

Also, my custom humidifier, mentioned a few posts back, raises the relative humidity to 69% when the lights are off. So it’s definitely doing its job (sweet :)). The RH sits around 40-45% when the lights are on.
 

Puanatat

Member
Transplanted yesterday just after the lights came on. 48 hrs before hand I gave the plants a light water with no nutes. 24 hours after which, I gave each of the large pots a solid watering with the appropropriate amount of neem oil and magnesium sulfate - for reasons previously explained; bugs and to keep my plants healthy.*

The transplant went relatively smoothly. I picked the strongest 4 plants out of the total six. I gave each of the lucky few a light water with some transplant nutrient, 2-3 ml or so per litre, just before they went into their designated pot. I did this to protect the roots from the atmosphere during the transplant and to keep the soil together. I cut a slit straight down the plastic pots and also around the base. After which, they were easily removed and placed gently into their new soil. I used the same transplant water to water each of them in and made sure that each plant was secure by compressing the soil around them.

I didn't lower the lights just yet but changed the arrangement to 1 x 40 W over each plant with a 22 W tube in the middle of the fixture. Like many of the things I've mentioned this post, my timing is usually dependent on my spare time and isn't what I'd necessarily do in an ideal case.

None-the-less, I think it was a solid effort. Everything looks great and I'm glad I chose to apply the neem oil and what not 24hrs before because it's not the easiest stuff to deal with. In the future I may make a neem spray with some soap in it and apply it to the surface of the soil -then water it in. I got my hands on some 100% neem oil off eBay and it's pretty oily to say the least ha.

I'll post some pictures tomorrow most likely.
 

Izoc666

Well-Known Member
hey Puanatat, Im really enjoying to read your thread....and interesting about the humdiity with sponge, I will do same thing to see if it really helpful, good creative. And cant wait to see the pictures tomorrow. Im gonna sub this for sure. and you deserve +rep my bro. happy growing.
 

MurshDawg

Active Member
Good stuff, bro! I am subbed up to this thread I really like your 'ghetto' CO2 producer. Good on you, mate! Cheers
 

Puanatat

Member
Thanks Izoc, you may be the first to rep me, so double thanks ha. Had a flick through your profile - I've never even thought about growing a bonsai, yet there being a place for it on this forum, could be really interesting.

Yeah ta MurshDawg. Appreciate the feedback. You've got some phat plants going, had a geeze at your lastest journal update. Lookin good.
 
Top