mrandersonnen
Member
i have thermal compound on the back of the chips. what about kapton concerns you?I would definitely stay away from kapton fixture.
i have thermal compound on the back of the chips. what about kapton concerns you?I would definitely stay away from kapton fixture.
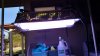
Gnarly. But if it works it works. Do you ever get any bleaching or heat stress?8-12" here hortilux shps 1kw, horizontal though, in a sealed sun systems reflector.
You are right my friend. What is happening, with sugars and many other "plant fertilizers" is that we are feeding the microbes, or some would say the soil and they have to break it down into a small enough molecule of something that the plant may actually use. That's fine for organics and is a sloooowww process. Still, in my opinion a great percentage of nutrient additives are a waste. Now some fine tweaking and an ability to read a plant, those are true skills that can prove beneficial. Please know that I'm not trying to tell any one how to tend their garden. There are many ways to have success. No worries.plants have "Active transport" for specific ions. Its not a matter whether they want or not. mostly only the smaller ions like NA or K that are absorbed passively.,
there is also the fact that while a plant does absorb some ions by osmosis, if they don't "metabolize them" ie incorporate them into proteins, cell walls etc. it just sits in solution, just like the blue dye in celery uptake experiments
My veg is approx 6 weeks, during that time, if they cannot handle my hortilux blue at 5-10" away, i just toss them because the hps WILL bleach them if the MH/Blue does. i dont have any sealed place higher than 5ft to flower. If i get desperate, ill dim the bulb but that always sucks!Gnarly. But if it works it works. Do you ever get any bleaching or heat stress?
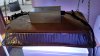
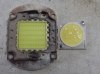
No, there wasn't any bubbles or impregnancies at the back, but i think Kapton loose it's tension due to temperature fluctuations, as well as compound loose it's "vacuum" because it dried. So, if there was a holder, i think temps didn't get that high.Are you sure that Kapton played any part?
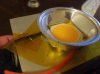
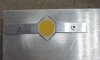
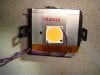
What did the back of the diode look like? Was the surface area impregnated by anything?
Something doesn't add up all the way, thanks
You can face with situation like mine.i have thermal compound on the back of the chips. what about kapton concerns you?
I had the parts for a while and needed more light quickly. Trying to avoid hid all together. Still have another cob bar to build also...@SomeGuy, super cool study! It should feature 50-100 PARW of highly efficient LEDs and a wee bit more sophistication on cooling, but I like the compact form very much.

So if you would be so kind, I am about to put the same combo together and I'm trying to find out if when I run the driver at full capacity, are each of the 4 cobs receiving 50 watts? Or do I need to turn it down and if that's the case how do I determine how much power each cob is receiving? If you can answer this, I'd be greatly appreciative. If you can't answer it, thank you all the same.CXB3590 36v
Meanwell 185h c1400bb
Arctic alpine 11 gt
Do you know have many CC's of material were used?No, there wasn't any bubbles or impregnancies at the back, but i think Kapton loose it's tension due to temperature fluctuations, as well as compound loose it's "vacuum" because it dried. So, if there was a holder, i think temps didn't get that high.
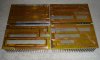

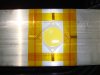

Yeah pics will be soon. Can't get to the place right now. I'm IT engineer for 15 years, applying TIM isn't much differ from CPU installation to get the "vacuum seal". Almost identical light is working without any issues. I think my TIM doesn't meet Cree requirements for TIM's, as well as kapton tape isn't recommended to fix Cree Cob's. I also saw incidents when cxa cob degraded under lens because of phosphor evaporation. Cree also has recommendations for ventilated lenses in datasheets for cx** series. Yes kapton was applied tight, but after 3 cycles i think it might loose it's tightness because of numerous temperature drops.Do you know have many CC's of material were used?
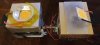
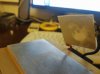
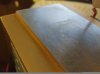
Any pics?
Something is not adding up, not trying to Call you out, just trying to figure this out....
I have used a handful of Vero 10's for well over 14 months of 18 hour use everyday. Personally I haven't experienced this problem, so I am trying to figure out how to avoid it in the future....
Based on testing of Kapton @SupraSPL, something is a amiss....Any thoughts?
I thought that is what I had read as well.. I believe it was that the difference was extremely small for the amount of work put in. Don't quote me on that one, It's certainly been a while.Just curious...is everyone still sanding their heatsinks before applying the tim/cob? I thought I read in a thread that it was determined that was an unnecessary thing to do. Anyone know about this?
Good info, we can agree to disagree on this. Kapton+paste is a viable way to mount COBs. Like anything it does have to be done correctly and with some care. Many DIYers prefer screwing them in which is understandable and "proper" installation.I really admired of your work Supra, you are the person who brought me in to cob's universe, but let me disagree with you.
Your and other "lucky" (sorry for using this word) diy builds with capton tape can't be generalized.
It's just imho, i'm not trying to insult you.
I think my case is proving that.
@werm11I thought that is what I had read as well.. I believe it was that the difference was extremely small for the amount of work put in. Don't quote me on that one, It's certainly been a while.
Excellent info! Thanks as always.@werm11
That is correct, I had to retract my recommendation to flatten heatsinks. When I started temp droop testing I measured no difference between a sanded heatsink vs stock, even though the stock heatsink was far from flat. No difference between PK3 paste vs MX4 or MX2 paste. The reason I am so convinced of this is because I did a direct comparison with COBs running at 100W, and yet I measured no difference. Most of us run at 50W or even 25W so it is even less of a thermal bottleneck for those designs.
The reason for this, much of the temp droop is occurring inside the package and increases with current, beyond our control for the most part.
I am not saying the thermal interface is unimportant because it is critical, the COB will die without it, but as long as there is sufficient heatsink and the interface is sound (filled with paste and no air gaps), you will get very good temp droop figures.
That's very good to know. Thank you for clearing that up. Have you ever tested the pre applied tim that comes on the arctic alpine 11?@werm11
That is correct, I had to retract my recommendation to flatten heatsinks. When I started temp droop testing I measured no difference between a sanded heatsink vs stock, even though the stock heatsink was far from flat. No difference between PK3 paste vs MX4 or MX2 paste. The reason I am so convinced of this is because I did a direct comparison with COBs running at 100W, and yet I measured no difference. Most of us run at 50W or even 25W so it is even less of a thermal bottleneck for those designs.
The reason for this, much of the temp droop is occurring inside the package and increases with current, beyond our control for the most part.
I am not saying the thermal interface is unimportant because it is critical, the COB will die without it, but as long as there is sufficient heatsink and the interface is sound (filled with paste and no air gaps), you will get very good temp droop figures.