New Cabinet Grow - 9'x4'x18" - Complete Build Journal - Lot's of Pics

jsgamber

Active Member
Looks Awesome man!!
Thanks CB!! BTW congrats on your harvest man! I hope you are enjoying the fruits of your labors!


So I think I've made some excellent progress here as you'll see over the next few posts. I also have some plant updates that I'll make over in my grow journal.

So turning the AC unit into a passive cooling unit was easier than I expected. The tricky part was making it work efficiently. Don't laugh but I've actually changed the designed direction of airflow!! As a passive unit I'll be ducting the air directly off of the cooling fins! One thing to note, the person who owned this unit previously was a heavy smoker and there is tons of gunk on the fins.

First shot is with the outside case removed and the top cowling removed. The plan is to remove the fan and disable the fan motor. The reason for removing the fan is to increase air flow since a non-running fan becomes an obstruction. This fan even on low pushes far too much air. Maybe later, I'll find a way to build a modified exhaust system from the motor and fan blades! Now that would be cool!
CIMG0380.jpg

Fan is now removed. This side used to be the output side which will now be air input.
CIMG0381.jpg

Adding back the cowling. The orange arrow is the power cord for the fan which is now unplugged.
CIMG0383.jpg

The new air output side. This is also a good shot of the blower for the heat exchanger on the lower left and the compressor on the lower right. These still are enabled! :)
CIMG0384.jpg

30 minutes with Simple Green and a toothbrush used on cooling fins (along with lots of shaved knuckles...that shit is sharp!!) letting it drain through the humidity tube into a bucket. This lady said she only owned this unit for one summer!!! God only knows what the air quality was like in her house!! Dude!!
CIMG0385.jpg

Okay I'm addicted to Aluminum Tape. Best stuff ever! Here's a shot after taping up all the cracks and edges along the cooling fins. The only way air is gonna travel is across these fins!
CIMG0386.jpg

I was an idiot and forgot to take a good final shot. This is the unit running during a test against the flower chamber! I'll get better shots later. The way it works is that I taped and sealed a piece of rigid foam right up against the cooling fins. In the foam I am cutting a 4" hole to attach a duct fitting to. Any air flowing into the duct comes immediately off the cooling fins!
CIMG0388 (2).jpg

So the result from the mini test were perfect! For the hell of it, I started with the 400w light turned off and set the thermostat to 66* (lowest setting). With two 200 cfm fans pulling away, I had the chamber down to 66 (from 79) within 5 or six minutes and it felt even colder than that when I opened up the doors...brrr! What really nice about this set up is that even after the AC unit cycles off, the fans continue to pull chilled air off the fins into the chambers. Pretty darn efficient!

Next test was with lights on and the thermostat set at 84*. At first the unit cycled on once every 8 minutes or so but after about two hours the garage was heating up. I haven't yet figured out where to exhaust the AC unit yet but my thinking is a new hole in the wall under the stairs.

More to come!
 

gumball

Well-Known Member
great to hear the great progress!! and i read the bugs have not returned on the other thread, so aside from exhausting the heat from the AC, your about done building arent ya? do you have any projects you'd like to do with the cabinet, like wish list shit? keep us posted.
 

jsgamber

Active Member
great to hear the great progress!! and i read the bugs have not returned on the other thread, so aside from exhausting the heat from the AC, your about done building arent ya? do you have any projects you'd like to do with the cabinet, like wish list shit? keep us posted.
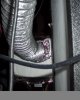
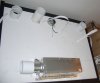
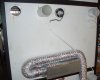
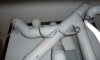
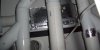
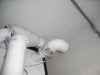
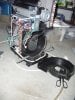
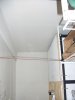
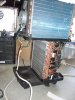
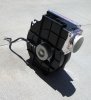
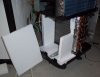
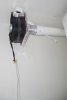
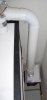
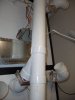
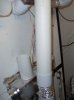
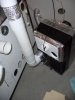
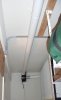
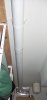
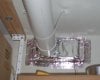
Final goal is to get the ventilation right. I put it all together (I'll show you in a bit) but I'm already gonna change it up. The finished product gave me another better idea so I'll switch it up in a bit. The issue is I was exhausting my cool tubes and AC unit into the wall which leads to underneath the staircase and then exhaust the cabinets to the outside garage vent (opposite wall). The AC unit blows a huge amount of pressure and the cool tubes run a close 2nd and they both throw off the most heat which goes directly into the house. I'll now vent AC and cool tubes to the outside (I now have enough 4" PVC) and the cabinet under the stairs. Makes it better for odor control too!! The only reason I did it this way was basically "instant gratification". I didn't have enough 4" PVC to make the run across the garage and I wanted to dump the AC and cool tube somewhere else. Now's the best time to fix this!


So here's what I built currently. Basically I'm gonna reverse it so cab exhaust goes down and AC/cooltube exhaust goes up.

Here's the before pics after taking down what I had previously giving myself a clean slate.
CIMG0388.jpg
CIMG0389.jpg

Taking close-up pics of a 9 ft cabinet is pretty tough. Here's a top down set of pics, you'll have to mentally stitch them together. Sorry about the 3rd pic, I was leaning over and my hand got in front of the flash.
CIMG0390.jpg
CIMG0391.jpg
CIMG0393.jpg
CIMG0394.jpg

For now I have the cab turned sideways so it's easier to work on and troubleshoot. Once all the kinks are worked out, I'll be turning it and sliding it back to the wall. BTW, the colored arrows show where the passive intakes are and where they will/do hook up to the portable AC unit. I also put the temp probe just inside of the air exhaust tube just in front of the fan. This keeps the sensor out of direct light and I get a true reading of what the air temp in the chamber is as it's being exhausted.
CIMG0398.jpg
 

gumball

Well-Known Member
looks real good, a mess from my stand point!! but i am sure the setup is great to give you exactly the right ventilation control!!
 

jsgamber

Active Member
Hey man where did you get thoes hps ballast and the bulbs?? It looks great btw good job!
http://www.plantlightinghydroponics.com/grow-light-ballast-kits-c-357.html -- the MH and HPS kits near the bottom of the page.

I actually bought the kit so there is no enclosure, just the core, the capacitor and the igniter. These are not digital but magnetic. The nice thing is that the 400w HPS is perfect for a 400w CMH bulbs which I will be looking into in due course!! :) They also came with mounting brackets so the plan is to mount them onto plywood boards and then mount the boards to the wall. These ballast kits are also "multi-tapped" meaning they can be connected to different voltage services. You have to do the wiring yourself so if you don't know how to read an electrical schematic, just find an electrician buddy. It'll take him all of 3 minutes to wire it correctly. This site also sells bulbs as well.

looks real good, a mess from my stand point!! but i am sure the setup is great to give you exactly the right ventilation control!!
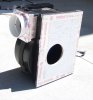
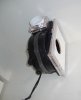
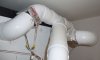
You are right, it does look like a mess but I think it's because it's spread across 4 different pics. :) The point behind the design was to minimize 90* bends and stick with 45* or better straight. PVC is perfectly smooth so it's static pressure coefficient is 1 (where flexible ducting has a coefficient of .5 - .7 due to the accordion shape of the inside surface). Static pressure is the force of air measured against the surface, either with air in motion or rest, for which the fan must overcome in order to keep air moving at it's rated cfm.

For reference in the above pics, the ducting coming straight down the middle is the cool tube exhausts. The ducting starting from the lowest chamber in the top corners of the chamber and connect upward to each corner vent upward ultimately to the top right corner is the cab exhausts. Anything connected to the metal boxes is considered passive intake and ports to the AC unit for cooling.

HTH to understand until I change everything ... again. :D
 

jsgamber

Active Member
So this morning I'm up early to start in on the redesign. I took off all the ducting and started in on rerouting the cool tube exhaust upwards so I can route it out of the garage through the exterior vent on the opposite wall.

First shot shows the cool tube ducting running up the middle and to the top right (second shot). In the middle of the pic where the gray shopping bag is stuck to the ducting is where I tried to do a test running the AC exhaust up through the same tube behind all my cool tube exhaust fans. As I feared, when the AC exhaust fan came on it overran the cool tube fans and started to push air back into the cool tube...not good.
CIMG0403.jpg
CIMG0404.jpg

So I got high and thought a bit. I really need to get that fan on the complete opposite side of the system and use it to extract as much as possible.

You know what? For $150, there's no reason not to gut the AC unit and completely modify it. Here goes. Out comes the Heat Extraction fan and motor. I'll put all of the cowling back and tape it up just like I did on the upper fan. I'm still going to let the AC unit control the fan by extending the wiring.
CIMG0401.jpg

Here's the fan blade, the motor and a bit of plywood. Time to make a fan enclosure. :)
CIMG0399.jpg

Then we'll mount it up here and tie all my extraction into it and then run that to the outside wall and out the exterior vent!
CIMG0402.jpg


Stay tuned!!
 

jsgamber

Active Member
As it turns out, the cowling for the extraction fan comes out of the AC unit intact!! Let's not reinvent anything if don't have to! :)
CIMG0406.jpg

Motor side. You can see the 4" adapter on the exhaust.
CIMG0407.jpg

On the intake side I mounted a piece of plywood with a hole. I'll put in another 4" adapter..
CIMG0408.jpg

And here it is hung up on the ceiling waiting to be run outside!!
CIMG0409.jpg


Back to work after a bite to eat! This is WAY fun! I still have to run the wiring and do some testing and then we'll hook everything up!

:joint::joint:
 

jsgamber

Active Member
sounds like a lot of fun, wish i could help you out!!
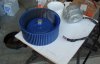
Me too. Yours look way more fun than mine. I'm just gluing PVC to trick my Outdoor plant Theresa.
Daniels
Hey I know you guys are here in spirit! bongsmilie bongsmilie

So cool tube exhaust/AC exhaust is a success!! I just need to extend to the outside vent and we're golden!! Here's some pics along the way.

First I had fill the void where I pulled the fan out and turn it into a passive intake box. Again using rigid foam and aluminum tape. This shot is just before putting on the last side and sealing all the joints with tape. To make sure everything works I had to put the unit back together again but first I had to extend the wiring to the fan and test.
CIMG0410.jpg

Shot of the duct attaching to the fan intake. You can see the wire extensions which run back to the AC unit. This shot is taken from the front of the cab.
CIMG0411.jpg

Shot taken from the rear of the cab along the side looking at the fan and ducting. Once the cab is turned back against the wall I'll remove the 90* turn and drop right into the fan.
CIMG0412.jpg

This shot shows the exhaust of the top cool tube running to the last 90*. You can see where the middle cool tube exhaust is coming in from below.
CIMG0413.jpg

Here's where the middle cool tube comes in and continues down toward the AC.
CIMG0414.jpg

Since the bottom chamber isn't ready yet, I'm not hooking in the bottom cool tube (I don't have the light yet). We're still running down to the AC.
CIMG0415.jpg

And here we are. I use just 4" of flex ducting connect things together. I also cut a 2nd hole in the rigid foam panel where the cold air comes out. Now I can cool two chambers! :)
CIMG0416.jpg

Need to grab a bite and get back to the fun!
 

gumball

Well-Known Member
awesome work gamber. shoot, as cool as the top 2 chambers will be from the AC, you probably wont have to cool the bottom cab. but to continue your airflow for all intake and exhaust, you will probably run it inline as well so it pulls and dumps from the same places as the higher cabs, huh??
 

jsgamber

Active Member
awesome work gamber. shoot, as cool as the top 2 chambers will be from the AC, you probably wont have to cool the bottom cab. but to continue your airflow for all intake and exhaust, you will probably run it inline as well so it pulls and dumps from the same places as the higher cabs, huh??
The third cab will still have a 400w bulb which will have to be exhausted. The way it's set up right now, it won't be that hard to add in. In fact I was just thinking I'll just bite the bullet and finish all 3 chambers so I don't have to move the cab anymore, because it's heavy! :)

As far as exhausting the chambers, I'm going to dump that air under the staircase after running it through a carbon filter. I have to remember that the blower was designed to keep the heat exchanger cool and adding in 1050 watts of HID lighting is probably putting it at it's limit.

So here's how I finished out the evening. I got the duct run over to the exterior vent. Everything is sealed! Now here's the cool part. Since I'm dumping air out of the garage which is coming from the cool tubes which is coming from the inside of the garage, air has to come from somewhere and it's coming from the lower external vent!!! This is what I've wanted all along! In fact when the new blower is running, fresh air just pours in from the bottom and keeps the garage cool!

From the fan.
CIMG0417.jpg

To the outside vent.
CIMG0418.jpg

Close up of the connection. This was the exhaust setup I had earlier. I just removed one fan and taped over the other (it's a cheapy, and much easier than taking it apart.
CIMG0419.jpg

This was a lot of work and very satisfying!! Lot's of things came together right and are exceeding expectations! Now let's get the rest of it done.

I'll be back.
 

jsgamber

Active Member
Looking forward to more, and bud porn is one step closer!
Coffee Break! :)

I had to do some clean-up work this morning. A couple of days ago I got a mini-refrigerator from a neighbor who didn't want it anymore, and it's like 18"x18"x18". I planned on using it for an experiment to keep water temps down by using it as a water chiller. I ran into the fridge while cleaning and my brain had a strange thought. What if I put the air pump inside the mini-fridge and allowed enough venting to bring air in to get chilled before going to the air stones?

Took me 10 minutes to set up. Unfortunately I already put the morning ice bottles in, but took them right back out. Let's do a temp test. Just so you know if I don't throw in any water bottles over a few days the water temps rest at 75*. So here are my starting temps with no ice bottles. Will they maintain, go up or go down?

Rez 1 (4 gallons) - 61.0*
Rez 2 (1 gallon) - 69.9*
Rez 3 (1 gallon) - 68.3*

Any guesses? :)
 

gumball

Well-Known Member
i think they will rise slightly, depending upon which light they are on top of. i dont know how much air your pumps make, but I wouldnt think there would be enough volume in such a short time to maintain let alone cool all that water. if the mini fridge has a freezer, maybe put it close to that for colder air. i hope it does better than i think, and i am interested in the outcome. i'll be toking on this keeping positive for you over waiting for the next update!!!
 
Nice build...... you spent a crap load of time building this unit. The AC unit will not operate as it might of before. This unit has a fan scroll blow through fan. Adding all the extra tubing downstream from this unit will increase your suction and discharge pressure beyond it's original design. I test HVAC systems for a living. If the flow across the coil is restricted the coil will freeze. The computer fans you used, will work but are designed to be just a transfor fan with no restrictions on the suction or discharge. I would recommend using a system like this to maintain a set point for your garage.
http://cgi.ebay.com/9000-Btu-Mini-split-Ductless-Air-Conditioner-Heat-Pump-/170554450710?pt=Air_Conditioner&hash=item27b5d66316

or a home made system like this would probably work better for your design inside of the unit. You can get coolers that heat and chill all in one.
http://www.instructables.com/id/Portable-12V-Air-Conditioner---Cheap-and-easy!/

hope this helps
 
Top