slow_grow
Well-Known Member
I'll start by just saying I have nearly zero patience when it comes to watering. In other areas I seem to have far more. For instance I could manicure for hours but for some reason I just hate sitting there watering things slowly to ensure good and even saturation. Water too fast and I'd get tons of runoff and no real sense of how much the medium could hold until after the fact which could potentially be too late. Water too slow and it becomes more of a chore.
So I decided to set out and design a drain container that closely mimics the distribution of water in nature that would also serve as a training platform for LST, mainlining or any technique where multiple, easily accessible anchor points could be had. In rocking my own mainline for this grow I found tomato cages to be somewhat awkward and too limiting. I was about to start clipping anchor points to the edges of my pots when it dawned on me to simply combine the two problems into the watering solution I was already mulling over.
Here is how I'm currently watering to ensure a good soak without requiring the plant to suck what it needs from the bottom run-off drain pan. Basically a bunch of smaller containers with holes punched in the bottom of them. This works very well however it's cumbersome and hideous.

Here is the current iteration of the drain container's design:
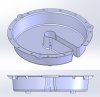
I'm still testing the drainage pattern which is why you don't see any drain holes in the model. The smaller holes on the outer lip serve as training anchor points. One need only tie a knot or form a ball in their training wire and run it up from under a hole to the plant, nice and clean. The large anchor points are for staking the container down. The idea is this would remain fixed in the pot the entire grow once the plant's lowest node was taller than 2". This initial size would accommodate both 3G and 5G pots from a diameter standpoint and hold just over 90 ounces of water.
Current flow testing shows that 80 .4mm holes in a concentric pattern focusing primarily on the outer perimeter will yield a drain time of 20 minutes. The idea being to simply fill it up and walk away. Measurement hash marks will be added in increments of 10 (oz) so I know exactly how much water is going in.
The container would be white to reflect light and since it would remain in place the entire grow it would also be a great way to keep tabs on any bugs since they'd pop against the white fairly well. It would also serve as a means to keep the upper portions of the soil from totally drying out. The container has stubby little legs to ensure that drainage hole contact with the soil is avoided. They are stackable for easy storage and each stake point is reinforced with ribs.
There are few more tweaks that need to be made before I have a 3D printed prototype generated to test with.
What do you guys think? Any suggestions?
So I decided to set out and design a drain container that closely mimics the distribution of water in nature that would also serve as a training platform for LST, mainlining or any technique where multiple, easily accessible anchor points could be had. In rocking my own mainline for this grow I found tomato cages to be somewhat awkward and too limiting. I was about to start clipping anchor points to the edges of my pots when it dawned on me to simply combine the two problems into the watering solution I was already mulling over.
Here is how I'm currently watering to ensure a good soak without requiring the plant to suck what it needs from the bottom run-off drain pan. Basically a bunch of smaller containers with holes punched in the bottom of them. This works very well however it's cumbersome and hideous.
Here is the current iteration of the drain container's design:
I'm still testing the drainage pattern which is why you don't see any drain holes in the model. The smaller holes on the outer lip serve as training anchor points. One need only tie a knot or form a ball in their training wire and run it up from under a hole to the plant, nice and clean. The large anchor points are for staking the container down. The idea is this would remain fixed in the pot the entire grow once the plant's lowest node was taller than 2". This initial size would accommodate both 3G and 5G pots from a diameter standpoint and hold just over 90 ounces of water.
Current flow testing shows that 80 .4mm holes in a concentric pattern focusing primarily on the outer perimeter will yield a drain time of 20 minutes. The idea being to simply fill it up and walk away. Measurement hash marks will be added in increments of 10 (oz) so I know exactly how much water is going in.
The container would be white to reflect light and since it would remain in place the entire grow it would also be a great way to keep tabs on any bugs since they'd pop against the white fairly well. It would also serve as a means to keep the upper portions of the soil from totally drying out. The container has stubby little legs to ensure that drainage hole contact with the soil is avoided. They are stackable for easy storage and each stake point is reinforced with ribs.
There are few more tweaks that need to be made before I have a 3D printed prototype generated to test with.
What do you guys think? Any suggestions?