My first grow

Jerry Garcia

Well-Known Member
Welcome to my first attempt at growing marijuana. Here's a brief run down of what I'm working with.

Space: 17"W x 30"L x 30"H. Removable shelf expands space to almost 60"H. Lined with bubble-wrap insulation coated in reflective material (I think this retains too much heat...1mm mylar on the way).

Lights:
1) 12 26w 6500k cfls
2) 2 2' T5 HO 24w 6500k
3) 1 Exo-Terra 26w 10.0 UVB cfl (used only for short bursts of 30-45 minutes, once or twice per day)

Not currently equipped but will be for flower: 1 150hps, 12 23w 2700k cfls, 2 2' T5 HO 2700k replacement bulbs, 2 65w 2700k cfls.

Soil: Fox Farm Ocean Forest. Added extra perlite. Began seedling growth in Miracle Grow Organic Potting Soil, but retained too much moisture imo.

Pots: 7 5.5" square black pots, 2 7" circular pots. Also 6 7" square pots for final upcan.

Ventilation: 2 CPU fans of unknown cfm as exhaust, 1 3" personal fan attached to duct as exhaust (for now), 1 4" personal fan as intake, 1 12" oscillating fan outside the space but blowing toward the plants.

Heat: 78-85 daytime (though 90 not uncommon), 60-65 night.

Humidity: 20-30% daytime (too low, I know...), over 30% at night.

CO2: Using the yeast/sugarwater mix in an old orange juice bottle with a hole in the top--I give it a good shake every now and then and try to shut off the fans for a few minutes, though it can get awful warm without them.

Seeds: Bag seeds collected from some quality bags.

About 3 weeks ago...

I germinated these seeds, using a moist paper towel on a plate covered with a bowl. Highly effective. Only 2 failed to sprout at all (leaving me with more than anticipated).

Once germinated, they went into 16oz clear plastic cups with 4 drainage slits cut into each one. After about a week and a half in these, they were upcanned to the 5.5" square pots.

During this time, they experienced varying degrees of stress related to...

1) Over-watering. The soil looked crusty, my finger came out dry, I guess the cup felt light, so I watered. The Miracle Grow soil I started with retained more moisture than I believed, leading to the plants getting a little droopy.

2) Shortly after (Feb. 17 I think) I upcanned to the 5.5" square pots and watered thoroughly. During the transfer, I tried to remove as much MG soil as possible, and invariably damaged the delicate roots (some more than others). Not too bad though.

3) Heat. Somedays, the heat got above 90 and stayed there for a while. This led to some yellowing and necrosis in the leaves, but I simply cut the bad part off the leaf. I've been busting as$ to try and improve the ventilation of this tiny space...progress is being made.

4) Humidity. Average 23%. Can't fix it. Tried paper towels, tried cups of water, bought a $15 dollar humidifier from Sears (and promptly returned as it had no effect--it was just a sponge in a res of water with a fan blowing out), just can't fix it. Tried buildling small humidity tents of seran wrap--worked, but made the plants too hot cuz no breeze from fans. I've just accepted that its low. All plants are growing and producing new growth, so I'm not too worried. And its good to be low during flower, so I'll have that to look forward to!

Here's what I've got so far...

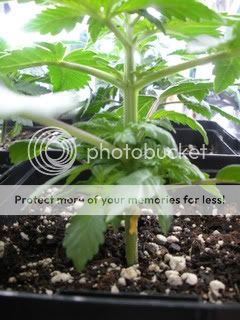
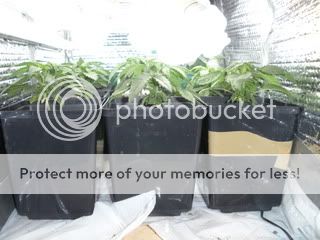
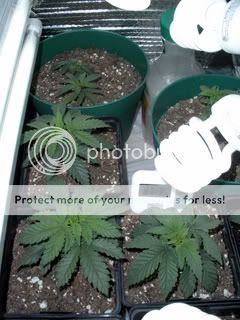
This is a general view inside. Note the general droop--still recovering from too much heat/water.


This next pic shows the biggest girl of the lot...she had some trauma and got a leaf tip snipped, but is doing fine for 2 weeks and a couple days.


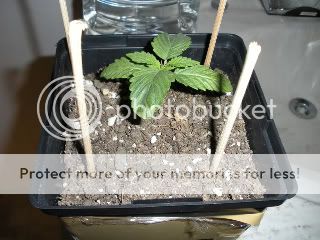
This next one is of the same plant about 5 days ago...you can see the trauma on that has since been cut off


None of these plants have been watered since their upcanning on Feb. 17. I mist ~once/day, causing the top of the soil to get a little damp, but no actual watering. I am now using a $5 moisture meter from Lowes that tells me when the soil is actually dry (at least until I learn to just recognize it). Since they have been slightly overwatered I want to ensure they are really DRY before they get wet again.

I will also begin using Fox Farm Grow Big (6-4-4) and Big Bloom (0.01-0.3-0.7) plant foods during the next feeding. I will likely use 1/4 of the recommended dosage and gradually increase as the plants adjust.

Any/all comments, suggestions, questions welcome!

~JG
 

Jerry Garcia

Well-Known Member
Yesterday I took moisture readings of all the plants using my moisture meter from Lowes. 10 DAYS since their last water and they finally registered in the dry/red zone on the meter. I took this opportunity to give the plants their first dose of nutes. I was planning on only using 1/4 of the recommended dosage, but the Grow Big suggested 1 tsp/gallon for standard feeding, which seemed conservative enough, so I went with .5tsp/.5gallon. I also used .5tsp of Big Bloom--my (not so) local hydro shop guy suggested using this throughout the life cycle and not only during budding, and a quick glance of the contents (Earthworm Castings, Bat and Seabird Guano) reassured me that I wouldn't do any harm using this stuff.

One day after feeding, the difference is staggering. All the droopy plants have perked up nicely and just look stronger...

Here is a general view of the improvement. Note the one on the left in front of the CO2 bottle was not watered witht he rest because the soil was still a little damp.


This is the same lady from the previous post (the biggest of the lot thus far)--note how all leaves have picked up are are not drooping at all.


So there it is. After one day of nutes the girls have all perked up.

I'm still constantly fighting the temp in there, so I may construct a "DIY Closet AC" using a styrofoam cooler, ice, duct, and a fan to move some colder air into the space. My goal is to stay 78-83 without aid from the large 12" fan (that sits on my toilet and requires me to move everytime I have to go...). I'll update pics of the cooler after I make it and give a report of its functionality.
 

Jerry Garcia

Well-Known Member
With some free time this morning I put together a DIY AC united as suggested in the following thread: https://www.rollitup.org/do-yourself/166300-diy-air-conditioning-closet-grows.html

I cut a ~5" hole in the side of the cooler, near the base (cold air sinks, so I wanted to draw air from the bottom). I then placed my 3" personal desk fan in the hole blowing out. To the other end of the fan I attached 3" expandable ducting from lowes. I didn't think this was going to produce enough pull to travel the 4' up to the grow space, so I cut the 3" duct in half and inserted a CPU fan (of unknown cfm...came from an old school apple) between the sections to act as an inline air booster. I then cut 3 holes in the lid of my styrofoam cooler to allow airflow. I purchased 6 $2 ice packs from Target (all they had in stock of the large size) and plan on using 3 at a time, so I always have three frozen packs ready to go.

Here's the cooler. Note: I didn't seal the lid onto the cooler. The suction produced from the fan is enough to hold the lid on firmly.


Here's an interior view and the duct going up to the shelf above. Note the square cpu fan duct taped in the center.


I had a small amount of ice in my freezer that I just threw in the cooler until the ice packs freeze. Currently, the temp is holding at 77 degrees with only my two cpu exhaust fans running and this ac.
 

Tatan

Well-Known Member
This looks great for a first grow man and tons of info, I´m on my first grow as well, so I´ll be following your thread.

I think you forgot to tell us what strain you are growing...:bigjoint:
 

Jerry Garcia

Well-Known Member
This looks great for a first grow man and tons of info, I´m on my first grow as well, so I´ll be following your thread.

I think you forgot to tell us what strain you are growing...:bigjoint:
Thanks for the kind words Tatan. I've been doing lots of research and want to share the knowledge as best I can. I also think visuals are key, so I will be including lots of pics to help explain.

As for the strain...they are all bagseed, though I can attest the bags they came from were quality. I mixed all the seeds together, so I can only try to classify them by phenotype. As they get bigger I should have a better idea of who is related to who.

AC UPDATE: It works. Temp is holding ~78 with no fans. Lets just hope it stays this way.

I've also begun to catch fleeting whiffs of the faintest aroma...:)
 

Tatan

Well-Known Member
Thanks for the kind words Tatan. I've been doing lots of research and want to share the knowledge as best I can. I also think visuals are key, so I will be including lots of pics to help explain.

As for the strain...they are all bagseed, though I can attest the bags they came from were quality. I mixed all the seeds together, so I can only try to classify them by phenotype. As they get bigger I should have a better idea of who is related to who.

AC UPDATE: It works. Temp is holding ~78 with no fans. Lets just hope it stays this way.

I've also begun to catch fleeting whiffs of the faintest aroma...:)

Good thing about the temp :) , and yeah I agree about the pics... they are essential to get a better idea of the grow. Im trying to do the same on my journal.
I think its cool that you are growing some bagseed, I´m doing the same for half my grow. I heard somebody on this forum say that a lot of times bagseed is great, cause sometimes people have to sell really good quality weed at a lower price just cause some damn male got in there and now the weed has seeds in it, lol. Btw, I have been using miracle grow potting soil as well, and I can see what you mean about it retaining a lot of moisture... I am also worried I might be overwatering due to it. It´s a good thing you were able to substitute for it.

And yeah, as your plants get older, maybe you can start seeing at first if its more indica or sativa by the leaves.. anbd then maybe by the height and bud formation you can kind of guess at its origins...
 

Jerry Garcia

Well-Known Member
I have been using miracle grow potting soil as well, and I can see what you mean about it retaining a lot of moisture... I am also worried I might be overwatering due to it. It´s a good thing you were able to substitute for it.
I would get some perlite and mix some into your MG soil if you can. The soil around the central root ball just stayed moist for days, even though the surrounding/top soil was dry and crusty. Though I never added perlite to mine (because I could upgrade to the good $hit!) I think it would help immensely, and you can get it at lowes or home depot for pretty cheap.

I agree about the bagseed thing too--one pesky undetected male can cost someone a big chunk of change! On a related note, I remember reading that pollen from male cannibus plants can stay viable for a long time--if a male has a chance to release the pollen from their balls, it gets in everything it can, and can contaminate future grows, especially indoors. So weed those guys out early.

Just checked out your journal and they're looking good! Keep up the good work and share the knowledge!
 

Tatan

Well-Known Member
I would get some perlite and mix some into your MG soil if you can. The soil around the central root ball just stayed moist for days, even though the surrounding/top soil was dry and crusty. Though I never added perlite to mine (because I could upgrade to the good $hit!) I think it would help immensely, and you can get it at lowes or home depot for pretty cheap.

I agree about the bagseed thing too--one pesky undetected male can cost someone a big chunk of change! On a related note, I remember reading that pollen from male cannibus plants can stay viable for a long time--if a male has a chance to release the pollen from their balls, it gets in everything it can, and can contaminate future grows, especially indoors. So weed those guys out early.

Just checked out your journal and they're looking good! Keep up the good work and share the knowledge!

Yeah I added some perlite already lol...

Keep the pics coming ;)
 

Jerry Garcia

Well-Known Member
Sorry for the delayed update...been busy finishing up classes before spring break.

AC UPDATE: Temps were beginning to climb up to around 84, so I put my 4" fan near the AC duct blowing towards my plants. It may have helped. Temp continues to stay around 78-81 on the whole. Even without the icepacks, the air drawn through the cooler is considerably cooler than that in the grow space, and helps with the temp--reassuring, as now I won't worry as much about the temp rising if the ice packs thaw out...

Upon my daily misting and inspection yesterday, I noticed some of the soil had already become dry and the pots comparatively light. I used the moisture meter and discovered three of the girls were already reading in the dry zone. I watered fully a couple days ago for the first time since repotting, so maybe they were just thristy?

Either way, I elected to water the three driest. Some of the others were still sufficiently moist, so they only received a misting.

For feeding, I decided to continue with the fertilizer and mixed a 1L spray bottle with a capful of Grow Big and a capful of Big Bloom. This is a higher concentration than last time of the Grow Big, but they responded favorably last time so I tried it again. This time, however, I administered some of the food foliarly using the spray (usually I use a spray bottle top without the spray nozzle--it creates a smaller hole from which I can gently administer the food).

A few hours after feeding, they were drooping hardcore...so badly I was distraught over the situation for most of the evening. By morning though they rebounded as I always knew they would, and are looking much better today. See for yourselves...

A general view of the plants this morning...little droopy still...


Here's another view of the front...


From the top down...note the two little guys in the back coming along nicely


A close-up of one of the tops...just keeps spitting out new leaves!


Another close-up, this one a profile showing the undergrowth


So that's it. I'll let you know if their status changes.
 

Tatan

Well-Known Member
Those plants are looking great, nice and compact. I really like how you have the Cfl up top really close to the plants. I´m using the same splitter to put 2 bulbs in 1 socket, nice.

Btw, how do you do it to put your pics inside your post ? I only know how to put in thumbnails that people have to click to see the enlarged pic.
 

Jerry Garcia

Well-Known Member
Those plants are looking great, nice and compact. I really like how you have the Cfl up top really close to the plants. I´m using the same splitter to put 2 bulbs in 1 socket, nice.

Btw, how do you do it to put your pics inside your post ? I only know how to put in thumbnails that people have to click to see the enlarged pic.
Yeah, I actually have three Y-splitters plugged in to each other, so I get 4 cfl's from one socket. I screw that into a socket that plugs into an extension cord and viola! A cheap way to cram lots of light in a small space. I have three separate fixtures, each with 4 cfls. Creates great coverage, and you can lower them as close as you want (I actually had to raise them a couple chain links today :weed:
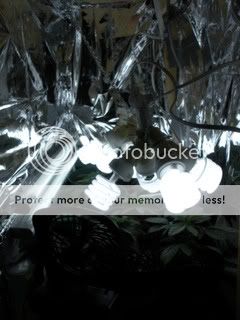
). To suspend them, I have hooks screwed into the top of my space, from which I run a chain around the splitters--because there are 4 of them per fixture, they are relatively stable and will just hang there without too much trouble. The chain also allows for easy adjustment of light height (and will allow me to drop the lights down when they outgrow the current shelf and move to the floor...still a little ways off on that though). As always, I have pics to help illustrate my ramblings...

Here you can see the whole setup. The Y-Splitters are each rated to 660watts, so provided you don't exceed the total wattage you should be able to screw as many of these together as you want with no worry. The beauty of cfls is each one is only 26watts...i'm pulling 104watts per fixture, well under the max. The plug-socket is also rated to 660 watts.


You can get the splitters and plug-sockets for less than $2 each, and any extension cord will be sufficient (another convienent feature is the fixtures can all be plugged into each other so only one cord needs to be run to a wall outlet).

It should be noted that lowes and home depot both carry these splitters. The one pictured above is from lowes, and has a less extreme angle of Y than those from home depot, pictured below. In other words, the home depot splitter forms a 90 degree angle, while the lowes splitter is more like 70 degrees. This is important when screwing many together, as the home depot one (with a larger angle) will spread the bulbs out more than the lowes splitter. It may or may not be desireable to have them spread that far out, but I like mine closer together (and the ones from lowes come individually packaged and just looked cleaner).


So to clarify, the splitter above is from home depot and the plug-socket is from lowes. In the first picture, its the other way around. I don't have a preference of plug socket.

To embed pics directly in your post, you need to select the "direct link" URL from whatever site you post your pics to (I use photobucket) and paste it into the "insert image" URL when posting.

Hope that helps!

P.S. Got my mylar today in the mail...may be doing some redecorating in the space tomorrow with my new-found free time...
 

Tatan

Well-Known Member
Very nice... I think I´m going to try using multiple splitters on a single socket like you are doing. Right now im only using 1 and getting 2 bulbs per socket.

Thankis a lot for showing me how to inbed pictures, I didnbt know I had to upload them somewhere, hehehe.
 

Jerry Garcia

Well-Known Member
After a busy day working in the garden yesterday, I have much to share today.

I administered another round of watering yesterday, again with stepped up nutrients. I used 2 tsp Grow Big, 1/2 cup Big Bloom, 1 tbsp high-phosphate indonesian bat guano, and 1 gallon distilled water (high-nitrogen would have been preferable, but I don't have any, and the store isn't exactly down the road). After giving most a thorough feeding, they began to do their customary post-watering droop. They responded well to their feeding, and as expected have lost most of their droop.

Here's an overview of their general disposition today


This one shows the stem and undergrowth of the front right plant above...looks pretty healthy I think


I'm having trouble finding a spot for the thermometer now that they are getting so big


Here's another from the front

After watering, I decided the bubble-wrap insulation had to go. While it created a nice false-wall on one side of the grow space, it retained too much heat, and temps began climbing back into the high 80's even with the ac unit running. This may be a result of the weather getting warmer (was like 75 outside yesterday...should be in the 80's today), and it is likely only going to get hotter over the next few months, so i took down 3 sides and replaced with mylar-like film (very thin...maybe too thin). It allowed me increase the interior space by a couple inches as well (though now there is gap from which the plants could fall...i'll just have to be careful)

This one's a little dark, but you can see the mylar.


Temp this morning was 75. Hope it stays that way.

I also had a slight mishap yesterday...while putting back up the lights I dropped one of the fixtures, breaking a bulb. So, I'm down to 11 right now. At least the plants were safe in the bathtub!

So that's it. I'm going out of town in a couple days, gonna be gone for 5 or so...I've got someone coming by to check on the babies for me. I'm going to water them again just before I go, but they have been gobbling up water so I may need the sitter to feed them.

Is it ok to pre-mix my nutrients in water and let it sit for a few days? I would like to brew up a batch and leave it for the sitter to feed in necessary.

I also want to start determining sex as soon as I get back from my trip so I can stop wasting my nutrients on males and upcan the females to their larger pots.

So this is basically the worst-time vacation ever, but I had little control over it. I think I've grown so attached to the little girls I don't want to leave them!
 

Jerry Garcia

Well-Known Member
I thought it was worth noting that the humidity has been around 40% (45% right now) for the last few days. I think the ac unit has also increased the humidity of the room while lowering the temp. Awesome.
 

Tatan

Well-Known Member
Those plants are looking really awesome I like such short spacing between nodes, means they are getting good light.

Pre mixing is fine, however most people here reccomend that you start feeding them when you put them on 12/12, so up to you.
I hope the sexing goes well when you get back, lol hope we both get enough females (crossing fingers)... hehehe
 

Jerry Garcia

Well-Known Member
Those plants are looking really awesome I like such short spacing between nodes, means they are getting good light.

Pre mixing is fine, however most people here reccomend that you start feeding them when you put them on 12/12, so up to you.
I hope the sexing goes well when you get back, lol hope we both get enough females (crossing fingers)... hehehe

I am certainly flooding their small space with light, so that's good. As far as the feeding, I've read just the opposite, that most people wait until the plant is at least 2 weeks old (the thought being the plant is more established and stronger than beginning to feed at the seedling stage) to begin feeding. I will certainly continue feeding when I hit 12/12 though.

And yeah, here's to hoping for girls! I only really need one, but I'd like all 13 ya know?
 

Tatan

Well-Known Member
I am certainly flooding their small space with light, so that's good. As far as the feeding, I've read just the opposite, that most people wait until the plant is at least 2 weeks old (the thought being the plant is more established and stronger than beginning to feed at the seedling stage) to begin feeding. I will certainly continue feeding when I hit 12/12 though.

And yeah, here's to hoping for girls! I only really need one, but I'd like all 13 ya know?
Good luck on the trip, yeah it´s hard leaving your girls... but there is a reward... there is nothing like seeing your plants after a few days, hehehe cause you really notice the growth, so its cool.

By the way, do you plan or topping your plants ? It makes them rounder and bushier, but some people prefer 1 main stem.

As far as the sexing goes, hehe yeah I do hope you get all 13. I guess I should have done what you did, get a lot of plants. If you have a lot of plants you dont sweat the sexing so much. Thats why for my next grow, I´m going with feminized seeds:bigjoint:
 

mared juwan

Well-Known Member
Hey man, you seem to be off to a good start here. You will find that your humidity will continue to rise as the plants grow and the increased number of leaves respirating pump a lot of moisture into the air. Keeping the humidity down in flower is always a bigger battle than keeping it higher in veg. Bud mold sucks. Also if you are still worrying about whether or not to water just lift up the pots every day. You will notice that immediately after watering they are quite heavy and will get progressively lighter until they feel empty when dry. So yea, good luck with the sexing and grow in general. -/\/\ared
 

Jerry Garcia

Well-Known Member
Good luck on the trip, yeah it´s hard leaving your girls... but there is a reward... there is nothing like seeing your plants after a few days, hehehe cause you really notice the growth, so its cool.

By the way, do you plan or topping your plants ? It makes them rounder and bushier, but some people prefer 1 main stem.
Yeah, I'm impressed every morning I wake up, so 5 days should be awesome.

I haven't really decided whether or not to top them--I'd really like some input/suggestions. I think it depends on how many are girls. Plus, my space is cramped, so there can only really be 8 max growing in there at once.

Hey man, you seem to be off to a good start here. You will find that your humidity will continue to rise as the plants grow and the increased number of leaves respirating pump a lot of moisture into the air. Keeping the humidity down in flower is always a bigger battle than keeping it higher in veg. Bud mold sucks. Also if you are still worrying about whether or not to water just lift up the pots every day. You will notice that immediately after watering they are quite heavy and will get progressively lighter until they feel empty when dry. So yea, good luck with the sexing and grow in general. -/\/\ared
Thanks Mared, I was wondering if it was the ac thing or something else bringing it up. The leaves are getting big...though the humidity is still only 37 or so. We'll see as the spring/summer approaches.

I've also become much better at recognizing the weight of the girls as you suggested--now they are bigger and drinking more, so it is easier to tell the difference. I still use the moisture meter just to be sure they are thoroughly dry before being watered again.

Thank you both for your input. Gonna post an update with pics before I leave.

Throw me some opinions about topping!
 

Tatan

Well-Known Member
Yeah, I'm impressed every morning I wake up, so 5 days should be awesome.

I haven't really decided whether or not to top them--I'd really like some input/suggestions. I think it depends on how many are girls. Plus, my space is cramped, so there can only really be 8 max growing in there at once.


Thanks Mared, I was wondering if it was the ac thing or something else bringing it up. The leaves are getting big...though the humidity is still only 37 or so. We'll see as the spring/summer approaches.

I've also become much better at recognizing the weight of the girls as you suggested--now they are bigger and drinking more, so it is easier to tell the difference. I still use the moisture meter just to be sure they are thoroughly dry before being watered again.

Thank you both for your input. Gonna post an update with pics before I leave.

Throw me some opinions about topping!

I had the same question, cause my plants in veg are only a few days older than yours. My goal is to get my plants to look like the plant Mammath has in his grow room:

https://www.rollitup.org/grow-journals/159334-stealth-cabinet-grow-bagseed-test.html


He posted on my grow journal about how to get them like that. Basically if you top them when they are around 3 inches talland then you have to get the branches to fan out. Take a look ... I think you will like:blsmoke:
 
Top