My First DIY Cab Grow: Using the K.I.S.S. Method
- Thread starter notballin
- Start date

notballin
Member
Brace yourselves for a major list of home improvement that I think you'd all be VERY impressed with.
List of Fixes TLDR:
-Fixed the exhaust and, using parts from the local Casa Depote, made a carbon air filter with no air leaks. (I'll thank myself for this later)
-Brought new socket adapters to change and re-position the lighting (so fans can blow on them to keep them cool)
-Added more fans for air circulation (to cool down the lights, Blow around the Co2, and to breeze the beautiful young lady)
-Added a DIY Co2 generator (at 8 bucks and with readily made materials, why not? It's no work for me to change it every two weeks and it helps any high temperature issues).
-Undid most of the LST on the plant (Keyword is MOST. I accomplished what I wanted to accomplish, and the plant is still extremely low, meaning I'll end up with adult leaves at a very low height.)
-Fixed a feeding issue (the leaves were starting to neute burn slightly. Adjusted feeding schedule to compensate).
Overall, she's looking mighty beautiful, green, and happy! I don't plan on adjusting anything in the box for now, nor do I plan on doing anything else that is strenuous to the plant, until I begin to see adult leaves forming.
With this being said, time to provide everyone with what they really want to see: PICTURES.
The first thing I decided to fix was the exhaust. SupChaka was correct with the potential of the exhaust fan being wasted. So while I began to fix it... I had an epiphany... I'll let the pictures do the talking.

I adjusted the hole to be in line with the size of the exhaust fan.
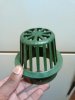
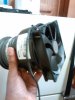
This is something I found at Home Depot. I figured it would work perfectly for what I needed it for. It fit into the piece that's displayed below:
The above piece is a drain plug and some kind of pvc pipe attachment superglued together to make a perfect seam. I decided to make the carbon air filter using these, some screws, some tape, some superglue, and a stocking.
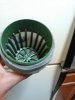
Covered with a stocking. You see where I'm going with this...
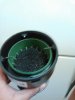
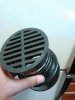
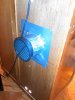
THE CARBON FILTER SANDWICH. There's nowhere for the air to go but into the filter, where it has to touch the carbon before exiting through the back. With the way it's screwed into place, no air can escape between any seams. Also, because of the way I have the fan installed and have this "screwed in," I can easily change the activated carbon whenever I want!
The fan, with the help of screws drilled in all the wrong places (if you know what I mean...) provide a support for the fan to blow air out of the filter. Note that half of this entire filter sticks out of the box and the part that is inside of the box is BIGGER which prevents any air from blowing out of the actual hole made to house it. Don't worry... I though this through.
Just in case. Duct tape is so useful...
Remember that it's mounted to the back with outdoor mounting tape to secure it. The tape is really... really strong. I attempted to pull something that was mounted with it out of the box... took a while.
ANYWAYS
I figured "I'm here adjusting the exhaust, might as well get everything over with." Because of this, I added many more fans and made a DIY Co2 system. Sure, I know that I won't be able to "gauge the pressure" and that people think it's a "waste of time in veg" and that some of the Co2 will be "exhausted out of the cab..."
Fuck if I care lol. All forms of Co2 help plant photosynthesis and it cost me literally 8 bucks, aside from material that I already had lying around. I only have to change it every two weeks and that requires 5 minutes of me mixing. Worst case scenario is it doesn't help (unlikely), best case is the plant growth skyrockets. Remember that I added this because of the natural "heat" issue that comes with a grow box. Rather than investing in expensive LED's to attempt to reduce heat, I decided to turn the heat into an asset. It's sitting at 84f at the moment (keep in mind that it's not a dry or stagnant heat. There are fans everywhere and the root zone always feels cool to the touch).
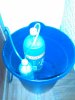
It's on a "one bubble per second" drip, running to a second bottle to make sure no yeast/fermentation/alcohol gets spewed into the box. The final tube is connected to the upper right fan, which is blowing directly at the green.

To keep temperatures from dropping to retarded levels during the dark cycle, the extra fans are ran on the same timer as the lights. Multi purpose!
So there you have it. The updates to the cab. It's been rough, but Pepper (I nicknamed her Pepper because of Peppermint Kush... get it? No? ... ok moving on...) is looking a bit greener, and her new growth looks waaaaaay healthier than the original growth.
TO DO LIST:
-Make the Co2 generator STEALTH
-[DONE] Elevate the plant using a prop and some wood to be relatively close to the light and Co2 fan.
-Double Stack the exhaust with another PC fan to get more power out of it
-[DONE] add a bright white bulb to even out the light spectrum a bit (yes I know they need only blue, but a tad bit of red never hurt anything)
-[DONE] make use of the pot and bury the stem since soil likes to play jokes and compact itself when it gets watered.
Small edit: I wish there were a way to edit original posts... I'd like to add a "go to this page for updates" link or something
List of Fixes TLDR:
-Fixed the exhaust and, using parts from the local Casa Depote, made a carbon air filter with no air leaks. (I'll thank myself for this later)
-Brought new socket adapters to change and re-position the lighting (so fans can blow on them to keep them cool)
-Added more fans for air circulation (to cool down the lights, Blow around the Co2, and to breeze the beautiful young lady)
-Added a DIY Co2 generator (at 8 bucks and with readily made materials, why not? It's no work for me to change it every two weeks and it helps any high temperature issues).
-Undid most of the LST on the plant (Keyword is MOST. I accomplished what I wanted to accomplish, and the plant is still extremely low, meaning I'll end up with adult leaves at a very low height.)
-Fixed a feeding issue (the leaves were starting to neute burn slightly. Adjusted feeding schedule to compensate).
Overall, she's looking mighty beautiful, green, and happy! I don't plan on adjusting anything in the box for now, nor do I plan on doing anything else that is strenuous to the plant, until I begin to see adult leaves forming.
With this being said, time to provide everyone with what they really want to see: PICTURES.
The first thing I decided to fix was the exhaust. SupChaka was correct with the potential of the exhaust fan being wasted. So while I began to fix it... I had an epiphany... I'll let the pictures do the talking.
I adjusted the hole to be in line with the size of the exhaust fan.
This is something I found at Home Depot. I figured it would work perfectly for what I needed it for. It fit into the piece that's displayed below:
The above piece is a drain plug and some kind of pvc pipe attachment superglued together to make a perfect seam. I decided to make the carbon air filter using these, some screws, some tape, some superglue, and a stocking.
Covered with a stocking. You see where I'm going with this...
THE CARBON FILTER SANDWICH. There's nowhere for the air to go but into the filter, where it has to touch the carbon before exiting through the back. With the way it's screwed into place, no air can escape between any seams. Also, because of the way I have the fan installed and have this "screwed in," I can easily change the activated carbon whenever I want!
The fan, with the help of screws drilled in all the wrong places (if you know what I mean...) provide a support for the fan to blow air out of the filter. Note that half of this entire filter sticks out of the box and the part that is inside of the box is BIGGER which prevents any air from blowing out of the actual hole made to house it. Don't worry... I though this through.
Just in case. Duct tape is so useful...
Remember that it's mounted to the back with outdoor mounting tape to secure it. The tape is really... really strong. I attempted to pull something that was mounted with it out of the box... took a while.
ANYWAYS
I figured "I'm here adjusting the exhaust, might as well get everything over with." Because of this, I added many more fans and made a DIY Co2 system. Sure, I know that I won't be able to "gauge the pressure" and that people think it's a "waste of time in veg" and that some of the Co2 will be "exhausted out of the cab..."
Fuck if I care lol. All forms of Co2 help plant photosynthesis and it cost me literally 8 bucks, aside from material that I already had lying around. I only have to change it every two weeks and that requires 5 minutes of me mixing. Worst case scenario is it doesn't help (unlikely), best case is the plant growth skyrockets. Remember that I added this because of the natural "heat" issue that comes with a grow box. Rather than investing in expensive LED's to attempt to reduce heat, I decided to turn the heat into an asset. It's sitting at 84f at the moment (keep in mind that it's not a dry or stagnant heat. There are fans everywhere and the root zone always feels cool to the touch).
It's on a "one bubble per second" drip, running to a second bottle to make sure no yeast/fermentation/alcohol gets spewed into the box. The final tube is connected to the upper right fan, which is blowing directly at the green.
To keep temperatures from dropping to retarded levels during the dark cycle, the extra fans are ran on the same timer as the lights. Multi purpose!
So there you have it. The updates to the cab. It's been rough, but Pepper (I nicknamed her Pepper because of Peppermint Kush... get it? No? ... ok moving on...) is looking a bit greener, and her new growth looks waaaaaay healthier than the original growth.
TO DO LIST:
-Make the Co2 generator STEALTH
-[DONE] Elevate the plant using a prop and some wood to be relatively close to the light and Co2 fan.
-Double Stack the exhaust with another PC fan to get more power out of it
-[DONE] add a bright white bulb to even out the light spectrum a bit (yes I know they need only blue, but a tad bit of red never hurt anything)
-[DONE] make use of the pot and bury the stem since soil likes to play jokes and compact itself when it gets watered.
Small edit: I wish there were a way to edit original posts... I'd like to add a "go to this page for updates" link or something
notballin
Member
Thanks broLooking really good man!!
notballin
Member
Not at all! They're personal desk fans so they lose a bit of power the further you go back. The wind pressure is just right.That's a lot fans, it's not too windy in there is it?
Think of a perfect summer morning at 10 am with a light breeze blowing on the trees and your skin. It's a bit like that, just less powerful

(small note: The only fan aiming directly at the plant is the one at the top right that's rigged with a Co2 line. It's also slightly blocked by the CFL's).
notballin
Member
You won't regret itInterested to see how this one turns out... subbed")
notballin
Member
No worries, she's elevated. It was on the "to do" list on page 3.I just saw the above picture. With those CFLs I would try to move them a lot closer it should prevent any stretching.
I had mine sit about 1-3 inches from the leaves
I changed the lights to face "up" as well, so the heat could stay at the top of the cab.
Ah i didnt see that part. Just saw the picture. I had like 3-5 CFLs on top of mine. Only had one instance of any burn but that was because a light actually fell and sat on it over night My temps also got hot some nights too; like 91F But all turned out well.
I cant wait to start a cab and get two plants going
I cant wait to start a cab and get two plants going
notballin
Member

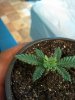
Here's a crap pic from my phone.
-The bottom leaves are from an earlier time period where heat was an issue. It's been fixed (as you can see from the new growth).
-The stem is actually buried (from the LST) and has taken shape nicely.
-I noticed growth has increased by a lot since I've made the changes.
I'll keep everyone posted. Overall she's been through some hell, but she seems to be coming along quite nicely.
Small update: I ordered 6 wholesale e27red/Blue60 grow lights and I'm working on the Mylar. I've got another idea...
supchaka
Well-Known Member
I dicked around with some DIY filters and found that anything I did with stockings clogged up with dust really fast. I eventually tried window screen which was better but still clogged fairly quickly. I could tell because my temps would start raising a little each day.
notballin
Member
Back with a few updates. Still waiting on those LED's and I plan on adding a few "containers" to the back of the cab to house the DIY Co2 generator.
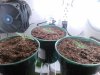
Here are a few pics. I decided that I'd get more bang for my buck and popped a few bag seeds to occupy my time while "Pepper" recovered. She's been through quite a bit of bullshit... nute lockout, heat stress, etc. Things are back on track now and she's recovering from her FIM.
So here she is with a seemingly successful FIM cut (and covered in soil particles...)!
Needless to say, she's nowhere near down for the count. While I play around with the bagseed that I popped, I have a feeling that this one will make an excellent mother. I don't plan on putting her into flower until I nab and root a few clones down the road. (Note that she's taller than she looks. LST'd and buried at the stem to maintain a very low height with mature leaves).
As for the bagseeds, it sure is a tossup when you plant them. Out of 12 seeds, only 6 of them popped on time. I chose and planted the best six and only three of them really took. I'm hoping to get a strong mother out of at least one of the three so I can have a variety of clones.
They're a bit older now. It's amazing what kind of differentiation you can get from bagseed. One seems to be mostly sativa and likes to stretch regardless of how close I put it to the CFL (no worries, the entire stem is red and strong... but holy shit does it like to grow tall). The other two are relatively short which is intriguing. One has a darker set of broad leaves and the other has a lighter set of slightly smaller leaves. I'll be monitoring them closely and will follow up with more pics.
They've been on a weekly feed cycle of Alaskan Fish Emulsion and Miracle Grow Organic Choice All Purpose Plant Food (The ratio of Miracle Grow fert that I use in the feeding process is very low... this shit is super concentrated and not 100% organic).
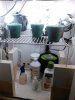
Also, here's a picture of the new shelving system. With the varying heights of the wooden blocks (I can remove the shelf from them), and the adjusting of vertically mounted CFL's, I can achieve perfect light distance. All of this won't matter once I fill the box with LED's, but for now this will have to do.
More updates to come. I apologize for not posting earlier, but I like to make every post count. "The proof is in the pictures" as they say...
EDIT: I triple stacked the exhaust using a few of the fans that were placed in odd positions. I also added a bit of tape around the box to reduce light leaks.
Here are a few pics. I decided that I'd get more bang for my buck and popped a few bag seeds to occupy my time while "Pepper" recovered. She's been through quite a bit of bullshit... nute lockout, heat stress, etc. Things are back on track now and she's recovering from her FIM.
So here she is with a seemingly successful FIM cut (and covered in soil particles...)!
Needless to say, she's nowhere near down for the count. While I play around with the bagseed that I popped, I have a feeling that this one will make an excellent mother. I don't plan on putting her into flower until I nab and root a few clones down the road. (Note that she's taller than she looks. LST'd and buried at the stem to maintain a very low height with mature leaves).
As for the bagseeds, it sure is a tossup when you plant them. Out of 12 seeds, only 6 of them popped on time. I chose and planted the best six and only three of them really took. I'm hoping to get a strong mother out of at least one of the three so I can have a variety of clones.
They're a bit older now. It's amazing what kind of differentiation you can get from bagseed. One seems to be mostly sativa and likes to stretch regardless of how close I put it to the CFL (no worries, the entire stem is red and strong... but holy shit does it like to grow tall). The other two are relatively short which is intriguing. One has a darker set of broad leaves and the other has a lighter set of slightly smaller leaves. I'll be monitoring them closely and will follow up with more pics.
They've been on a weekly feed cycle of Alaskan Fish Emulsion and Miracle Grow Organic Choice All Purpose Plant Food (The ratio of Miracle Grow fert that I use in the feeding process is very low... this shit is super concentrated and not 100% organic).
Also, here's a picture of the new shelving system. With the varying heights of the wooden blocks (I can remove the shelf from them), and the adjusting of vertically mounted CFL's, I can achieve perfect light distance. All of this won't matter once I fill the box with LED's, but for now this will have to do.
More updates to come. I apologize for not posting earlier, but I like to make every post count. "The proof is in the pictures" as they say...
EDIT: I triple stacked the exhaust using a few of the fans that were placed in odd positions. I also added a bit of tape around the box to reduce light leaks.