HerbalRemedy
Well-Known Member
Just wanted to show off my entire DWC setup. Very simple and very effective. Been running for a few years with a dozens of harvest. Yields are excellent and more than enough for me and my friends for what ales us.
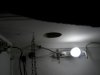
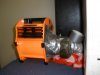
Short Cabinet- Veg cab is actually an old floor model tv case I converted over to a grow cab. I have a harbor freight blower mounted to the top pulling air out with vents at the bottom to refresh the air. I found that to veg plants don't need very much light at all. I mounted some surge protectors at the top and have used light bulb adapters so I can install a few cfls. Right now I have a couple of feminized bubblicious under a homemade dual cfl. light I made out of pvc board, i'll keep this above the ladies for a couple more weeks before removing and sticking strictly to the bulbs at the top of the cab. I have painted most of the surfaces flat white. I see a lot of people installing mylar and security reflective blankets but this seems to work out just fine and its simple. When the doors are shut the lights are bright as hell so it works for me.
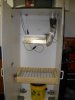
Taller Cabinet - is for flower. Wardrobe cab. from home depot converted over. Stanley Blower at the top and vents at the bottom. Same setup as veg cab. 400watt hsp. Blower is positioned to blow over ballast at top of cab also. First time using scrog screen so I may not need all the height but ohh well.
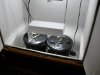
DWC Buckets-5gal Black lids and buckets. Guess I could have used white lids to reflect more light but I haven't seen any difference between the two. Black really helps keep algae to a standstill. I haven't seen any algae at all since I started using black with the reservoirs. Lids have a built in spout which is very nice for water testing and top offs.
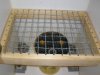
The plant sites are around 1.75 in diameter. I designed my own custom netcups out of pvc pipe and end caps. I use the rapid rooter starter plugs and wanted a cup that it would fit perfectly in. I couldn't find one available on the market. I was tired of dealing with those stupid grow rocks in my old 3 inch cups. They got everywhere and always left a film in my water no matter how many times I cleaned them. Plants grow very nice in the cups but sometimes need a little help standing up straight once the plants grow above 3 feet. Thats to be expected, at least I don't have to deal with cup inserts or grow rocks anymore. Cups are made out of sch 40 and heavy duty. They have stood the test of time.
I'm using 6 inch anchor sand air stones now. I finally solved the problems of floating air stones when I found these. No suctions cups or weights to worry about. Connect airline and drop into water. stays put at the very bottom of the reservoir with no problems. I have an airline coupler installed on the lid so I quickly disconnect the lines and move the reservoir when needed.
I also use 15 watt Hydor Mini Aquarium heaters for winter. I've used a lot of them over the years and they are by far the most reliable and smallest. Perfect for reservoirs this size. They come with suction cups to prevent them from floating but I just zipped tied an lead egg fishing weight to them. I notched out a small section for the electrical cords in the lip of the reservoir so the lid can be closed properly.
I'm using Dyna-Grow Grow and Bloom Nutes. I was using General Hydroponics 3 part but switched to Dyna-grow because it was cheaper and a very simple two part. I have no regrets and have great results with these nutes.
DWC Buckets are by far the simplest and easiest method of hydroponics I have come in contact with. I've used other systems and other forms of reservoirs and the buckets win hands down every-time in my opinion. I get quick positive results every time. I am not a fan of tubs or totes for reservoirs anymore. For one or two plants 5 gal buckets work just fine. The handle and size make them very easy to move around. Fill ups are a snap. I really appreciate the ease of breakdown and cleanup during harvest.
Scrog Screen - First time I've tried it but very happy with how the screen turned out. I looked at a lot of designs and haven't seen any like this one yet. Cost me around 5 bucks in supplies because I had most of them already. Just a simple 2x4 frame. Roughly 2ft x 2.5ft. I made marks every 2 inches around the perimeter which will create a grid of 2in by 2in squares. I took cheap jack chain and secured one end with a screw, pulled tight, then secured on the other end. I just created an entire row like that then weaved the chain over and under on the other side. End result is very sturdy and will last for years to come. Great thing is the cab. has shelving holes on each side so I just used 2 bolts screwed in on each side. I can easily remove, raise, or lower the screen according to the type of plant or reservoir in use.
Neways thought I would share my DWC setup with everyone. I'm very happy with the simplicity and the yields I get from the system time and time again. I'm trying out the feminized Bubblicious strain from Nirvana right now. Germinated two, one will stay in the cab as a mother and one will be transfered to the screen cabinet for a little more veg then flowering. Plants stretched a little at first because I didn't have the removable light installed. I had to leave out for a few days and they had shot up like that in a couple of days. They are ok now and have stopped stretching since the light was brought down. To everyone out there, Happy Growing
Short Cabinet- Veg cab is actually an old floor model tv case I converted over to a grow cab. I have a harbor freight blower mounted to the top pulling air out with vents at the bottom to refresh the air. I found that to veg plants don't need very much light at all. I mounted some surge protectors at the top and have used light bulb adapters so I can install a few cfls. Right now I have a couple of feminized bubblicious under a homemade dual cfl. light I made out of pvc board, i'll keep this above the ladies for a couple more weeks before removing and sticking strictly to the bulbs at the top of the cab. I have painted most of the surfaces flat white. I see a lot of people installing mylar and security reflective blankets but this seems to work out just fine and its simple. When the doors are shut the lights are bright as hell so it works for me.
Taller Cabinet - is for flower. Wardrobe cab. from home depot converted over. Stanley Blower at the top and vents at the bottom. Same setup as veg cab. 400watt hsp. Blower is positioned to blow over ballast at top of cab also. First time using scrog screen so I may not need all the height but ohh well.
DWC Buckets-5gal Black lids and buckets. Guess I could have used white lids to reflect more light but I haven't seen any difference between the two. Black really helps keep algae to a standstill. I haven't seen any algae at all since I started using black with the reservoirs. Lids have a built in spout which is very nice for water testing and top offs.
The plant sites are around 1.75 in diameter. I designed my own custom netcups out of pvc pipe and end caps. I use the rapid rooter starter plugs and wanted a cup that it would fit perfectly in. I couldn't find one available on the market. I was tired of dealing with those stupid grow rocks in my old 3 inch cups. They got everywhere and always left a film in my water no matter how many times I cleaned them. Plants grow very nice in the cups but sometimes need a little help standing up straight once the plants grow above 3 feet. Thats to be expected, at least I don't have to deal with cup inserts or grow rocks anymore. Cups are made out of sch 40 and heavy duty. They have stood the test of time.
I'm using 6 inch anchor sand air stones now. I finally solved the problems of floating air stones when I found these. No suctions cups or weights to worry about. Connect airline and drop into water. stays put at the very bottom of the reservoir with no problems. I have an airline coupler installed on the lid so I quickly disconnect the lines and move the reservoir when needed.
I also use 15 watt Hydor Mini Aquarium heaters for winter. I've used a lot of them over the years and they are by far the most reliable and smallest. Perfect for reservoirs this size. They come with suction cups to prevent them from floating but I just zipped tied an lead egg fishing weight to them. I notched out a small section for the electrical cords in the lip of the reservoir so the lid can be closed properly.
I'm using Dyna-Grow Grow and Bloom Nutes. I was using General Hydroponics 3 part but switched to Dyna-grow because it was cheaper and a very simple two part. I have no regrets and have great results with these nutes.
DWC Buckets are by far the simplest and easiest method of hydroponics I have come in contact with. I've used other systems and other forms of reservoirs and the buckets win hands down every-time in my opinion. I get quick positive results every time. I am not a fan of tubs or totes for reservoirs anymore. For one or two plants 5 gal buckets work just fine. The handle and size make them very easy to move around. Fill ups are a snap. I really appreciate the ease of breakdown and cleanup during harvest.
Scrog Screen - First time I've tried it but very happy with how the screen turned out. I looked at a lot of designs and haven't seen any like this one yet. Cost me around 5 bucks in supplies because I had most of them already. Just a simple 2x4 frame. Roughly 2ft x 2.5ft. I made marks every 2 inches around the perimeter which will create a grid of 2in by 2in squares. I took cheap jack chain and secured one end with a screw, pulled tight, then secured on the other end. I just created an entire row like that then weaved the chain over and under on the other side. End result is very sturdy and will last for years to come. Great thing is the cab. has shelving holes on each side so I just used 2 bolts screwed in on each side. I can easily remove, raise, or lower the screen according to the type of plant or reservoir in use.
Neways thought I would share my DWC setup with everyone. I'm very happy with the simplicity and the yields I get from the system time and time again. I'm trying out the feminized Bubblicious strain from Nirvana right now. Germinated two, one will stay in the cab as a mother and one will be transfered to the screen cabinet for a little more veg then flowering. Plants stretched a little at first because I didn't have the removable light installed. I had to leave out for a few days and they had shot up like that in a couple of days. They are ok now and have stopped stretching since the light was brought down. To everyone out there, Happy Growing
Attachments
-
 22.2 KB Views: 131
 -
 40.9 KB Views: 166
 -
 40.5 KB Views: 122
 -
 57.5 KB Views: 174
 -
 38.6 KB Views: 122