Observe & Report
Well-Known Member
I need an auto watering setup. Watering is time consuming and I'm lazy. When I go out of town on a long weekend my plants get really stressed out. I also want to be able to go on vacation for up to two weeks at a time. So I'm building a Blumat system.
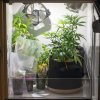
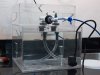
I have a small perpetual stealthy cab with water cooled COBs inside a shallow/wide sliding door type closet. There's a flowering chamber with three Vero 29's @ 1.9A. Below it are side-by-side mother and veg chambers, each with a single Vero 18 (moms @ 1A, veg @ 1.7A) The COBs are affixed to copper water blocks and they're all plumbed together to a PC case holding a pump and radiator on the other side of the room and outside of the closet. Build thread http://rollitup.org/t/more-money-than-brains-a-water-cooled-cab-build.802108/
Pressure pumps are noisy and regular drippers may be tough tune so each plant gets the right amount since my plants range from party cup bonsai moms to 1 or 2 gallon fabric pots. I didn't want to do a flood and drain system. The bottom compartments are only a few inches above the floor, which would make things tricky since I can't spare any vertical space at all . There might be noise issues from pumps and drains and noise is very high on my priority list. The reservoirs would have to go next to the cab which I don't want while I do have space available above my cab. I'd have to start topping up the res and replacing it and all that jazz instead of just mixing up the same formula every time and dumping it in.
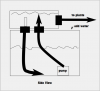
Blumats are silent and adjust watering for each plant individually. Just about everyone raves about them. The downside to Blumats is they can run away. A flood would be a major hassle that I want to avoid. So I'm taking a belt and suspenders approach to dealing with it.
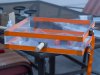
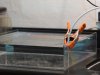
Belt: catch basins custom sized to cover the entire compartment and can hold the entire reservoir
&
Suspenders: industrial leak detection rope surrounding and beneath the cab connected to reservoir shut off valves and a txt/email alert system. I can't wait for that scenario to play out while I'm on vacation. "uhh hey buddy sorry to wake you up, uhh yeah I like uhh have a grow at my house and can you check on it?? like now." One of my best friends revealed his grow to me when he went on vacation and I managed to keep his plants alive so he owes me one. I'm hoping to never have to call it in.
An issue for me is the mothers. I have sixteen party cups in there with mothers and potential mothers and I'm not all that interested in reducing the number of different flavors I can keep in my harem. Blumat is available with small cones for very shallow bonsai pots, so the system should be OK in the 18 oz cups. The bonsai carrots are $20 a pop vs $5.75 or so for the regular ones. While it's well established that I have More Money Than Brains, this project is going to be expensive enough without spending another $225+ just to get teeny cones. The regular ones physically fit in the party cups without the cones being all the way at the bottom or otherwise snugged against exterior, so I'm forging ahead with them. I couldn't find anyone else online attempting to use Blumats with party cups...
So the plan is two reservoirs and systems, one for flower and one for mom/veg. Parts are in transit and on the way and I've already built one catch basin (next post.)
Feel free to chime in with your own comments. Fair warning though: I'm skeptical, cynical, and kind of a dick...
I have a small perpetual stealthy cab with water cooled COBs inside a shallow/wide sliding door type closet. There's a flowering chamber with three Vero 29's @ 1.9A. Below it are side-by-side mother and veg chambers, each with a single Vero 18 (moms @ 1A, veg @ 1.7A) The COBs are affixed to copper water blocks and they're all plumbed together to a PC case holding a pump and radiator on the other side of the room and outside of the closet. Build thread http://rollitup.org/t/more-money-than-brains-a-water-cooled-cab-build.802108/
Pressure pumps are noisy and regular drippers may be tough tune so each plant gets the right amount since my plants range from party cup bonsai moms to 1 or 2 gallon fabric pots. I didn't want to do a flood and drain system. The bottom compartments are only a few inches above the floor, which would make things tricky since I can't spare any vertical space at all . There might be noise issues from pumps and drains and noise is very high on my priority list. The reservoirs would have to go next to the cab which I don't want while I do have space available above my cab. I'd have to start topping up the res and replacing it and all that jazz instead of just mixing up the same formula every time and dumping it in.
Blumats are silent and adjust watering for each plant individually. Just about everyone raves about them. The downside to Blumats is they can run away. A flood would be a major hassle that I want to avoid. So I'm taking a belt and suspenders approach to dealing with it.
Belt: catch basins custom sized to cover the entire compartment and can hold the entire reservoir
&
Suspenders: industrial leak detection rope surrounding and beneath the cab connected to reservoir shut off valves and a txt/email alert system. I can't wait for that scenario to play out while I'm on vacation. "uhh hey buddy sorry to wake you up, uhh yeah I like uhh have a grow at my house and can you check on it?? like now." One of my best friends revealed his grow to me when he went on vacation and I managed to keep his plants alive so he owes me one. I'm hoping to never have to call it in.
An issue for me is the mothers. I have sixteen party cups in there with mothers and potential mothers and I'm not all that interested in reducing the number of different flavors I can keep in my harem. Blumat is available with small cones for very shallow bonsai pots, so the system should be OK in the 18 oz cups. The bonsai carrots are $20 a pop vs $5.75 or so for the regular ones. While it's well established that I have More Money Than Brains, this project is going to be expensive enough without spending another $225+ just to get teeny cones. The regular ones physically fit in the party cups without the cones being all the way at the bottom or otherwise snugged against exterior, so I'm forging ahead with them. I couldn't find anyone else online attempting to use Blumats with party cups...
So the plan is two reservoirs and systems, one for flower and one for mom/veg. Parts are in transit and on the way and I've already built one catch basin (next post.)
Feel free to chime in with your own comments. Fair warning though: I'm skeptical, cynical, and kind of a dick...
Last edited: