Micro, very sthealthy, grow room...help me out!

Micro G.

Active Member
Hi everybody!

I'm working on a Micro Growing and I need your help becouse there are some things that the "micro" makes very difficult...
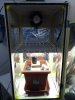
First of all, my grow room is 35x37x67 cm or 14"x14,5"x27" if you prefer. Ok, it's not very tiny but it is tiny-er than most micro grow room I've found. I've tryed my best to make it air tight.
In my case the problem is that there is no room for error and for error I mean smell. :lol:
P_20200319_114505.jpgWhatsApp Image 2020-03-19 at 11.53.20.jpeg
Lets go step by step:
-Light: I know it's not the best option but this is what I have and what I will use. I decided to use common, simple Led stripes. For Veg I have 66% of 6000K light and 33% 6500K I should have 2000-2250 lumens. For Flo I have 50-50 of 3000K and 2700K that the sellers says are 6000 lumen but there is no way that these are 6000 lumen, but for sure it's more powerful than the Veg setup it maight be around 3000 lumen. Not great but not bad either and I will not have temprature problems.
P_20200319_114537.jpgP_20200319_114542.jpg
-Plant and Strain: I will have only one Royal Dwarf Autoflowering plant.
-Soil and fertilizing: I will use 33% peat moss 33% humus 33% perlite/vermiculite. I'm not going to use fertilizer. I'm aiming to a "dwarf" plant that will have a short life cycle and should find everythig she needs in this soil mix. I prefer to have a lower yeld than nutrient problems for over fertilizing.
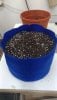
-Pot: I know that for autoflowering strains the perfect place to start is around 5-6 liters or 1,3-1,5 gallons especially for the royal dwarf which is one of the most compact strains.
BUT, looking at grow diaries I've too often seen this strain going throgh the ceiling and this is something i can't afford so this is my idea: I'm going to use around 4 liter or 1 gallon fo soil to prevent the plant to grow too much. Again, I prefer a lower yeld than having a plant too big that takes 11-12 weeks of life cycle instead of 8. I'm also going to use a pot low and wide, like 15 cm tall (probably less) becouse I don't have much space expecially due to the next point of this list.
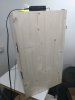
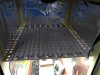
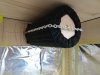
-Venitlation and Carbon Filter: As I said in the beginning, I will do anything to eliminate the smell. I've build a DIY carbon filter with 400g of activated carbon for acquarium. For my job I have a lot of materials and a lot of different power tool and 3d printers so I can built almost anything I want by my self.
P_20200319_114527.jpgWhatsApp Image 2020-03-19 at 12.01.59.jpeg
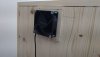
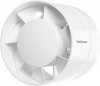
The problem is that i'm only using two 80mm pc fan, one for the intake and the other one to suck the air out of the grow room through the filter. But i'm at a point that I don't want to risk anything so I decided to buy an inline fan and a "proper" carbon filter. Here I'm facing two new problems.
My grow room has a volume of 0,087 mc or 3 cf. Guides say to add a 20% of volume due to the effect of the filter, then we are talking about 0,1 mc or 3,5 cf. Again guides say that change the air inside the grow room every 3-5 minute it's absolutely fine, once every minute would be the best of the best. Well the tinyest air extractor i've found it's 110 mc/h or around 65 cf/m which means that keeping in mind the carbon filter, the whole air of the grow room will be changed 18 times every single minute...this is INSANE...
But to use a "proper" carbon filter I don't have alternatives becouse there aren't in line extractor with a 50mc/h or 30 cf/m flow(for my grow room 6mc/h or 3,5 cf/m would be enough) and there aren't filters under 100mm or 4". And if this is not enough the tinyest 4" filter ha s a body of 170mm diameter, almost 7", and my grow room is 67 cm tall so the filter will takes the 25% of the hight. That is why I have to keep the pot low and wide.
Obviously i'm going to use also LST with the hope that the led stripes will let me keep the light pretty close to the plant, something like 100mm or 4" or even less.

As you can see my real and only concern is ventilation and relative carbon filter.

Do you have any suggestion keeping in mind that the smell has to be eliminate(if not 100%, 99%)

Thank you!
 

Attachments

SUNDOG

Well-Known Member
Hey nice micro cab, all you have to do is buy a speed controller for your fan. It will plug right in and you can have full control of you cfm's. Their cheap too. Good luck.
 

Micro G.

Active Member
Thank you for your answer! Unfortunately all the in line fan with the right dimension I've found are not dimmable. I only have 37 cm and in that space a can only put the 4" carbon filter an this type of in line fan:
1584694935600.png
And anyway how do I set up properly it with a dimmer? If at normal speed the fan sucks 18 times the volume of the whole grow room how do I know when the settings are right...? That's my problem.
I know that for the filter to make its job properly, which is my priority, there are some parameter to fulfill and I don't want to leave them to chance...
I'd like not to buy an anemometer just for this...


This kind of in line fans are "toys" i would be surprise if in the real world this fan is capable of doing what the description says. I've bought one that says "107 cm/h" but probably it will likely be more 80-90 cm/h. In my case, anyway, it's good because my GR is very tiny. But, for example if I run the fan at 50% which is still way more than refresh the whole volume of air once every minute, will the filter still do its job?
I was thinking of using a passive intake...but i don't really know how to design it not knowing how much air the fan will pull. I dont' want the fan to broke for overworking after 2 weeks becouse the intake was to tiny.

Anyway thank you again! The fan should be here next week. I just wrote an email to the seller to know if it's dimmable because the descritption doesn't say anything about that.

For the filter i bought this:
1584696991400.png

I can't find Rhino or Phresh where I live. I could buy them on ebay but the shipping would cost me between 40 and 60% of the filter value. All the guides i've read says "don't buy cheap filter" and this is not cheap it costs the same of a Rhino Pro, just one dollar less but it has free shipping! The brand is "Ram" and it uses australian RC 412 carbons. It has way more reviews then any other filter in my country; 215 reviews with 4,5/5 stars.
Unfortunately i will find out its real dimension only when it will be here, I only know that the description says 100/200. 100 it's the ducting for sure but i don't know if 200 is the lenght or the diameter of the body of the filter. I wasn't able to find the answer.
 

Poobzilla

Well-Known Member
For the filter i bought this:
View attachment 4509002

I can't find Rhino or Phresh where I live. I could buy them on ebay but the shipping would cost me between 40 and 60% of the filter value. All the guides i've read says "don't buy cheap filter" and this is not cheap it costs the same of a Rhino Pro, just one dollar less but it has free shipping! The brand is "Ram" and it uses australian RC 412 carbons. It has way more reviews then any other filter in my country; 215 reviews with 4,5/5 stars.
Unfortunately i will find out its real dimension only when it will be here, I only know that the description says 100/200. 100 it's the ducting for sure but i don't know if 200 is the lenght or the diameter of the body of the filter. I wasn't able to find the answer.
I have the same filter as you, Its 8 inches long and 7 inches diameter.
 

Micro G.

Active Member
Thank you very much!!! :hug:

So it mean it will takes 25% of the height of my grow room :lol: , but now i know there is space enough for both the fan and the filter inside the GR.
Can I ask you what do you think about the filter? And please tell me also how big is your grow room and how many plant you have in there so that I can have an idea of what to expect from its performance!
 

Poobzilla

Well-Known Member
My tent is 80x80cm and 160cm tall with 3 plants currently between 3 and 4 weeks into grow.
Don't really know how effective it is as not much smell yet still being so young and in veg.
I did use a fan like the one in your post with the ram filter but that crapped out in a day as I did not realise it could not adjust its speed.
My intake is passive and using a sheet of kitchen roll over one of the vents to make sure there is negative pressure at as low a fan speed to try and keep temps up.
 

Micro G.

Active Member
That is why i'm worring about that type of in line fan, i've read that if not designed to be dimmed, of course, it brokes pretty fast.
I did ordered mine on amazon but it looks like it is not dimmable so, thanks to amazon policy, I will sand it right back with no charge and I've already ordered another one that, even if it looks a bit more cheap(2,5$ cheaper), it is 100% dimmable.
 

nederwierie

Active Member
That inlinefan on the picture is dimmable . Check out the ´ SMScom Smartcontroller MK2 ´ for dimming ,
cost around 30 Euro/ Dollar . Nice feature of it you can also buy an temperaturesensor for this model so that you also can control the temperature,
just set it on 27 ¨ and the smartcontroller use 1 of the 60 fanspeedsettings what is need to blow more warm air out of the growbox.
So not directly on max like some older fancontrollers do but step by step automatic which is nice.

Thank you for your answer! Unfortunately all the in line fan with the right dimension I've found are not dimmable. I only have 37 cm and in that space a can only put the 4" carbon filter an this type of in line fan:
View attachment 4508989
And anyway how do I set up properly it with a dimmer? If at normal speed the fan sucks 18 times the volume of the whole grow room how do I know when the settings are right...? That's my problem.
I know that for the filter to make its job properly, which is my priority, there are some parameter to fulfill and I don't want to leave them to chance...
I'd like not to buy an anemometer just for this...
 

Micro G.

Active Member
Hi a thank you for the suggestion. The fan in the picture is not dimmable, but I have already found another one which is almost identical but dimmable. The idea of a temperature sensor it's interesting i'll try to find some more info about that. But I think it will be ok if I set it to a low costant speed also to prevent any odour leaking.
 

nederwierie

Active Member
Hi a thank you for the suggestion. The fan in the picture is not dimmable, but I have already found another one which is almost identical but dimmable. The idea of a temperature sensor it's interesting i'll try to find some more info about that. But I think it will be ok if I set it to a low costant speed also to prevent any odour leaking.
Never knew some of that type inlinefans could´nt be dimmed , thought they were some universal model with different brandnames.
Normally you can dim the dimmable versions to around 30 % , you shall hear that soon enough when you hear a buzzing sound from the fan when you go to low. Go with a descent fancontroller to get that numbers .
And that 30% is enough for that space maybe even overkill , you will be suprised how much 8 Watts of energy of that kind of fan will do in a small space like that.

Another thing i can advice for this small space is to place the inlinefan outside of the growbox and blow the air through the carbonfilter which is offcourse also outside the growbox. Another great thing with the air outlet through the carbonfilter is that it silence the sound alot .
With that height of only 67 Cm you will get problems with to less height space even if you run that ledstrips low enough in wattage,
that inlinefan and carbonfilter inside will give you headaches in the future.
1 meter height would be better if you leave the inlinefan/carbonfilter outside and even then it´s a real job to keep the plants that low to not touch the leds.
Also keep it as much Indica growing as possible .

Microgrowing is a real art which is possible to do but you´ll find it´s not as easy as it looks,
but if you can grow in such a tiny space you´ll learn lots of things on a level you can grow larger with the experience in the future.
Just grow it and you´ll learn.
 
Last edited:

Micro G.

Active Member
Never knew some of that type inlinefans could´nt be dimmed , thought they were some universal model with different brandnames.
I know lots of folks dimmed these type of fans without checking if they were dimmable and blow them up within hours. So I decided to go for one that was specifically sold as dimmable.

Of course I can keep the fan and the filter outside but I've read to many time that, for the filter to work at is best, the air needs to be sucked trough the filter and not pushed through it. I also know that recently filter are more often design to work fine both ways but i couldn't find anythig at this regards about the filter that I ended up ordering. Probably my DIY filter could have been just fine but odour control it's number one priority so better safe then sorry.

At least for this first run I'm going to mount the filter and the fan inside the box and try to keep the plant as tiny as possible, either using a small pot and with LST. As i said in other thread my aim is not to maximize the yield, but to create "best" the condition for my plant to have just enough to going on untill the next time. If the plant will give me 15/20 g of Dry buds I will be totally happy, i can go a long way with that amount. I'm really a casual smoker nowadays.

Still trying to understand the right pot volume for my goal...I've seen lots of folks here that got a "great result" with 2,5 liters pots. I might go with 3 liters... and see what will happen...
 

Canibas

Member
I know lots of folks dimmed these type of fans without checking if they were dimmable and blow them up within hours. So I decided to go for one that was specifically sold as dimmable.

Of course I can keep the fan and the filter outside but I've read to many time that, for the filter to work at is best, the air needs to be sucked trough the filter and not pushed through it. I also know that recently filter are more often design to work fine both ways but i couldn't find anythig at this regards about the filter that I ended up ordering. Probably my DIY filter could have been just fine but odour control it's number one priority so better safe then sorry.

At least for this first run I'm going to mount the filter and the fan inside the box and try to keep the plant as tiny as possible, either using a small pot and with LST. As i said in other thread my aim is not to maximize the yield, but to create "best" the condition for my plant to have just enough to going on untill the next time. If the plant will give me 15/20 g of Dry buds I will be totally happy, i can go a long way with that amount. I'm really a casual smoker nowadays.

Still trying to understand the right pot volume for my goal...I've seen lots of folks here that got a "great result" with 2,5 liters pots. I might go with 3 liters... and see what will happen...
If you trully believe that the filter works better if the air is sucked and want to still keep it outside, you can build a box to house it and vent the box from the cab
Maxime the space inside while doing the scrubbing.

I've done it both ways and believe it works better when the air is sucked instead of blown.
 

Micro G.

Active Member
Ok, this is what I end up with.
From this:
WhatsApp Image 2020-03-19 at 11.53.20.jpeg
To this:
WhatsApp Image 2020-03-25 at 15.48.02.jpeg
As you can see the new filter is huge compare to my DIY filter. I've also changed the pot. This one is already filled with 3 liters of a mix of 33% peat moss, 33% compost/humus 33% perlite/vermiculite. With the new filter and the new pot I now have about 35cm or almost 14" of space between the max light hight and the soil in the pot.
Lets see what happen.

I'm now waiting for the dimmer and then I hope I could say that my grow room is finished.
 

nederwierie

Active Member
3 liters of soil is not much . I think the roots will overgrow the soil in about 3 to 4 weeks and then you´ve a problem that the plant stops growing.
Be sure to check out if that´s gonna happen since it practically will be.
That compost/humus will give the roots a great start so keep an eye on that , if the roots are taking over the ground it takes another week of 18/6 to recover .
If you see the roots are taking over the soil and some roots are going to be yellow since they´re starving and rotting then you can consider to use more soil , like filling the bottom of the box over the lenght and bredth with a 10 CM layer of soil . On that way you can save some space in height since that gives you around 10 liters of soil amount.

Also my advice on the inline fan and filter to place that outside of the box if the height is getting to narrow but that´s future talk which you will understand later in the grow.
Another tip is to look into ´ scrogging´ the plant cause that´s something you´ll need in the tiny height space of the box.

Keep on growing you´re on the good way .
 
Last edited:

Micro G.

Active Member
Hi Nederwierie. Thank you for your suggestion.
Because I'm still waiting to have one seed to sprout(2 of 3 gone bad untill now...so sad), I decided to study a little bit more the "pot topic".
I've read in many articles that fabric pot produce lower and wider plant, so, also keeping the root bound problem in mind, I decided to give it a try.
Since I can't find fabric pots or smart pots or air pots where I live and on internet I only find very pricey and to big pots, I decide to go DIY:
WhatsApp Image 2020-03-30 at 12.04.49.jpeg
This is what a came up with. I went from 3 liters to 4.1 liters which is roughly 1.1 gallons. Even if it is not much bigger, I still have enough free space in the pot to add another 0.6 liters an reach 4.8 if I want to. Anyway I already have a + 25% of soil volume compared to the previous solution, an now it's also a "smart pot" that would not give root bound problem and for the same reason, as i read in many articles, a pot that it's a little bit smaller should be absolutely fine.
 

nederwierie

Active Member
Do you seed the seed directly in the soil or do you germinate them before?
The best method i know is place the seeds in a wet paper coffeefilter, close it up and put that in a plastic ziplog and hang it somewhere vertical.
Some seeds are real hard to germinate let stand alone directly placed in soil but the coffeefilter can handle even that hard ones.
Best is to place them after the germinate in a mix of 50/50 wormcompost/ sow and cuttingsoil and place the seed in the soil on a way the seed and the soil is on the same level and roots down offcourse , the sow and cuttingsoil is a soft soil for the first 3 days after the seed is growing but after that the seedling needs some better soil. Here jumps the wormcompost in since it gives the young seedling what its needs in slowly dosis so it does not overdose the seedling. After 10 to 14 days you can put them in the rich soil.
Those 3 days in the beginning are important for the seedling to prevent overdosing, normally some people use the sow and cutting soil to prevent overdosing of the seedling but after the 3 days the seedling needs more . So that´s where the wormcompost kicks in after that 3 days, saves some over potting from soft soil to medium soft soil and on that way less stress for the young plant.
The sow and cutting soil 50/50 wormcompost is allready a medium soft soil and a super start for seedlings and the seedlings are strong enough to overcome the rich soil when over potted without to many stress. Prevent stress in the young plant .
That´s the best way i know how to do , gives young and strong plants and a good start is a good future life of the plants.

Those smart pots are also on aliexpress , 2 gallon pots for around 2 Euro/dollar.
The diy´s work also great as long the soil can breed through the open structure , even an old tshirt can do that job as to speak of the idea.
The one you made seems great , very nice job. No need for buying one if you can fabricate them self.
Great you can add some more soil in the future if needing , those fresh air in the soil are a heaven for roots and they love to grow in it which is a good thing offcourse.

Keep on the growing and the learning , even the most experienced growers learn new things every day .
 
Last edited:

Micro G.

Active Member
Thankyou again!
My first attempt with the first seed was actually the one that went the further. I got the seed to sprout but the seedling looked very weak since the beginning. I still don't know which was the real problem with the first seed. Maybe I did over water it or maybe I created an ambient with too much humidity because I could see tiny wite mushroom in the soil insode thebplastic cup where I planted the seed. I wait for one week but there was absolutely no changes.

I've planted the second again in soil inside another plastic cup. I don't really know if in this case I did the opposite and to not over water it i gave it not enough water...the soil was costantly humid i water it two times a dai with a dropper. After a week I took it from the soil and place it in a wet paper towel and keep it in darkness at 27 °C 80% humidity along with the third seed. After 48 hours in the wet paper towel, 10 days after i've planted it in the soil the first time, the seed was still closed. This morning i found it with some wite stuff on it...mold i though, or something like that and I throw it away.

The first two seed were royal dward autoflowering.

I also had one royal quick one so I decide to try it for the third attempt. This seed didn't really look like a good seed. It was light-brown, maybe a little yellow...not how a lood seed look.
Anyway this time i tried the cup of water maerhod and leave it there 24 hours and then move it to the wet paper towel method. Yesterday morning, day 2 of paper towel and day 3 after the cup of water, it crack open. I was super happy but this morning, day 3 of paper towel it looked exactly like the day before...and 7 hours later nothing has changed. Tomorrow morning I will find out if abything has changed but i think this is just another bad seed...

There are two possibities or I'm really unlucky or I'm make one mistake after the other...even if I'm trying my very best...
 
this is really brilliant with the pegs to move the lights up and the drilled ventholes / dead space to collect/vent the hot air.

but i doubt that 80mm-120mm fan has the CFM to move that carbon filter effectively.
i mean the more CFM the more effective obviously. but good enough or not?
might need a proper ventilation motor, but fortunately the proper ones shouldn't exceed your dimensions, but the good ones can be $100 easy
if you have any type of legal concerns just eat the cost i'd say
 
Last edited:

Micro G.

Active Member
Hi, i've changed the filter and the fan which is now a 100 cm/hour. It can suck 18 times the volume of the grow room every minute.
 
Last edited:

Micro G.

Active Member
And, as an update with the the third attempt, the seed in the wet paper towel that was crack opened until yesterday, today morning it's closed.
I cant even find anything on the web of anybody that witnessed the same...
I sincerely don't know what to do or to say...
 
Top