liesandlies
Active Member
I have a MarsHydro Reflector 150w and want to make it quieter. (and the ideas should generally apply to other Mars Hydro models, and many other brand or non-brand LED case or UFO lights, and maybe diy lights).
...replacing fans, adding heatsinks, increasing ease of airflow.
all the specifics below, are for the MarsHydro Reflector 150w . I've never used this yet, or any other LED light before, so I have no experience or advice on brands/models.
before changing anything, it might be smart to get temperature measurements of the LEDs running, with the case as it is stock. Then it'll be possible to know that a quieter-modded case is still providing the same cooling (same LED running temps).
Sources of operating sound:
-Fan inlet grill - reduces airflow and creates turbulence and unnecessary noise
solution - remove the grill, or replace with a less restrictive grill
-The heatsink is a flat aluminum slab - the fan has to blow a lot of air to cool the flat surface
solution - adding heatsinks will allow it to be cooled using less airflow (less cfm, less rpm)
-Both should allow the fan to maintain adequate LED temperatures, with less airflow.. and lower fan rpm (less sound).
Fan Inlet Grill - replacing with no grill, or with a less restrictive grill
Having an obstruction in front of a fans intake is known to create sound.
MarsHydro did put the fan at some distance from the grill, using plastic spacers on the fan screw posts... which unfortunately also causes the fan to be closer to the flat aluminum slab, the air gets immediately pushed into a flat surface which creates much sound.
..Ideally, there would be no (or very little) air obstruction, and as much much distance possible between the fan and the aluminum slab.
Solutions
-remove or replace the grill, and put the fan to be flush with the top of the case (without the plastic spacers).
there are many types and designs of 120mm fan grills. ones with a filter can be used to reduce dust from reducing the heatsink's cooling ability, though it will reduce airflow. a simple diy filter can be added to any grill.


-use a rubber/silicone gasket/damper/dampener/silencer, to reduce vibrations between the fan and the metal case


(for better airflow and less sound, the fan can also be placed on top (on the outside) of the case. This allows more room for the volume of air being pushed into the case, reducing the back-pressure.
it would require cutting a slot in the metal case, for the fan's cord.. and attaching the fan securely to the metal case)
Modding the grill will have an effect on sound, and should allow a higher airflow through the case to some amount.
Also, the case can be modded so it can more easily dissipate the heat, which will reduce the airflow needed... and the stock fan can be run at a slower speed (lower voltage), or it can be replaced with a lower-cfm fan that is quieter at full speed.
To increase the efficiency of cooling, one clear method is adding heatsinks to the flat aluminum slab.
Adding Heatsinks
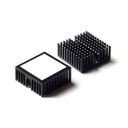


There are many available heatsinks. some major aspects are:
material - copper and aluminum.
copper absorbs heat better, and aluminum dissipates heat better.
the heatsinks being added, would be used specifically for dissipating heat... so choose aluminum heatsinks.
(copper would be better to create a large heatsink mass... not very possible to do within the small amount of space within the M.H. Reflector 150w case)
method of attaching-
some heatsinks come with an adhesive pad or adhesive tape already attached to the base.. just peel the film off the exposed side, and press to stick it onto any surface.
some heatsinks have just bare metal on the base. these require getting double-sided thermal adhesive pads, or tape, or using thermal epoxy.
-Adhesive Tape/Pads - are easy to use, and can be removed (some remove easy and clean, some require a lot of force, and will rip the adhesive
-Thermal Epoxy - *is permanent*. Allows 5-7 times as much heat transfer to the heatsink, compared to tape/pads. Potentially messier - push out paste from 2 syringes, mix, and apply
Heatsink design and placement:
The amount of airflow past the heatsink, is one of the largest factors for heat dissipation. Fast smooth airflow is more important than a lot of turbulence, because it reduces back-pressure which allows more cfm. So it is best if the heatsink design, and placement, allows the airflow to move smoothly towards the exit slots.
There are a lot of good ways to do this, and a lot of types of heatsinks designs.. square with stright-cut fins, square with grid-cut fins, rectangular, long thin rails, tall fins, short fins, round heatsinks... Just try to align the heatsink fins with the direction of airflow.
a lot of sites have a large variety of heatsinks. heatsinks for computer "chipset" and "mosfet" or "mm" are good keywords to search for relatively small heatsinks.
Also, the heatsinks might be best to spread out so they can handle the heat from the entire aluminum slab area of 10"x9".. since the LEDs and their heat is spread across that entire area. The slab is about 2mm thick.
Underneath the AC/DC adapters inside the Mars case, there is about 5mm of height. In the corner areas, there's 30mm+ of height. Again, be sure to pay attention to the final airflow of any design.
Another idea, to help the air flow more smoothly and quickly through the case, is to reduce the turbulence of the airflow when it runs directly into the heatsink. One simple way to do this... is to fill in the empty air space area caused by the fans center hub, which is 1.5" in diameter.
When the air is pushed into the surface, it moves in all directions, including into that middle space... and all the air that gets pushed there gets mixed and chaotic, before it can (chaotically) be pushed sideways (towards the lower air pressure of the case exits). If this area is filled-in with a solid, then the air will push off of that solid matter more smoothly, making the airflow more smooth (and should be quieter) and increasing the speed of air through the case.

(the height isn't to scale, but just for the basic idea)
This can be done with a 1.5" diameter aluminum rod (ebay or amazon), of a length that will attach to the slab and extend to just below the fans hub.
(if the fan is installed in the case, with no spacers, then it's about .75" length, or about 1.75" if the fan is attached on top of the case.)
Get the base as smooth as possible, using file and sandpaper, and use adhesive pads or thermal epoxy to attach it securely in place.
A simple round rod will work, but an even better shape would be a cone shape (with the top cut off).

This diagram is with a 4" wide base, 1.5" wide top, and 1.75" in height.
A straight round 1.5" rod is the smallest diameter. Up to 4.5" diameter. Any diameter larger that that would extend underneath the AC/DC adapter boxes. with any of this, check and measure space and dimensions.
(120mm fan hubs can be 1.5" diameter, 1.625", and there may be other diameters.. so check with the exact fan to know it's exact size)
If some mods have lowered the LEDs temps, it may be possible to do with less cfm, and allow reducing the fan's rpm.
Stock Fan - reduced speed, or Replacing...
The MarsHydro 150w Reflector series, uses a 120mm fan DFH1225B (fan specs and info.. http://csfan.co.kr/p01_29.htm)
DFH1225B is
120mm ball bearing fan, running at .3A
12v fan, and can be operated from 10.8 to 13.2v
At 12v, it runs at 2000rpm, for 80cfm, at 32.5dba, and providing 2.6 mmH2O of static pressure
The fan AC/DC adapter inside the Reflector 150w is rated at 12v 1A.
All of the solutions listed require cutting and modifying the fan cord.
Reduce the rpm of the stock fan:
- a fan speed reducer resistor can be used. these are simply a resistor wired to a 2 or 3 pin cord. there resistor lowers the voltage (and the rpm) a set amount. there are a variety.
- easier to find, and easier to dial-in, are fan speed controllers. there are a lot, something simple and basic is all that's needed, just be sure it can handle the amps of the stock fan (.3a, 12v)
(both these parts are easily found in computer parts sites)
a variety of computer specific sites have a variety of plugs and connectors for wires, as do general electronics sites like Mouser and Digikey.
Fan swaps -
-The adapter is rated for 1A, so any fan attached should be .8A or less.
-The fan needs to be compatible with horizontal positioning. (Ball Bearing fans are all okay, Sleeve bearings are generally not, fluid dynamic bearings generally are)
-The fan is best to have a high static pressure rating (mm H2O), since the airflow inside the case immediately has to turn 90 degrees (or a bit less if using the cone diffuser), and then has to squeeze through the case.
...replacing fans, adding heatsinks, increasing ease of airflow.
all the specifics below, are for the MarsHydro Reflector 150w . I've never used this yet, or any other LED light before, so I have no experience or advice on brands/models.
before changing anything, it might be smart to get temperature measurements of the LEDs running, with the case as it is stock. Then it'll be possible to know that a quieter-modded case is still providing the same cooling (same LED running temps).
Sources of operating sound:
-Fan inlet grill - reduces airflow and creates turbulence and unnecessary noise
solution - remove the grill, or replace with a less restrictive grill
-The heatsink is a flat aluminum slab - the fan has to blow a lot of air to cool the flat surface
solution - adding heatsinks will allow it to be cooled using less airflow (less cfm, less rpm)
-Both should allow the fan to maintain adequate LED temperatures, with less airflow.. and lower fan rpm (less sound).
Fan Inlet Grill - replacing with no grill, or with a less restrictive grill
Having an obstruction in front of a fans intake is known to create sound.
MarsHydro did put the fan at some distance from the grill, using plastic spacers on the fan screw posts... which unfortunately also causes the fan to be closer to the flat aluminum slab, the air gets immediately pushed into a flat surface which creates much sound.
..Ideally, there would be no (or very little) air obstruction, and as much much distance possible between the fan and the aluminum slab.
Solutions
-remove or replace the grill, and put the fan to be flush with the top of the case (without the plastic spacers).
there are many types and designs of 120mm fan grills. ones with a filter can be used to reduce dust from reducing the heatsink's cooling ability, though it will reduce airflow. a simple diy filter can be added to any grill.
-use a rubber/silicone gasket/damper/dampener/silencer, to reduce vibrations between the fan and the metal case
(for better airflow and less sound, the fan can also be placed on top (on the outside) of the case. This allows more room for the volume of air being pushed into the case, reducing the back-pressure.
it would require cutting a slot in the metal case, for the fan's cord.. and attaching the fan securely to the metal case)
Modding the grill will have an effect on sound, and should allow a higher airflow through the case to some amount.
Also, the case can be modded so it can more easily dissipate the heat, which will reduce the airflow needed... and the stock fan can be run at a slower speed (lower voltage), or it can be replaced with a lower-cfm fan that is quieter at full speed.
To increase the efficiency of cooling, one clear method is adding heatsinks to the flat aluminum slab.
Adding Heatsinks
There are many available heatsinks. some major aspects are:
material - copper and aluminum.
copper absorbs heat better, and aluminum dissipates heat better.
the heatsinks being added, would be used specifically for dissipating heat... so choose aluminum heatsinks.
(copper would be better to create a large heatsink mass... not very possible to do within the small amount of space within the M.H. Reflector 150w case)
method of attaching-
some heatsinks come with an adhesive pad or adhesive tape already attached to the base.. just peel the film off the exposed side, and press to stick it onto any surface.
some heatsinks have just bare metal on the base. these require getting double-sided thermal adhesive pads, or tape, or using thermal epoxy.
-Adhesive Tape/Pads - are easy to use, and can be removed (some remove easy and clean, some require a lot of force, and will rip the adhesive
-Thermal Epoxy - *is permanent*. Allows 5-7 times as much heat transfer to the heatsink, compared to tape/pads. Potentially messier - push out paste from 2 syringes, mix, and apply
Heatsink design and placement:
The amount of airflow past the heatsink, is one of the largest factors for heat dissipation. Fast smooth airflow is more important than a lot of turbulence, because it reduces back-pressure which allows more cfm. So it is best if the heatsink design, and placement, allows the airflow to move smoothly towards the exit slots.
There are a lot of good ways to do this, and a lot of types of heatsinks designs.. square with stright-cut fins, square with grid-cut fins, rectangular, long thin rails, tall fins, short fins, round heatsinks... Just try to align the heatsink fins with the direction of airflow.
a lot of sites have a large variety of heatsinks. heatsinks for computer "chipset" and "mosfet" or "mm" are good keywords to search for relatively small heatsinks.
Also, the heatsinks might be best to spread out so they can handle the heat from the entire aluminum slab area of 10"x9".. since the LEDs and their heat is spread across that entire area. The slab is about 2mm thick.
Underneath the AC/DC adapters inside the Mars case, there is about 5mm of height. In the corner areas, there's 30mm+ of height. Again, be sure to pay attention to the final airflow of any design.
Another idea, to help the air flow more smoothly and quickly through the case, is to reduce the turbulence of the airflow when it runs directly into the heatsink. One simple way to do this... is to fill in the empty air space area caused by the fans center hub, which is 1.5" in diameter.
When the air is pushed into the surface, it moves in all directions, including into that middle space... and all the air that gets pushed there gets mixed and chaotic, before it can (chaotically) be pushed sideways (towards the lower air pressure of the case exits). If this area is filled-in with a solid, then the air will push off of that solid matter more smoothly, making the airflow more smooth (and should be quieter) and increasing the speed of air through the case.
(the height isn't to scale, but just for the basic idea)
This can be done with a 1.5" diameter aluminum rod (ebay or amazon), of a length that will attach to the slab and extend to just below the fans hub.
(if the fan is installed in the case, with no spacers, then it's about .75" length, or about 1.75" if the fan is attached on top of the case.)
Get the base as smooth as possible, using file and sandpaper, and use adhesive pads or thermal epoxy to attach it securely in place.
A simple round rod will work, but an even better shape would be a cone shape (with the top cut off).
This diagram is with a 4" wide base, 1.5" wide top, and 1.75" in height.
A straight round 1.5" rod is the smallest diameter. Up to 4.5" diameter. Any diameter larger that that would extend underneath the AC/DC adapter boxes. with any of this, check and measure space and dimensions.
(120mm fan hubs can be 1.5" diameter, 1.625", and there may be other diameters.. so check with the exact fan to know it's exact size)
If some mods have lowered the LEDs temps, it may be possible to do with less cfm, and allow reducing the fan's rpm.
Stock Fan - reduced speed, or Replacing...
The MarsHydro 150w Reflector series, uses a 120mm fan DFH1225B (fan specs and info.. http://csfan.co.kr/p01_29.htm)
DFH1225B is
120mm ball bearing fan, running at .3A
12v fan, and can be operated from 10.8 to 13.2v
At 12v, it runs at 2000rpm, for 80cfm, at 32.5dba, and providing 2.6 mmH2O of static pressure
The fan AC/DC adapter inside the Reflector 150w is rated at 12v 1A.
All of the solutions listed require cutting and modifying the fan cord.
Reduce the rpm of the stock fan:
- a fan speed reducer resistor can be used. these are simply a resistor wired to a 2 or 3 pin cord. there resistor lowers the voltage (and the rpm) a set amount. there are a variety.
- easier to find, and easier to dial-in, are fan speed controllers. there are a lot, something simple and basic is all that's needed, just be sure it can handle the amps of the stock fan (.3a, 12v)
(both these parts are easily found in computer parts sites)
a variety of computer specific sites have a variety of plugs and connectors for wires, as do general electronics sites like Mouser and Digikey.
Fan swaps -
-The adapter is rated for 1A, so any fan attached should be .8A or less.
-The fan needs to be compatible with horizontal positioning. (Ball Bearing fans are all okay, Sleeve bearings are generally not, fluid dynamic bearings generally are)
-The fan is best to have a high static pressure rating (mm H2O), since the airflow inside the case immediately has to turn 90 degrees (or a bit less if using the cone diffuser), and then has to squeeze through the case.
Last edited: