Larry OG vs. Tahoe OG in Dual Monster Plant System (2nd Scrog)
- Thread starter lordjin
- Start date


killerobsession
Member
just read this whole thread!! learned some good stuff!! and your models are a good choice!!
lordjin
Well-Known Member
Okay, I'm fairly certain we're on the road to recovery. You might notice a bit of discoloration in the Tahoe foliage, but her roots are exploding again, so I'm not really worried as to what the final outcome will be.

The Larry side blows chunks, so it's all about filling it in as much as possible with the more aggressive Tahoe plant. It's getting there.

I was gonna do a Final Phase flush today and switch to flowering, but I've decided to hold off. I have just enough veg nute left for another water change. More vegging. Boring you now, but harvesting more later.

Look at those fancy algae covers I bought!
The Larry side blows chunks, so it's all about filling it in as much as possible with the more aggressive Tahoe plant. It's getting there.
I was gonna do a Final Phase flush today and switch to flowering, but I've decided to hold off. I have just enough veg nute left for another water change. More vegging. Boring you now, but harvesting more later.
Look at those fancy algae covers I bought!
lordjin
Well-Known Member
Whitney Houston Dead: Singer Dies At 48
http://www.huffingtonpost.com/2012/02/11/whitney-houston-dead-sing_n_1270889.html

Cause of death has not been released. All that bullshit with Bobby Brown? Nah, I'd rather remember her like this. When she first came out with this album, who didn't love her? RIP.
[video=youtube;ewxmv2tyeRs]http://www.youtube.com/watch?v=ewxmv2tyeRs[/video]
http://www.huffingtonpost.com/2012/02/11/whitney-houston-dead-sing_n_1270889.html
Cause of death has not been released. All that bullshit with Bobby Brown? Nah, I'd rather remember her like this. When she first came out with this album, who didn't love her? RIP.
[video=youtube;ewxmv2tyeRs]http://www.youtube.com/watch?v=ewxmv2tyeRs[/video]
lordjin
Well-Known Member
Guess I'm not completely useless after all.just read this whole thread!! learned some good stuff!! and your models are a good choice!!
lordjin
Well-Known Member
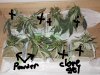
So to celebrate the fact that they're regaining their vigor, I squashed them again.

It's especially important to keep it low and spread out right under the blazing light. The tops at the outer edges can be allowed to grow taller for obvious reasons. I'm really gonna veg them out and fill that cage this time. I don't think I took full advantage last time, but again, a good thing because of the PM. I'll have a sharp eye out this go round. And I have a feeling my preventative h202 measures will keep the PM out of the picture entirely. A clean root zone is key. Final Phase flush and fresh veg nutes tomorrow. One more week.
Again, the weaker Larry side is getting an exaggerated push. Those bendy little sub-branches are sort of a joke moving from one square to the next, but I gotta do what I can.

As the vegging progresses beyond my last scrog, the strategy of it is getting pretty deep.

It may look harsh, but I only do it because I love them.

Note how the tender, developing top needs to be positioned just so to avoid getting squashed by the cage. You really gotta watch those tension points to make sure cage contact is being made on a non-critical part of the branch. This is quite an art form.
It's especially important to keep it low and spread out right under the blazing light. The tops at the outer edges can be allowed to grow taller for obvious reasons. I'm really gonna veg them out and fill that cage this time. I don't think I took full advantage last time, but again, a good thing because of the PM. I'll have a sharp eye out this go round. And I have a feeling my preventative h202 measures will keep the PM out of the picture entirely. A clean root zone is key. Final Phase flush and fresh veg nutes tomorrow. One more week.
Again, the weaker Larry side is getting an exaggerated push. Those bendy little sub-branches are sort of a joke moving from one square to the next, but I gotta do what I can.
As the vegging progresses beyond my last scrog, the strategy of it is getting pretty deep.
It may look harsh, but I only do it because I love them.
Note how the tender, developing top needs to be positioned just so to avoid getting squashed by the cage. You really gotta watch those tension points to make sure cage contact is being made on a non-critical part of the branch. This is quite an art form.
flowamasta
Well-Known Member
ok, here i go, i didnt get pics in order, and i really cant be bothered, but you can get the idea where i take my clones from hopefully!, i took 8 clones all up of the main branches, and most of the little tips that were poking up top got a minor pinch to leave 2 nodes instead of one main, all four corners got fimmed, or i like to call it a 'miss' where i don't make a clean cut under the nodes but instead slice right through the chunky part of the tip growth. looks ugly in the process, but it stunts that branch and will produce maybe 4 - 6 colas instead of one, i was able to do this is, as my corner sections of the plant were my 4 biggest mains, and they can easily be quadrupled in yield, i wouldn't normally be able to fimm 4 tops but my side growth was nearly equal to my top growth, i have a very nice even canopy now, took 8 clones, threw maybe 6, or another 8, and pinched/ fimmed maybe another 8-10 tips..
when i get ready to cut my clones and top my plant i do these following things.
1. soak rockwool cubes in 1ml-litre tap water, have a sterile blade, cup tap water, cloning gel and rooting powder (just for experiment.)
2. squeeze my cubes to rid excess water.
3. poke sterile hole smaller than stem size.
4. time to cut clones....... i cut a 45' angle slice after atleast 4 nodes, then scuff the bottom edges with blade to increase root spots.
5. dip stem and coat it in the gel / powder, i did 6 with gel, and 2 with powder to see which roots faster. i like the gel, it seems easier and cleaner.
6. poke tightly into hole pushing down until i can feel it squish the cube
7. 3 hrs darkness
8. into bottom of the tent where its nice and warm for 1 night.
9. then into propagator with growlush cloning flouro outside of the tent in the nice warm growroom
if you would like any other photos or would like me to explain any other aspect i am happy to.
pics.....it's really hard to see in these pics where ive cut, but all the mains have been sliced for big clones, 5-6 nodes, will return a huge wreath crown cola each......yummmm
enjoy, this is how i do it..... courtesy of Jin, allowing me to post this on his thread, I hope i help people. the next week she is going to flourish bigtime


they may look sad now, but thats just shock. darkness will help them adjust, and then in the tent for a warm environment, will get those root cells tingling away! the ones bent over and look real bad is just visual, trust me, they were simply growing in the direction of the lamp, and they are curved, they will grow upwards again once they adjust to growing new roots. soo far i have had a 100% happy clone rate doing this way
when i get ready to cut my clones and top my plant i do these following things.
1. soak rockwool cubes in 1ml-litre tap water, have a sterile blade, cup tap water, cloning gel and rooting powder (just for experiment.)
2. squeeze my cubes to rid excess water.
3. poke sterile hole smaller than stem size.
4. time to cut clones....... i cut a 45' angle slice after atleast 4 nodes, then scuff the bottom edges with blade to increase root spots.
5. dip stem and coat it in the gel / powder, i did 6 with gel, and 2 with powder to see which roots faster. i like the gel, it seems easier and cleaner.
6. poke tightly into hole pushing down until i can feel it squish the cube
7. 3 hrs darkness
8. into bottom of the tent where its nice and warm for 1 night.
9. then into propagator with growlush cloning flouro outside of the tent in the nice warm growroom
if you would like any other photos or would like me to explain any other aspect i am happy to.
pics.....it's really hard to see in these pics where ive cut, but all the mains have been sliced for big clones, 5-6 nodes, will return a huge wreath crown cola each......yummmm
enjoy, this is how i do it..... courtesy of Jin, allowing me to post this on his thread, I hope i help people. the next week she is going to flourish bigtime
they may look sad now, but thats just shock. darkness will help them adjust, and then in the tent for a warm environment, will get those root cells tingling away! the ones bent over and look real bad is just visual, trust me, they were simply growing in the direction of the lamp, and they are curved, they will grow upwards again once they adjust to growing new roots. soo far i have had a 100% happy clone rate doing this way
flowamasta
Well-Known Member
this is where alot of the main cuts were taken, sorry bout the quality i drew the arrows on my camera

lordjin
Well-Known Member
Wow, that's cool shit. And it's just gonna get angry and grow harder cuz you cut it. I'm really baked right now and still a little sick, so I'm gonna have to study it a bit more carefully in a minute.this is where alot of the main cuts were taken, sorry bout the quality i drew the arrows on my camera
View attachment 2053882
Thanks for posting that, though.
lordjin
Well-Known Member
A tale of two clearing agents.

Hey, at least AN tells you what the hell you're putting in your res.

GH? "Yeah, it clears your roots... just put it in your res... you'll like it."

I've said it once, I'll say it again. AN makes your cannabis taste and smell like cannabis. GH isn't as precise.
Edit:
Oh, and I skipped the Final Phase application last time and just them ride it out on a low nute concentration for the last week. I have no complaint about the aroma and taste of my last crop, but this one's gonna be even more tweaked out as I will be following the Final Phase regimen at finish.
Hey, at least AN tells you what the hell you're putting in your res.
GH? "Yeah, it clears your roots... just put it in your res... you'll like it."
I've said it once, I'll say it again. AN makes your cannabis taste and smell like cannabis. GH isn't as precise.
Edit:
Oh, and I skipped the Final Phase application last time and just them ride it out on a low nute concentration for the last week. I have no complaint about the aroma and taste of my last crop, but this one's gonna be even more tweaked out as I will be following the Final Phase regimen at finish.
Mohican
Well-Known Member
Hi LJ – More Baby Pictures
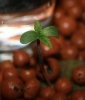
On February 4[SUP]th[/SUP] a seed that traveled around the world was inserted in an acid-washed rockwool cube. It is my first time using rockwool and the info on RIU about germinating seeds is, as usual, amazing and invaluable! Day after day, I watched and sadly saw no change. On day six I checked on the cube of RW expecting the same old nothing and there was my little Malawi baby! She was bent over and the seed leaves were still stuck together. I mounted the light and gave her a good watering and began building my LJT (Lord Jin Tote). I put together a simple 5 gallon bucket system until my tote is done.
Here is the Malawi baby on day 3:
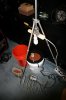
Here is the temporary 5 gallon setup with a tripod light stand:
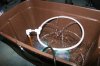
Now I am assembling the sprinkler ring for around the net pot in the tote:
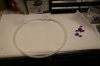
The sprinklers have a 360 degree pattern:
I can’t decide if they should be on the inside of the ring, the top of the ring, or on the bottom of the ring. What is your advice?
Thanks!
Mo
On February 4[SUP]th[/SUP] a seed that traveled around the world was inserted in an acid-washed rockwool cube. It is my first time using rockwool and the info on RIU about germinating seeds is, as usual, amazing and invaluable! Day after day, I watched and sadly saw no change. On day six I checked on the cube of RW expecting the same old nothing and there was my little Malawi baby! She was bent over and the seed leaves were still stuck together. I mounted the light and gave her a good watering and began building my LJT (Lord Jin Tote). I put together a simple 5 gallon bucket system until my tote is done.
Here is the Malawi baby on day 3:
Here is the temporary 5 gallon setup with a tripod light stand:
Now I am assembling the sprinkler ring for around the net pot in the tote:
The sprinklers have a 360 degree pattern:
I can’t decide if they should be on the inside of the ring, the top of the ring, or on the bottom of the ring. What is your advice?
Thanks!
Mo
lordjin
Well-Known Member
Hey, that's really cool. I'm not sure about the html thing, but maybe someone else knows?Hi LJ – More Baby Pictures
On February 4[SUP]th[/SUP] a seed that traveled around the world was inserted in an acid-washed rockwool cube. It is my first time using rockwool and the info on RIU about germinating seeds is, as usual, amazing and invaluable! Day after day, I watched and sadly saw no change. On day six I checked on the cube of RW expecting the same old nothing and there was my little Malawi baby! She was bent over and the seed leaves were still stuck together. I mounted the light and gave her a good watering and began building my LJT (Lord Jin Tote). I put together a simple 5 gallon bucket system until my tote is done.
Here is the Malawi baby on day 3:
View attachment 2055098
Here is the temporary 5 gallon setup with a tripod light stand:
View attachment 2055110
Now I am assembling the sprinkler ring for around the net pot in the tote:
View attachment 2055116
The sprinklers have a 360 degree pattern:
View attachment 2055117
I can’t decide if they should be on the inside of the ring, the top of the ring, or on the bottom of the ring. What is your advice?
Thanks!
Mo
You're going to install those emitters on that ring for use under the tote? If it's designed for one plant, I would install the sprayers upright on the ring spraying inward on the roots that will eventually occupy the center. But since they're 360 degree sprayers, it doesn't really matter where you put them, the roots will get wet. Lol.
And use H202, you'll avoid a lot of potential problems.
lordjin
Well-Known Member
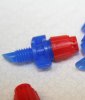
Yeah, those sprayers are better suited for pvc pipes. Holes work.The sprayers did not work! So I drilled some holes and now it squirts out of the ring on to the net pot. Pictures coming")
Mohican
Well-Known Member
DAY 3 – Finished the Lord Jin Tote (LJT)
Hi LJ - It was busy day today. I needed to get my seedling in its new home. But first I had to build it!
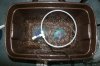
The sprinklers do not work with the pump I have so I drilled holes at an angle in the new ring and it seems to work great. We will see:
Here is a top view:
The finished LJT:
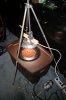
I added a pie pan reflector to my light:
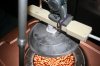
And I even made a Hydroton cover out of a tortilla warmer lid:

Thanks for the inspiration and leadership!
Cheers,
Mo
Hi LJ - It was busy day today. I needed to get my seedling in its new home. But first I had to build it!
The sprinklers do not work with the pump I have so I drilled holes at an angle in the new ring and it seems to work great. We will see:
Here is a top view:
The finished LJT:
I added a pie pan reflector to my light:
And I even made a Hydroton cover out of a tortilla warmer lid:
Thanks for the inspiration and leadership!
Cheers,
Mo
lordjin
Well-Known Member
I like it. The only thing that bothers me a little are those thick ol' streams of water shooting out of those ring holes.DAY 3 – Finished the Lord Jin Tote (LJT)
Hi LJ - It was busy day today. I needed to get my seedling in its new home. But first I had to build it!
The sprinklers do not work with the pump I have so I drilled holes at an angle in the new ring and it seems to work great. We will see:
View attachment 2055585
Here is a top view:
View attachment 2055586
The finished LJT:
View attachment 2055587
I added a pie pan reflector to my light:
View attachment 2055588
And I even made a Hydroton cover out of a tortilla warmer lid:
View attachment 2055589
Thanks for the inspiration and leadership!
Cheers,
Mo
You went to all this trouble, why not go all the way and replace that ring with a pvc pipe square? That way you can utilize those sprayer heads you have. The added pressure of the water shooting out into smaller droplets makes a difference.
lordjin
Well-Known Member

Surprise, surprise. They recovered again from their training.

Remember that top I pointed out yesterday? Here's how the recovery is progressing.

Larry. Still weak but actually looking a bit better.
And just a couple of random shots to highlight Tahoe's recovery.


I ran the Final Phase. Lotsa muck and dead root matter came off. I'm now running 30ml of H202 diluted to 3% in the res. How do you like that, nasty micro-organisms? I bet you don't, right? Shit...