Kitty's Commercial Grow Op-Bigger & Better Every Day!

marijuananation

Well-Known Member
Kitty !!
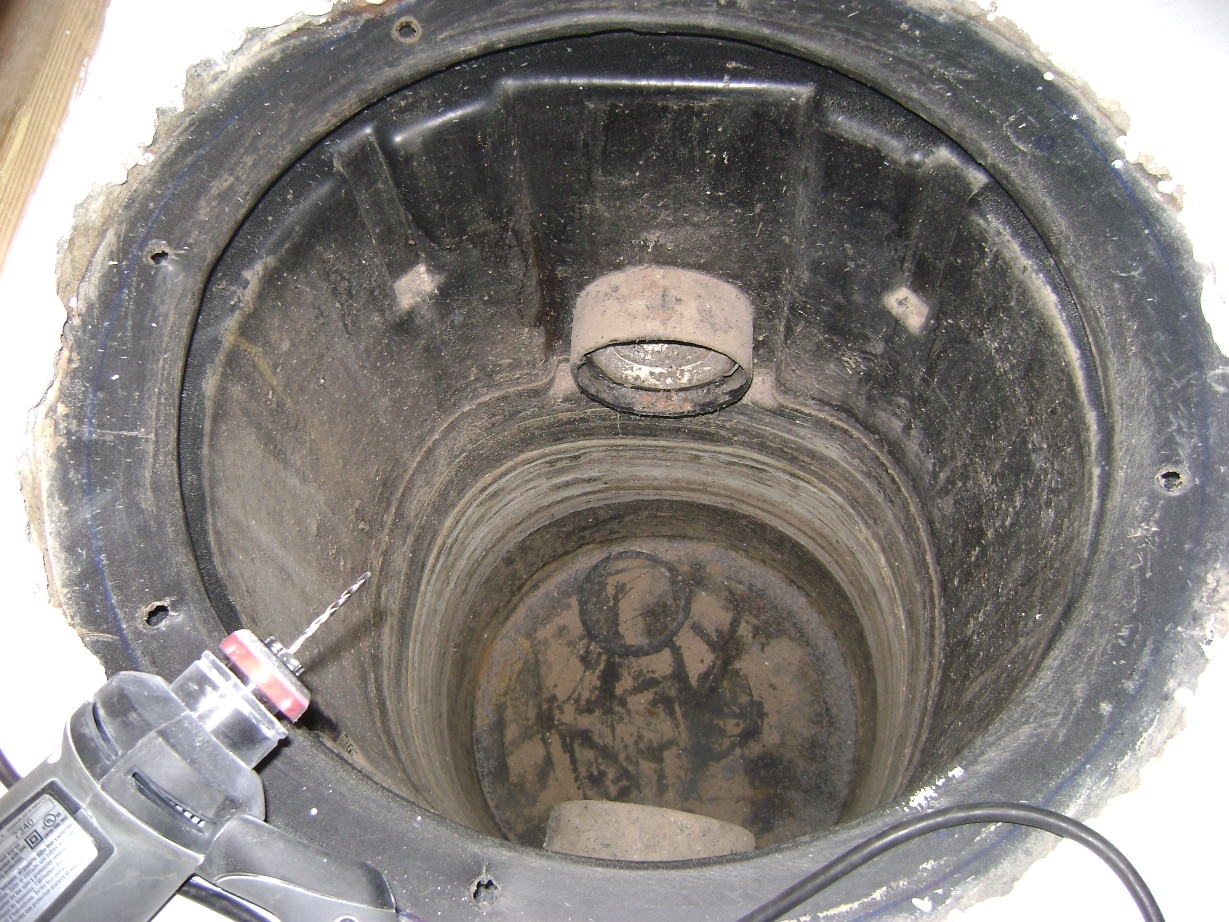
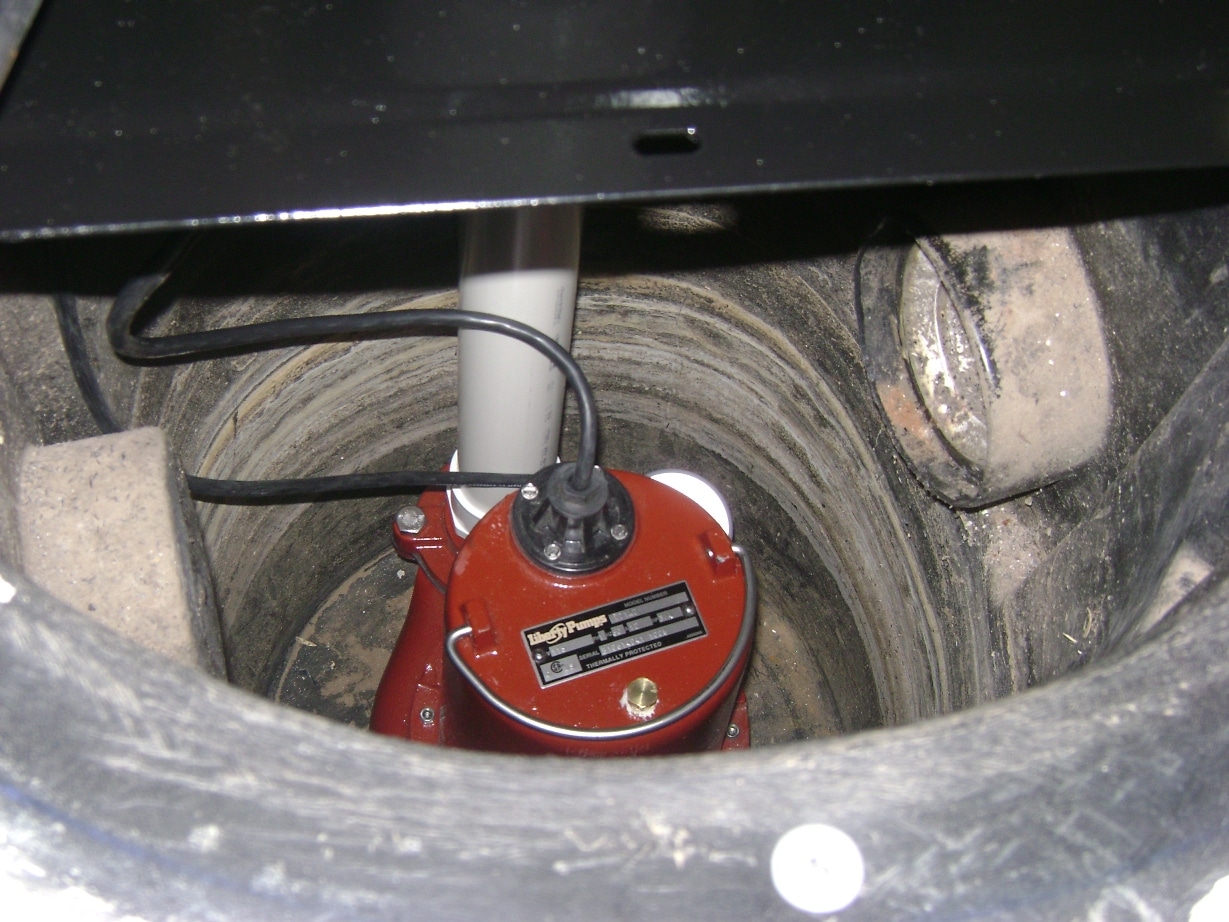
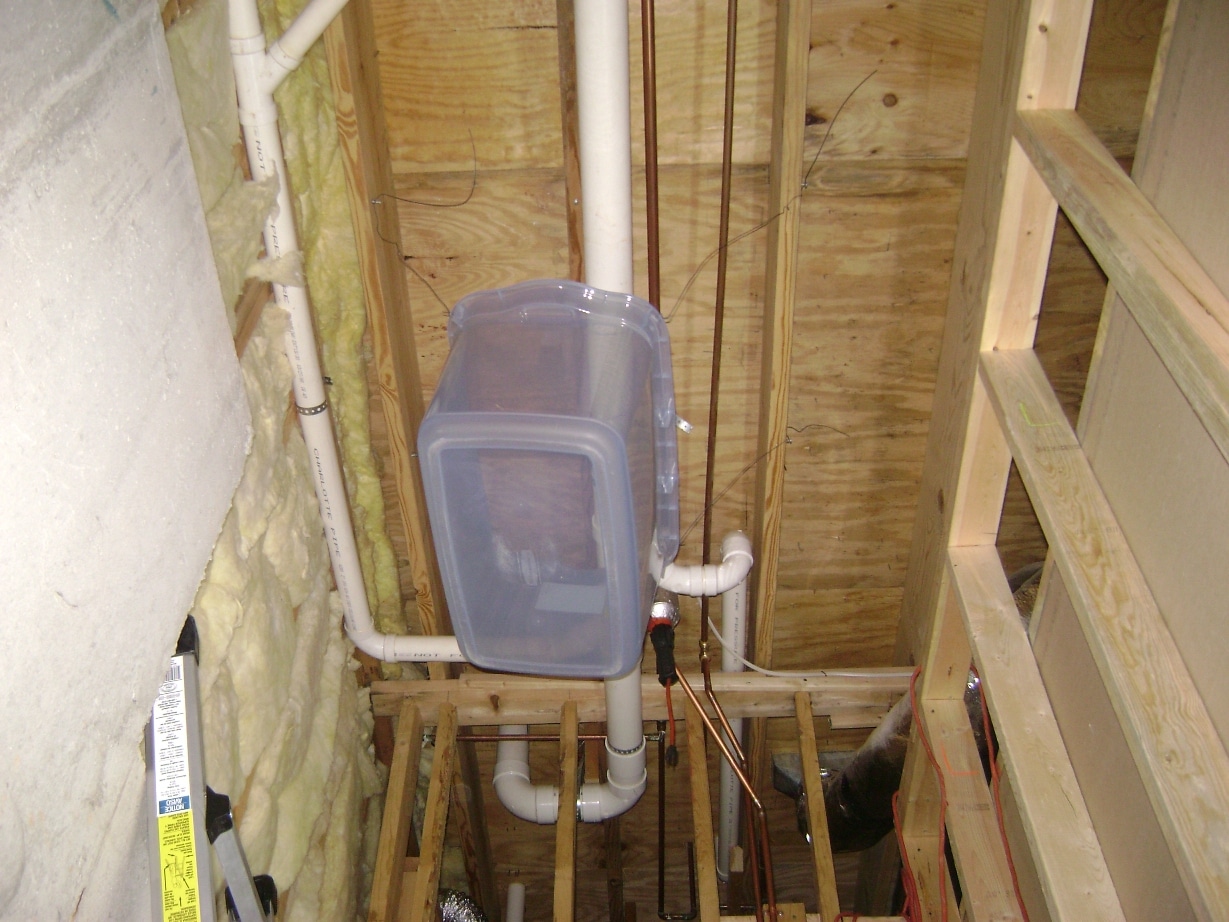
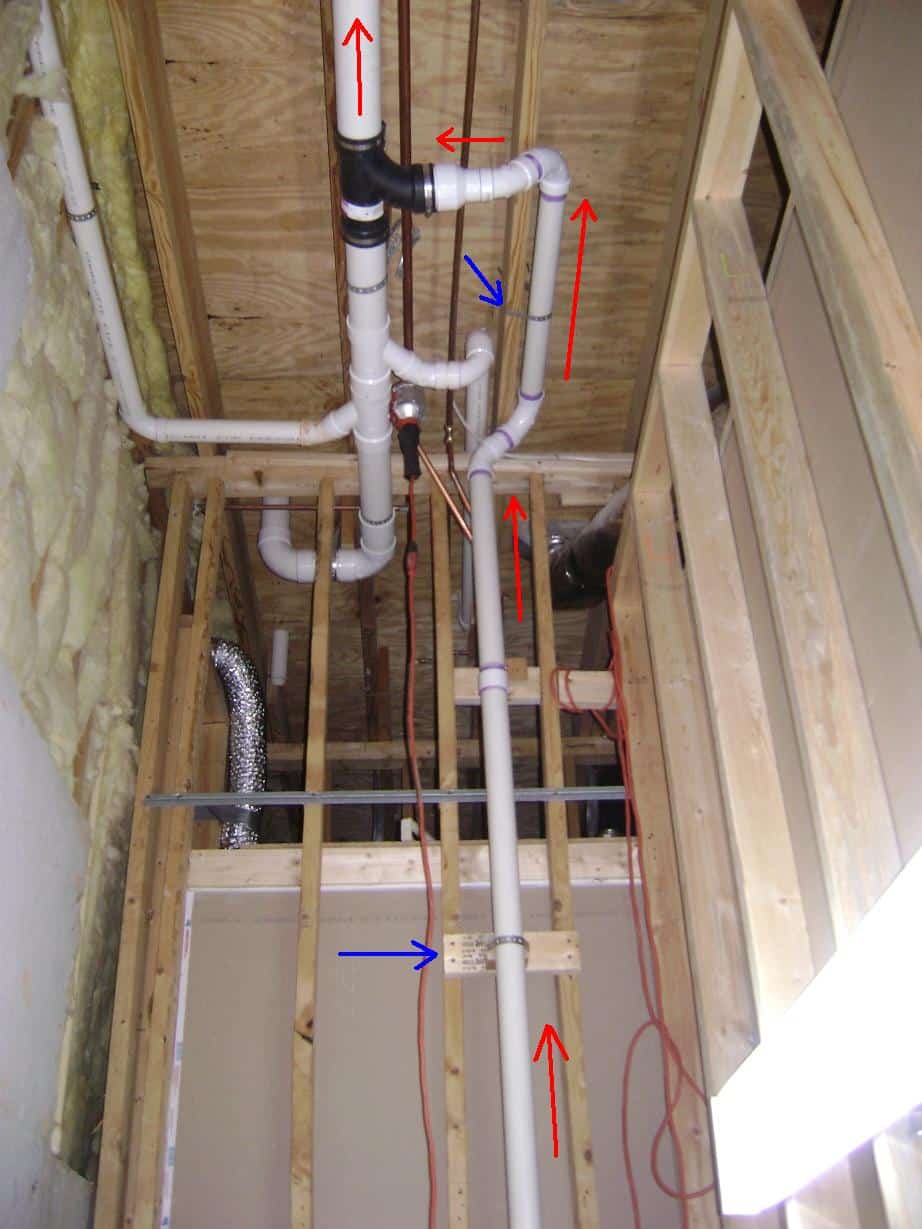
What you have there appears to be a vent line to the roof which was roughed in when the foundation was poured.

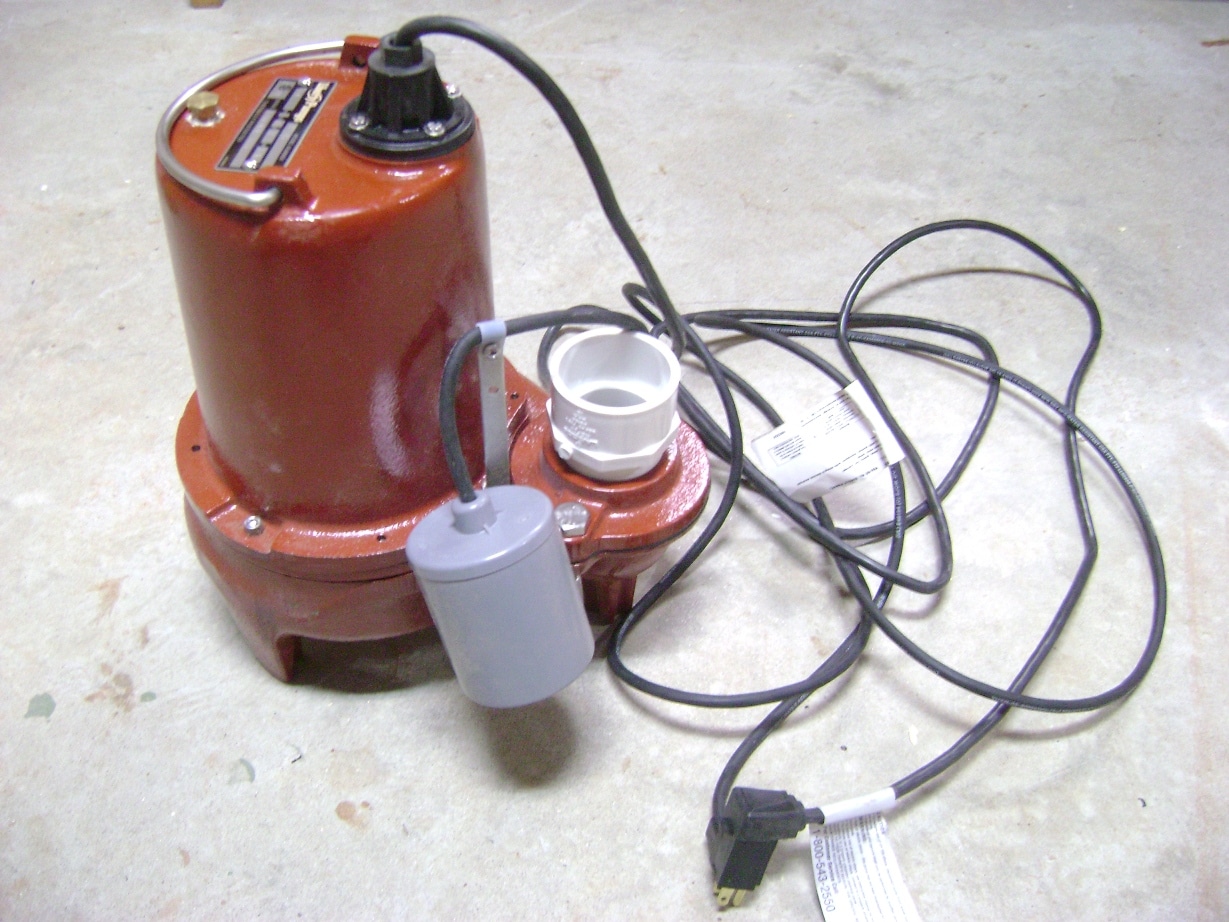
You will only have to make the interior vent pipe connections to the basin.

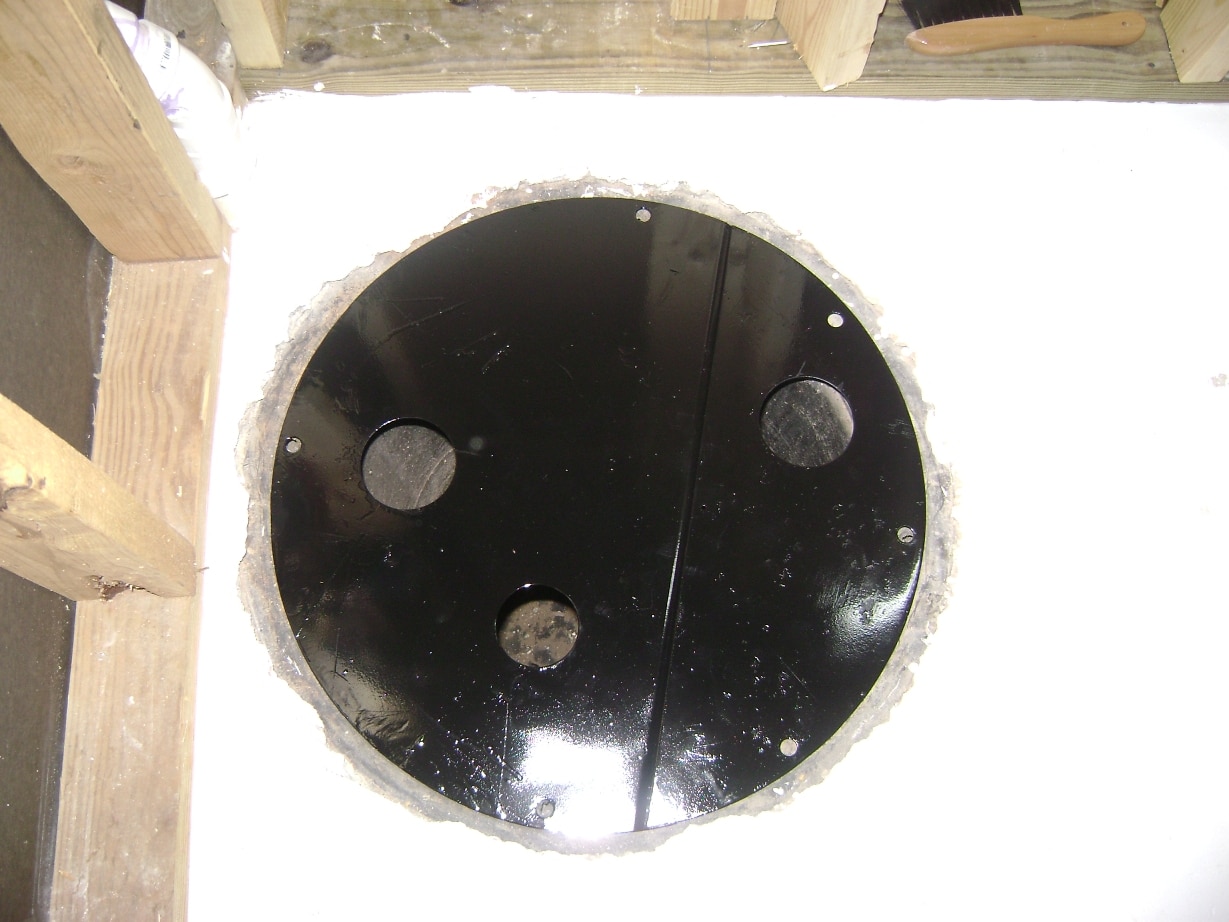
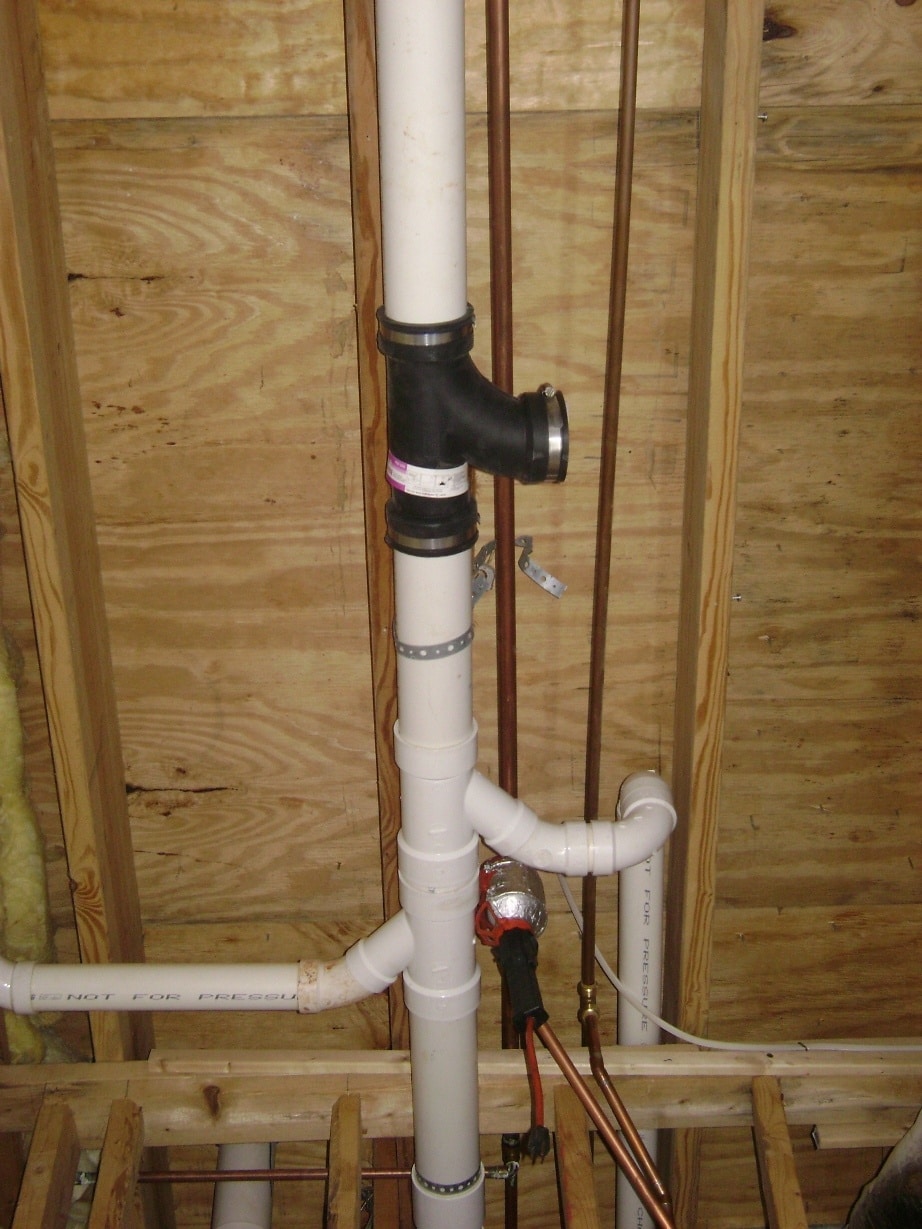
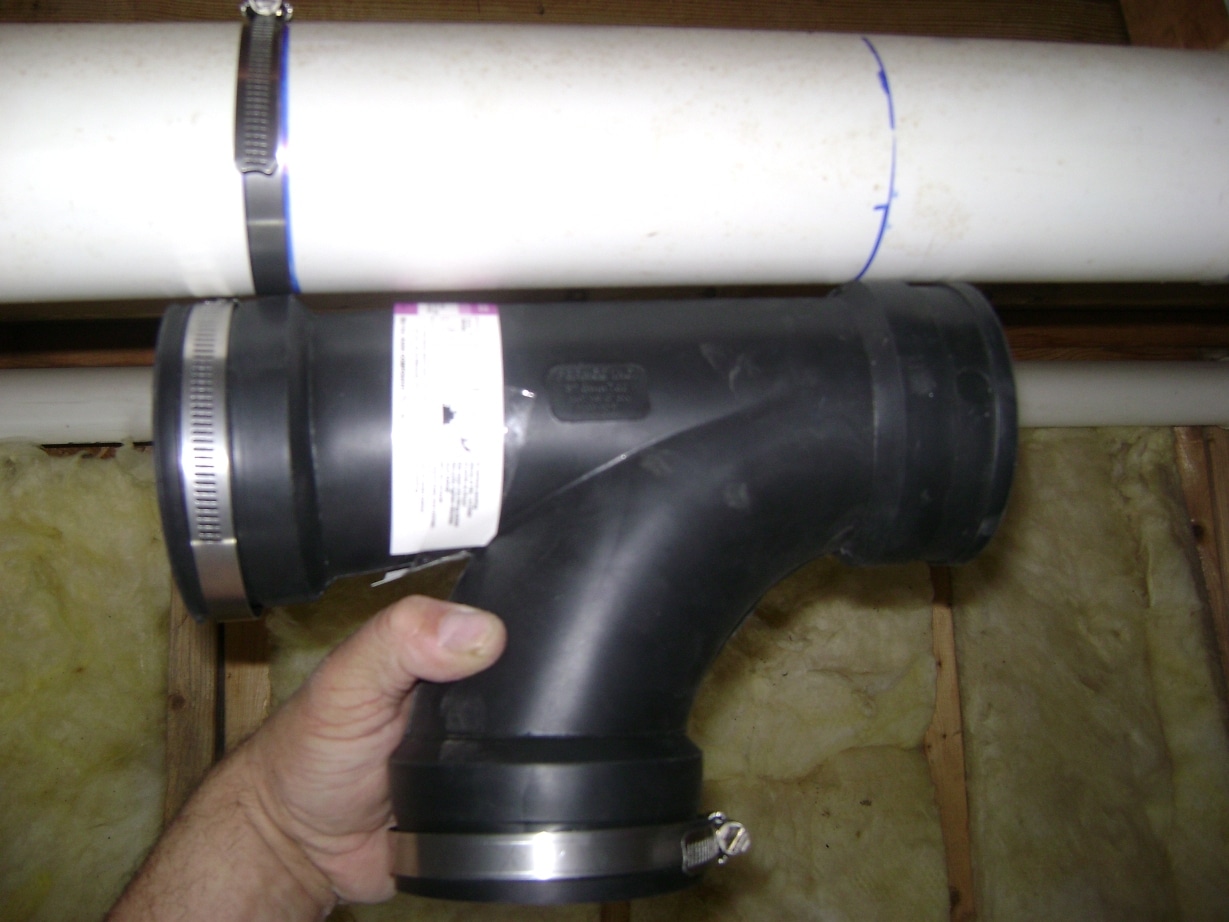
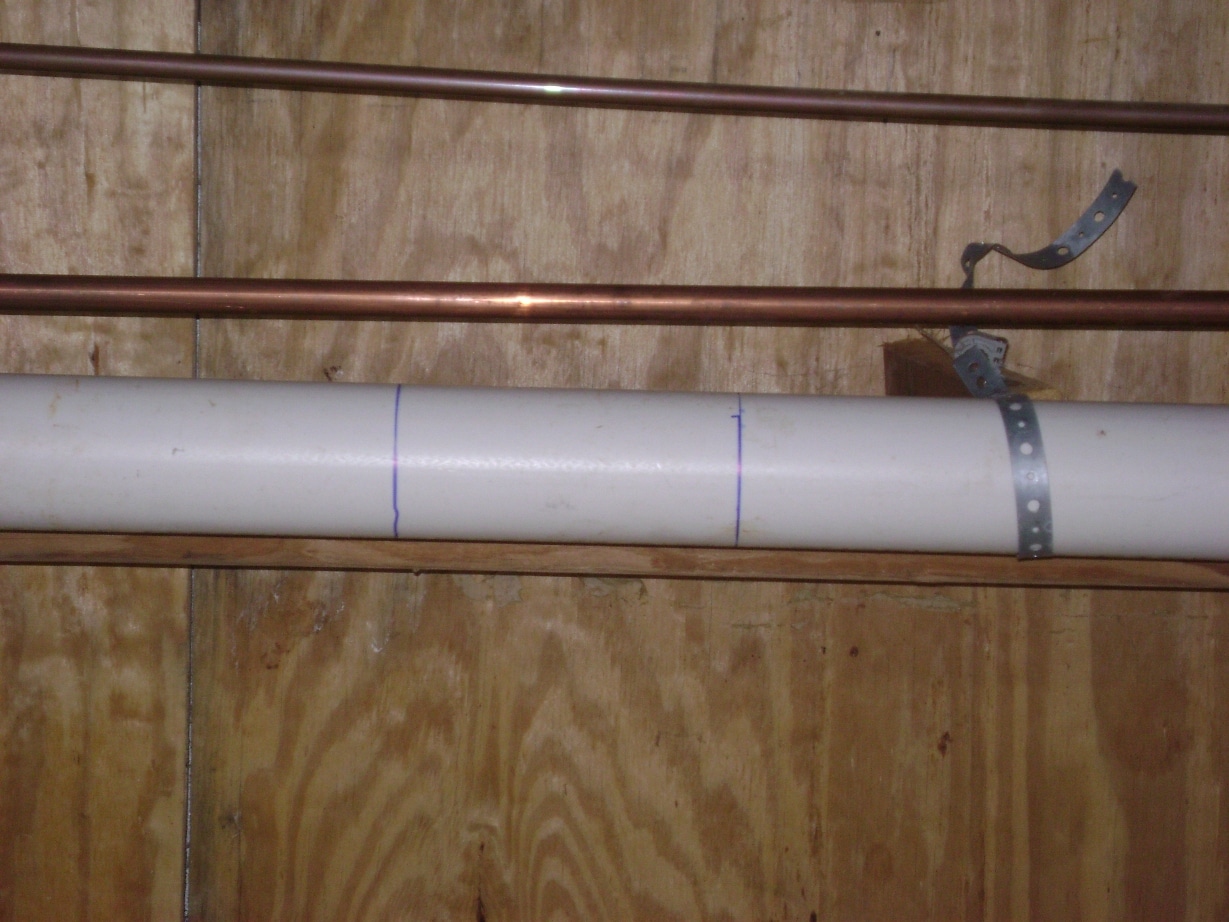
Blue lines in the next photos highlight the air vent line. The vent line extends about 3 inches below the lid of the sewage basin and is sealed by rubber grommet.


http://www.handymanhowto.com/wp-content/uploads/2009/01/dsc01205.jpg
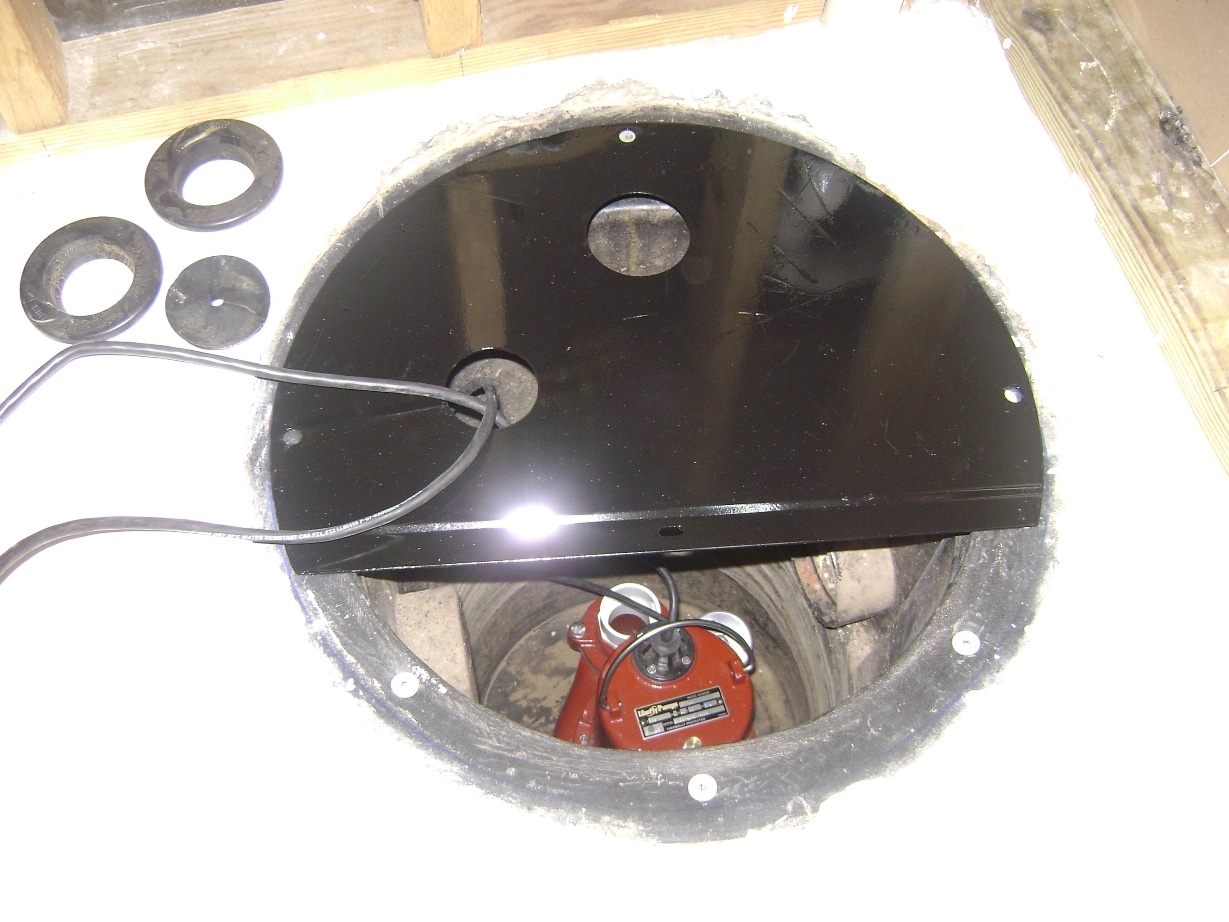
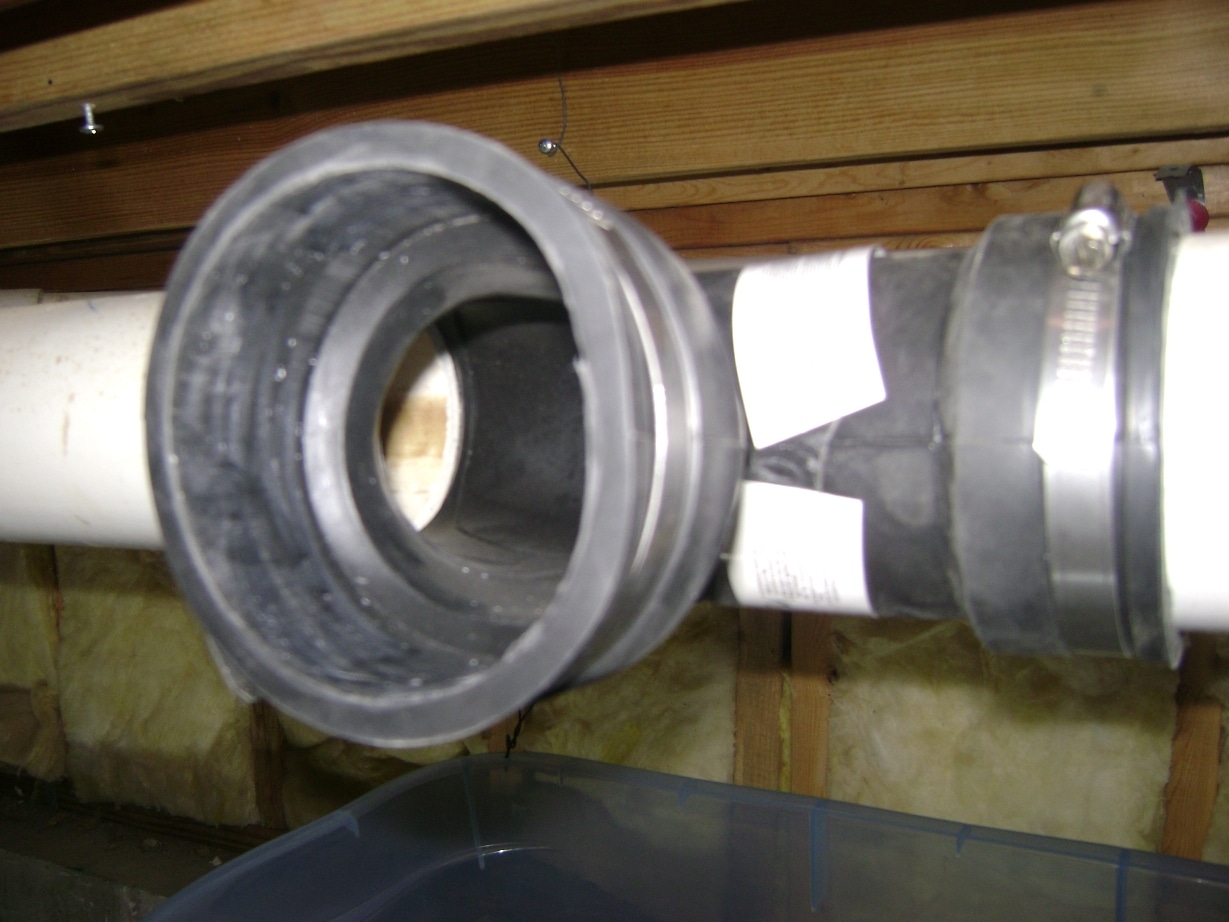
Another View of the Sewage Basin Split Cover


I hope this helps..

Peace and Happy Growing !!
 

marijuananation

Well-Known Member
Kitty,

Here are the directions on how to install this correctly..


In the photo below, the pump is shown with the gray mechanical float switch and white 2-inch threaded PVC pipe adapter on the discharge outlet. As the water level rises, the metal ball in the float switch rolls and closes the on/off switch contact to turn on the pump.

The water level should never rise more than half-way up the side of pump housing before the pump turns on. This pump is rated at 60 gallons per minute at 20 feet of head for my situation. “Head” is the vertical number of feet, including friction losses for plumbing elbows, that the pump must lift the sewage. Given that I only have a shower that uses ~7 gallons per minute, 1.6 gallon per flush toilet and sink, it will be impossible for the inflow to exceed more than 10 to 15 gallons per minute worst case.


The intake opening is shown here on the bottom of the pump. A cast iron impeller rotates at 1725 RPM inside the housing. It runs vibration free and whisper quite.


Preparing the Sewage Basin

I cleaned the dirt and cement splatters off the 2-part metal cover to the sewage basin, revealing several rust blisters under the paint. The rust spots were sanded down with a wire brush drill attachment and treated with naval jelly rust killer. Four coats of Rust-Oleum black enamel spray were then applied.


Sewage Basin 2-Part Metal Cover

The metal cover is secured to the perimeter of the sewage basin by “mirror mount nuts” and bolts. The old ones were rusted (left items) and replaced with six new assemblies. Mirror mount nuts splay out in star pattern when tightened to fasten the nut securely to the plastic rim of the basin.

Mirror Mount Nuts, Bolts and Washers


I also removed the rim from the inside of the sewage inlet with a Roto-Zip tool as I felt this lip would only serve as a catch point – another “contractor quality” oversight in my opinion. If you look carefully, you can see the black plastic rim at the bottom of the basin.

Roto-Zipping the Sewage Inlet Rim

Sewage Pump Installation

The following sewage pump installation diagram will be helpful to understand the following installation steps.

Sewage Pump Installation Diagram (C) Liberty Pumps, Inc.

The sewage pump is lowered into the basin and aligned with the plumbing holes in the metal cover. The rubber grommets for the sewer pipe, vent pipe and electrical connections are laying to the left. Also notice the new mirror mounts nuts installed in the rim of the basin (gray circles).

Sewage Pump in the Basin

The combination check and ball valve is dry fitted to a 36 inch length of 2 inch PVC pipe to begin the sewage line connections. I purchased mine from Grainger, the item in the Grainger catalog looks a little different than the one here. The purpose of the check valve is to prevent backflow and the ball valve allows me to shutoff the sewer pipe for maintenance without backflow problems. It’s also required by the building code.
If I ever need to pull the pump, the check/ball valve has a slip union threaded joint to disconnect the pipe.


Combo Check- and Ball Valve

The stem pipe is pushed down to the sewage pump through the rubber grommet in the basin lid. I’m still dry-fitting the piping and haven’t glued any connections.

Ball/Check Valve Stem Pipe and Pump

Closeup of the 2 inch PVC sewer pipe connection and pump inside the basin.

Sewage Pump and Stem Pipe

Splicing the Tee Fitting into the Main Sewer Line

The main 3 inch PVC sewer line must be cut to install the Tee connector for the sewage pump line. The installed Tee is shown below.

Sewer Line Ell Fitting by Fernco, Inc.

Sanitizing the Sewer Line

The 3 inch PVC sewer line in the photo above serves the master bathroom. In anticipation of cutting the sewer line, I poured 1/2 gallon of bleach down the toilet in the master bath and flushed several times to sanitize the PVC sewer pipe. The master bathroom was off-limits for 24 hours to allow the sewer line to fully drain as I didn’t want to get “dripped on” when I cut open the PVC line.
Installing the Flexible Tee Fitting

The section to be cut out from the main 3 inch PVC sewer line was marked as shown using the Fernco QT-300 Tee as a reference. I removed one of the steel bands from the Tee and snugged it around the PVC pipe to mark a perfect circle.

Fernco QT-300 Flexible Tee - 3 inch

The section to be cut out is shown in the next photo. This view is looking up directly overhead.

Main Sewer Line Marked and Ready for Cutting

I was concerned over what might spill out of the sewer line when I cut it open. I didn’t know if it would be dripping or filled with sludge or ??? I also don’t like cleaning up messes. I therefore suspended a plastic bin from the floor joist with wires as shown under the section of the sewer pipe to be cut out. This would catch the saw dust, drips and section of PVC pipe.

Plastic Storage Bin for Catching the Debris

I used a sawzall to make the cuts on the PVC sewer line.

Sawzall, Safety Glasses and Latex Gloves

The Sawzall cut the PVC pipe like butter in just seconds. The plastic bin caught the PVC shavings and the section of pipe. To my surprise, the sewer line was bone dry and odor free! Next, I deburred the PVC pipe ends by smoothing off the shavings with my gloved fingers.

Main Sewer Line Cuts

A closeup of the Fernco flexible Tee fitting installed on the main sewer line. I had considered using a rigid PVC fitting and was happy I didn’t because there was almost no “give” in the main sewer line ends to install a rigid fitting. I had to partially fold the Fernco fitting to squeeze it between the two pipe ends. All said and done, it took only a minute to fit it on the sewer pipe.

Fernco QT-300 Tee Fitting Installed

Another view of the installed Tee:

Flexible Tee Fitting Installed on Sewer Line

Working from the ground up, I completed the 2 inch PVC sewer pipe connections and cemented the joints together. Remember the bottom of the check/ball valve is slip union connection for a quick disconnect in case I ever need to pull the sewer pump.

Sewage Pump Pipe and Check/Ball Valve Connections

2 inch PVC riser pipe is installed to carry the waste water up to the main sewer line. The sewage is pumped upward as indicated by the red arrows.

Sewer Line Riser Piping

The sewage pump discharge lines must empty into the main line from above, hence the 45 degree elbows to clear the existing feeder line and floor joist. Red arrows indicate the direction of flow. Hanger straps are called out by the blue arrows.

Overhead Connections to the Main Sewer Line


I Hope this helps,

:leaf:Peace and Happy Growing:leaf:
 

researchkitty

Well-Known Member
Holy shit!!! THANK YOU for the pictures and the comprehensive guide. Its exactly what my setup needs to get the sump working. Originally this area was meant for offices, so these are the "toilet" areas. :) There's two, one in the veg room and one in the flower area between rooms.

THANK YOU AGAIN and +rep to yous. :) :) :)
 

marijuananation

Well-Known Member
Holy shit!!! THANK YOU for the pictures and the comprehensive guide. Its exactly what my setup needs to get the sump working. Originally this area was meant for offices, so these are the "toilet" areas. :) There's two, one in the veg room and one in the flower area between rooms.

THANK YOU AGAIN and +rep to yous. :) :) :)
You are more than welcome, anything I can do to help my fellow growers !!
 

researchkitty

Well-Known Member
Time for a photo update...............


#1 - Humidity was at 26%, so time to add a humidifier. Set to 55% now.


#2 - Current plant shot


#3 Instead of wiring new outlets, I dont need light bulbs in the ceiling. So, quick wired to provide A/C in another room.


#4 - Mostly done, a little more cleanup to do. Plus have to add 5 reservoirs and get em all wired up soon too!


#5 -


#6 - Extra 50' extension cord just 'for when you need it'.


#7 - HELP! How does my wire job look? :) Its being connected to the main panel tomorrow.......


#8 - Clones, seedlings, and veg plants looking great.


#9 - Two autoflowers, must have gotten the seeds mixed up. Woops.


That's all for now! Thanks for the continued help everyone............
 

Attachments

marijuananation

Well-Known Member
I would honestly change the electrical (below) and put in a grounded receptical asap !!

It might scare you to hear this but it is a accident waiting to happen. it's only a matter of time.

They cannot make a grounded light socket adapter (3 prong), because there is no ground wire in a socket.

Not all white wires are neutral. If you have a switch loop, one wire may be white, but they are both hot.

The best thing to do is to replace the socket with a grounded outlet.

They make outlets on round covers to replace a socket.

if that socket is designed for a 60 -100 watt bulb and you go throwing hundreds of extra watts on it, there will definately be a problem.. especially considering that it does not appear to be a ceramic fixture, but a generic plastic one.

Eventually the light receptical will heat up start smoking and catch fire..

If you have no other source of power in that room Seriously consider a high current (construction grade) extension cord.

It will be much safer in the long run even if your current power situation is temporary..

it is a much smarter, safer and effecient way to get power to your lights then a light socket.

I hope this helps.


researchkitty

Well-Known Member
How unsafe could it be? All I'm running on it is the timers for the control box and the pH meter and a 24w air pump. I'm using less electric than the light bulb that was in the socket to begin with........
 

cmt1984

Well-Known Member
your wiring in that box looks good to me.

i would listen to marijuananation about the light socket outlet, those things are accidents waiting to happen. my uncle had a refrigerator plugged in to one in his basement and it ended up catching on fire....burnt the place to the ground.
 

cmt1984

Well-Known Member
How unsafe could it be? All I'm running on it is the timers for the control box and the pH meter and a 24w air pump. I'm using less electric than the light bulb that was in the socket to begin with........
ah ha, i thought by a/c you meant air conditioning. if you're running that little power through it then you're good to go.
 

brownbearclan

Active Member
Just a minuscule suggestion, on your 50 ft. extension cord maybe get one of those extension cord reels next time you stop by a home depot. LIKE THIS They make it sooo much quicker to just reel it in instead of coiling cord. :idea: =)
 

420Marine

Well-Known Member
I thought you meant AC as well but the box looks awesome...Kitty ever think of remodeling old houses :) Everything looks so nice and clean looking great job
 

researchkitty

Well-Known Member
Aaah oops! That's a typo. I meant to say 120vAC to the other room, rather than A/C looking like air conditioning. :) The light socket thingy says 600 watts maximum on it. I total about 100 right now. They DO make a light socket adapter that replaces the entire unit, and you wire it in so it has a grounded 120v AC. I'll swap them in there after everything is up and running, just to play it safe.

I wouldnt recommend a fridge or freezer with one, those pull more than 600 watts, which is my guess at what caused his fire..........

My trucking shipment for the new equipment got delayed, should be here in the next day to two days max though. Its been almost 2 weeks already, arrrrrgh for buying in the heat of Christmas shipping times. :)

Time to go wire up that 240v panel, if you dont hear from me in a few hours, well.... ZAAAAAAAAAAAAAAAAAAAAAAAAP!
 

marijuananation

Well-Known Member
The best thing to do is to replace the socket with a grounded outlet.

They make outlets on round covers to replace a socket.

I hope this helps.
I also thought you meant Air Conditioner.. LMAO !!

I am glad you are chosing to go with the grounded light receptical adapter !!

Good luck making those connections to that panel.
 

BiteSizeFreak

Active Member
So are you going to run it SOG style with putting clones directly to 12/12 or are you going to run a full veg cycle then move to flowering?
 

budlover13

King Tut
Damn! I like, I like! I'm getting ready to move my grow into a bedroom and work my way up from there. Nice looking set-up!
 
Top