just ordered a mushroom grow kit.

JPCyan

Well-Known Member
Ok last flush, let some caps really open, Im diggin out a simple printing tek tonight. Just so you'll have them if and when you want to give it a try on your own.

No doubt about the mental health effect in my mind or my wife's. Though she doesn't really approve, even she noticed a change in me for quite some time after a dose. The "afterglow" as I call it, leaves me happier, more content, less anxious, more stable with emotions and radical mood swings for months sometimes. I dont partake often but once or twice a year almost always.

You showed more patience than any first timer I have ever seen. :) Most get excited, anxious, See something strange or worry something isnt right, Questioning everything and creating more problems for themselves by wanting to experiment to "fix it" before even understanding the whole thing. Patience makes a grow. These things do what they do if you just give them the right environment.

Fantastic job, multiple flushes, beat trich!!, and showed a kit can work. Congrats.
Enjoy the fruits of your labor.
 

Voodu

Well-Known Member
Ok last flush, let some caps really open, Im diggin out a simple printing tek tonight. Just so you'll have them if and when you want to give it a try on your own.

No doubt about the mental health effect in my mind or my wife's. Though she doesn't really approve, even she noticed a change in me for quite some time after a dose. The "afterglow" as I call it, leaves me happier, more content, less anxious, more stable with emotions and radical mood swings for months sometimes. I dont partake often but once or twice a year almost always.

You showed more patience than any first timer I have ever seen. :) Most get excited, anxious, See something strange or worry something isnt right, Questioning everything and creating more problems for themselves by wanting to experiment to "fix it" before even understanding the whole thing. Patience makes a grow. These things do what they do if you just give them the right environment.

Fantastic job, multiple flushes, beat trich!!, and showed a kit can work. Congrats.
Enjoy the fruits of your labor.
Thank you very much for the kind words! I learned to be patient from growing outdoor marijuana. Starting a seed indoors in March and starting curing in October, a 7 month endeavor for each plant, has taught me a lot about growing over the years. I look forward to your printing information. I only posted a couple pictures of my flush's, I definitely let some caps open fully in the later stages.
It should be pretty easy for me to get some sterile science syringes, and the other component is distilled water if I am not mistaken?
 

QUAD BREATH

Well-Known Member
Thank you very much for the kind words! I learned to be patient from growing outdoor marijuana. Starting a seed indoors in March and starting curing in October, a 7 month endeavor for each plant, has taught me a lot about growing over the years. I look forward to your printing information. I only posted a couple pictures of my flush's, I definitely let some caps open fully in the later stages.
It should be pretty easy for me to get some sterile science syringes, and the other component is distilled water if I am not mistaken?
Very nice report man! Some good information in this thread from some very experienced guys. Also, great to hear how mushrooms are helping you with your health.

I just made my first spore syringes, from a PF Tek grow, and they're a success as I got some jars ready to birth right now.

I can say, I only used bottled water to make the syringes. Further, I just reused the syringes from the spores I originally bought .....pump boiling water in and out of syringe several times and keep the water in on the last pump.

Sounds like you do a lot of research. However, if you want to know where I purchased my original spores recently or in the past just PM and I'll let you know.....I'm from Canada too.

I won't bother explaining my spore printing method because I've only tried it once using my own lazy Tek (which probably has a higher chance for contams). I look forward to JP's method because I can learn a lot too. I will mention, all I used for a still air box was a large clear tote extended over the edge of a table; just enough to get my hands and wrists inside. I used 10% bleach for spraying inside box, gloves, etc.

From a couple weeks ago, first flush on a cake that was pinning heavily in jar three days into consolidation. The flush happened so fast that I was late picking, as I like to get them before the veil breaks. Supposedly, Golden Teachers:


Hope you don't mind the picture, but it sounds you like them ;)

Good Luck Man!
 
Last edited:

Voodu

Well-Known Member
Very nice report man! Some good information in this thread from some very experienced guys. Also, great to hear how mushrooms are helping you with your health.

I just made my first spore syringes, from a PF Tek grow, and they're a success as I got some jars ready to birth right now.

I can say, I only used bottled water to make the syringes. Further, I just reused the syringes from the spores I originally bought .....pump boiling water in and out of syringe several times and keep the water in on the last pump.

Sounds like you do a lot of research. However, if you want to know where I purchased my original spores recently or in the past just PM and I'll let you know.....I'm from Canada too.

I won't bother explaining my spore printing method because I've only tried it once using my own lazy Tek (which probably has a higher chance for contams). I look forward to JP's method because I can learn a lot too. I will mention, all I used for a still air box was a large clear tote extended over the edge of a table; just enough to get my hands and wrists inside. I used 10% bleach for spraying inside box, gloves, etc.

From a couple weeks ago, first flush on a cake that was pinning heavily in jar three days into consolidation. The flush happened so fast that I was late picking, as I like to get them before the veil breaks. Supposedly, Golden Teachers:


Hope you don't mind the picture, but it sounds you like them ;)

Good Luck Man!
Dude! Those look awesome! Some of those caps are gigantic! How many flushes like that can you get (optimistic) from a cake of that size?
 

QUAD BREATH

Well-Known Member
Dude! Those look awesome! Some of those caps are gigantic! How many flushes like that can you get (optimistic) from a cake of that size?
Personally, I have gone up to three flushes and never tried going further....I've read claims of eight?
However, cakes are so easy that it isn't necessary to go past two or three. Once you get your first or second flush, you can easily clone a mushroom into a liquid culture (which I've done using syringe biopsy) or make a ton of syringes from a print. I don't have a pressure cooker and just use a large pot to steam sterilize. I can fit nine half-pints into that pot thus, I can pump out nine cakes a day if I want....you'll have more cakes than you know what to do with. You can knock-up eight to ten half-pints with a 10-12ml syringe.

That cake above, took approximately 21 days to colonize and you're suppose to give a week for consolidation; I only gave it three or four days because I already had mushrooms growing in the jar. That first flush was done in 28 days from inoculation and yielded close to five dry grams. I average seven grams per cake, total, in non perfect conditions.....there are people that average ten plus grams per cake. Actually, that cake, along with some others, were fruited just with window light in the kitchen/computer area where my dog spends most of his time too. I also inoculate and germinate my jars in this area too.........lots of mold spores too as I keep a window open as well. The point being how easy cakes are to do. I am like you in that I'm taking an interest in edibles and other psychedelic mushrooms and thus, I may get a pressure cooker and expand my horizons. Just like cannabis, it doesn't hurt to learn a variety of methods.

If you want to test the spore syringes you make, inoculating some cakes would be an easy way. It only takes twenty minutes to mix up a batch of brown rice and vermiculite for ten cakes.

It sounds like you need 120 grams a year to meet your needs.....20-30 cakes could be easily fruited in one 100 litre clear tote (shotgun fruiting chamber) and be completely done in 30-35 days. Or, you could just pump out a bunch of cakes and make 5 years worth in a couple months. I have successfully stored mushrooms in chocolate/freezer for 10 years with no notable loss in potency. Further, you can use whatever size fruiting chamber you want.....I've got some 100 litre ones as well as some smaller ones that only hold eight cakes max.

The hardest part of doing cakes is getting a good spore vendor with no contamination issues. That is why if you can learn to make your own spore prints and syringes you'll be laughing. I am still a newbie too, and I have lots to learn.

There are many write-ups on the PF Tek; however, the following is very concise and if you read the many pages of questions most of yours will be answered...follow it closely and you're guaranteed to produce:
https://www.shroomery.org/forums/showflat.php/Number/11585613

I have also used Shea 25's Teks on syringe sterilization and liquid culture. They are highlighted in green in his/her signiture.

This is around 24 days after inoculation (three days into consolidation) ......I just birthed them today.....some jars in that pic are only 12 days and still colonizing.


I'm not sure if the mushrooms growing in the jar that quick is ideal but I'm just experimenting. From what I understand, that is caused by exposing colonizing jars to light from the get go. But damn do they fruit fast.....just a little bit of a pain to get out of the jar versus a normal cake.

Hopefully, the above will give you some more ideas to help with your medical self-sufficiency.
 
Last edited:

JPCyan

Well-Known Member
Apologies Voodu, I spent over an hr last night late, writing, editing, fixing typos and trying to make some sense, Finally it was ready. (printing method). I hit reply and the little green progress bar just kept running and running, When it stopped.. No post. I have no idea where it went.

I will try again and give you some links as well.

Beautiful cakes and flush btw Quad Breath.
 

New Age United

Well-Known Member
Well since I temporarily got kicked out of My own thread... I'll will keep up with this one.
Fuck Heatless you scared me there with thread about you leaving, I do apologize for last night you're an asset to this community brother hope you stick around, I've learned a lot from you.
 

JPCyan

Well-Known Member
There are many, many, ways to print, some more, some less sterile. These are a few ways. Not the best or only ways, just ones Ive used successfully multiple times.

Printing tek(s). With Alternatives marked *A
Three methods listed will be, an "Oven method", a "Print Box" method, and "Simple method". All will use open face prints in mini zip bags. None use a glove box or hepa/laminar flow.
Some steps are universal. marked with *U ( info )

The biggest components of all. :
Be quick, prepared, move smoothly and precisely and most importantly, make sure every item you are using, and yourself (hands,gloves, clothes lighter, xacto,etc) are clean and sanitized! This is a constant.

Unless otherwise stated, assume this is law throughout every step , every method!


Items needed: all included but not needed for each method ( you can figure it out)
Aluminum foil
Iso alcohol 90% if possible, 70% will work
Exacto knife
Print box- a flat bottomed plastic food grade storage container with lid (gladware , tupperware, Sterilte etc)
A baking dish (size is dependent on how many prints you are making for both dish or box methods)
*Mini zips- 2x3" or similar. big enough to easily accept the foil squares. wlmrt craft aisle 50-100 for $1
*A Snack size zip bags
Jar, glass, plate, or just a clean flat disinfected surface (10% bleach/water solution)
Nitrile gloves (latex or vinyl work too)
Tweezers


The Simple Method-- *U1 -( Choose an open and flattening cap
from a standing specimen. Wipe the top of cap with a folded paper towel moistened with Iso. (moistened, not dripping) Gently grasping the cap with one hand(see *A2), and using flame sterilized and iso wiped Exacto or razor in the other, cut the cap from a standing mushroom just below, but not touching the gills.

A tiny bit of stem stub is ok, but you want to cut as close to the gills as you can get without touching.
Place on a square of shiny side up, iso wiped, aluminum foil, slightly larger than the cap. This should be already prepared and waiting )--- on a clean plate or flat surface covered by small jar or glass. Immediately cover with the glass, or jar. Leave for 12-24 hrs. Check for spore deposit by slightly tilting the glass/jar and gently lifting the cap edge using the exacto. If not dark enough leave another 8-12 hrs and then it should be ready.

( Prepare your mini zip with an Iso wipe on outside only. Using one had crack the seal of the zip with a sliding motion.Lay the zip in a position close to the print jar. Quickly but with as little air disturbance as possible, remove the cap from the foil and set aside for drying. Remove the print using sanitized/ iso dipped or wiped tweezers, grasping only the edge of foil. With one hand and using the sliding motion, further open the zip ,while quickly inserting the foil/print with the tweezers . Zip it closed.)
That's it. Label the zip with variety/date etc. Its ready for making syringes or to place in an envelope, and put in a dark location for later use.

*A2- use a small sharp object to pierce the top of the cap just deep enough to hold it, instead of grasping with your gloves. This is for removal and transfer to and from the foil. A small flame sterilzed tack, pin, needle,fish hook or piece of wire etc.. It can be left in while printing( as long as it is sanitized/sterile and fits in the covering jar/glass) Makes it easy if you have one for for each print. A little bend or hook shape on the wire can help grasp the cap. The little "handle" is really handy.


*U2 ( All of the steps you should be using the gloves, sanitizing as needed with iso. Have your items ready, dont reach into your pocket in the middle to get your lighter for example. Have it prepped, iso wiped and within reach to flame sterilize the Exacto blade.

All of steps in every process are done in a manner to limit exposure to open air.)

I suggests practicing the method of opening the zips with one hand and inserting a blank foil square using the tweezers with the other. Also the "handle", practice on a cap you are not going to print, make sure it's secures the cap and doesnt fall off during transfers. In fact a dry run for all steps helps get the movement, process and helps lessen exposure time.

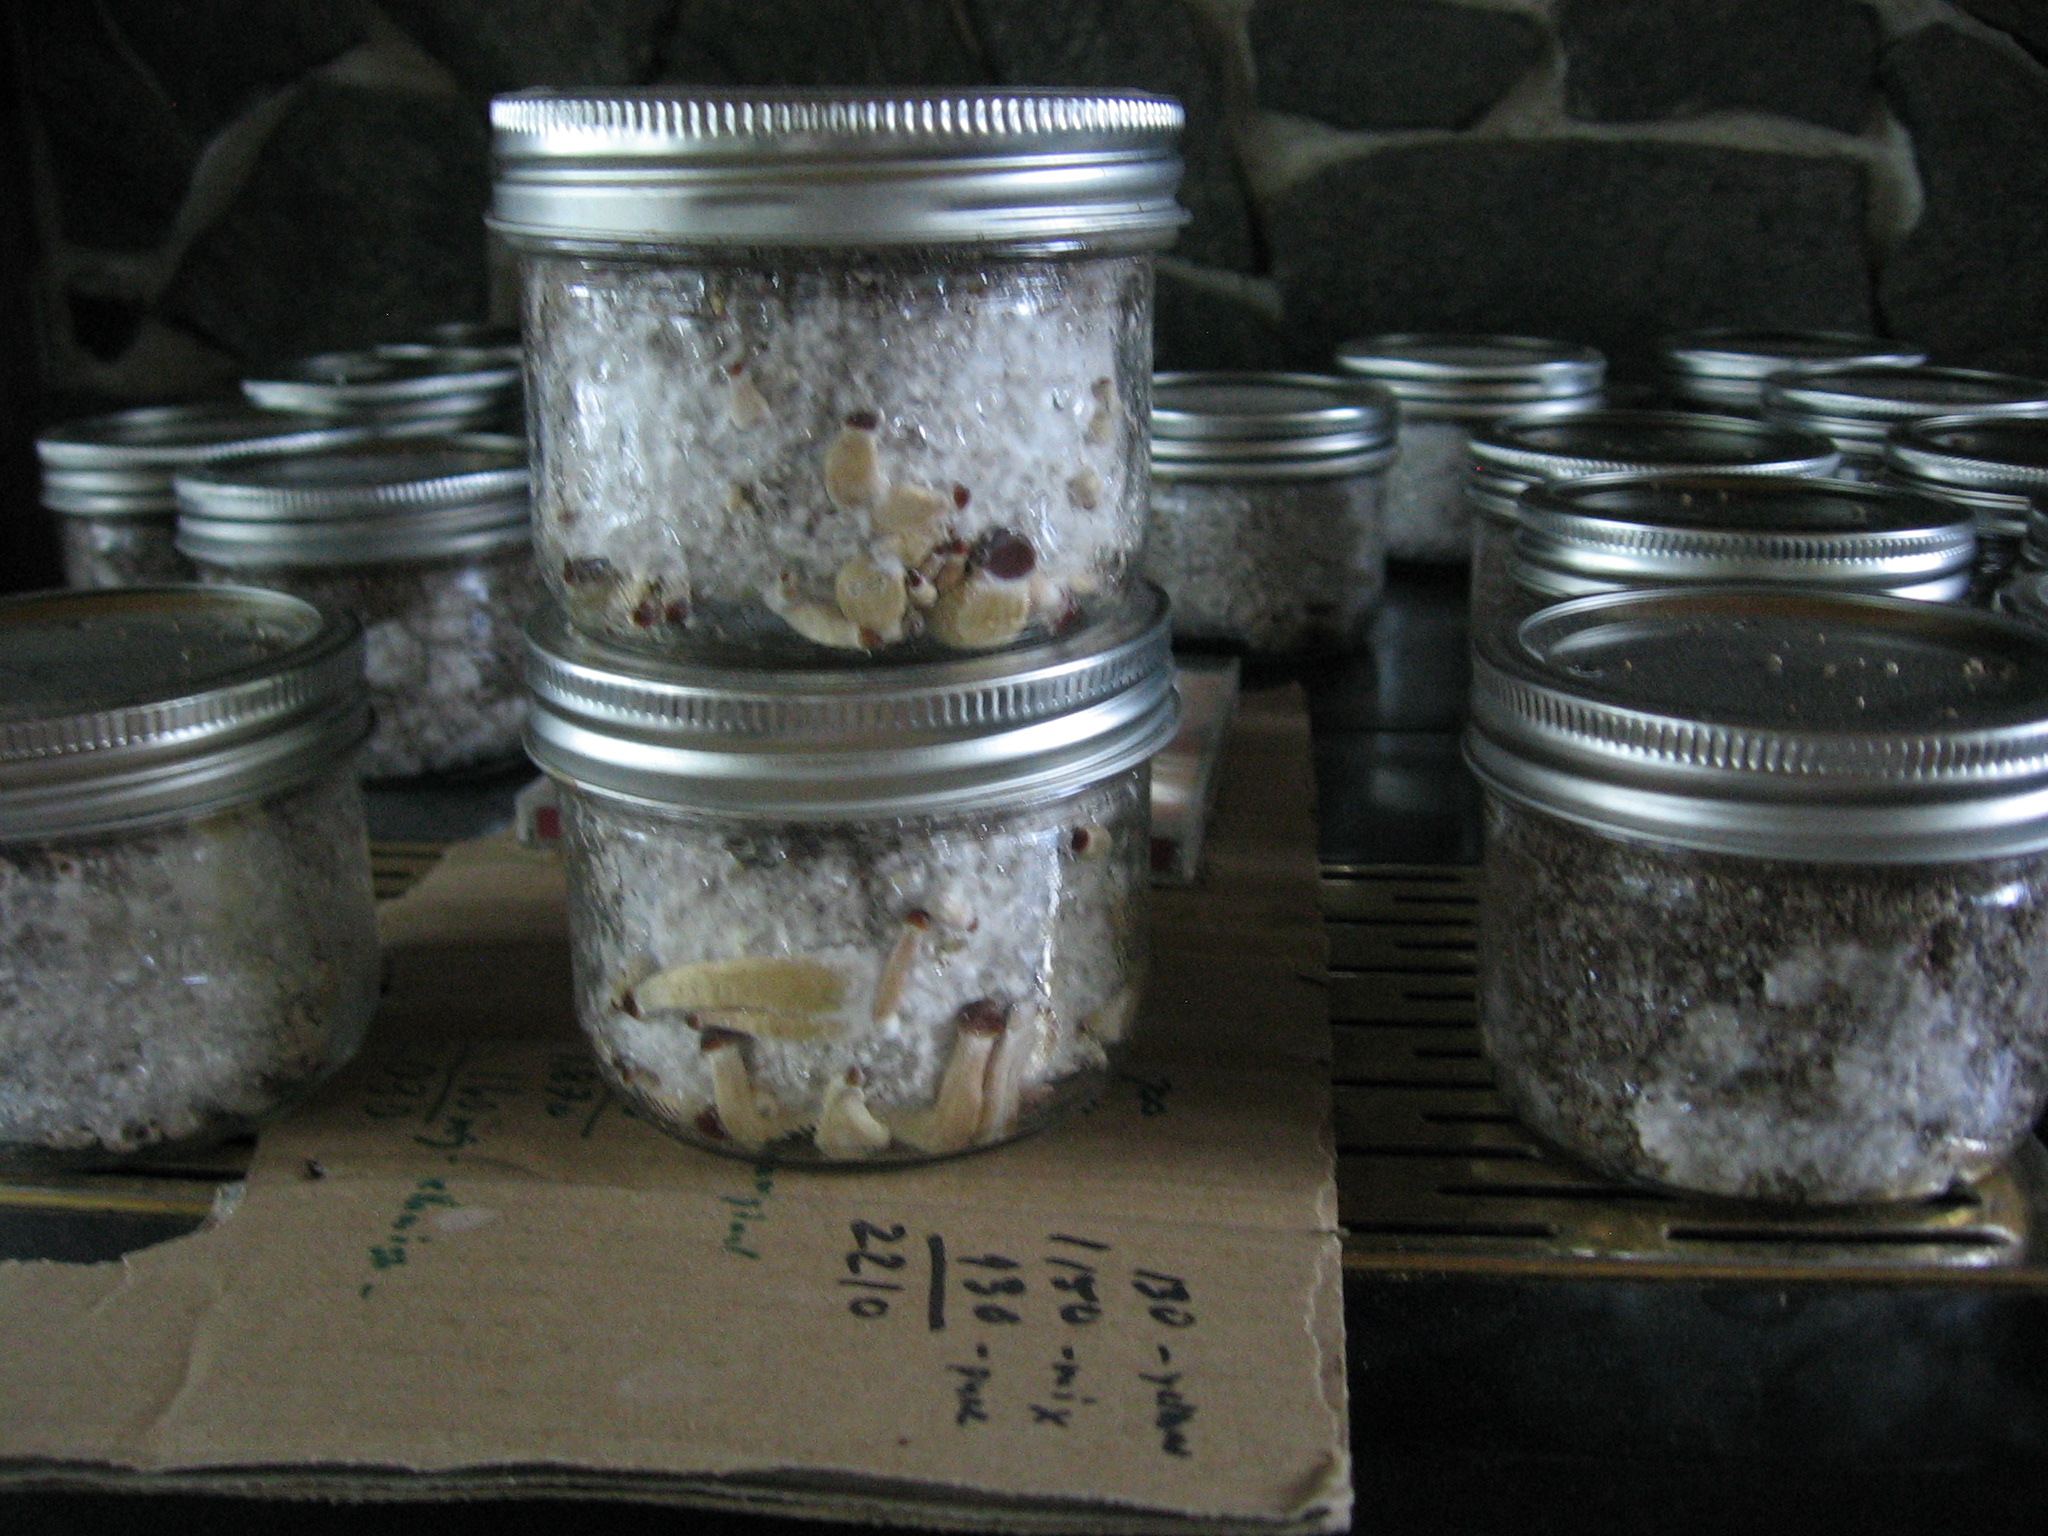
I will add the next method later for multiple caps in one container "Print Box" style, My preferred method, I will post a pick of what I print in when doing a large number. The size of the container is important in that the caps require a certain amount of humidity maintained to release the spore. A container with a totally air tight sealed lid can invite mold on the cap if left too long.

peace, jpc
.


JPCyan

Well-Known Member
"The Oven Method"

Prepare your baking dish by cutting 2 pieces of foil slightly smaller then the bottom of the dish. I use a pyrex type glass cake dish. Approx. 9 x 11" x 2 " depth. (Now available with a sealable silicone lid , its really nice)
Lay one in the bottom of the dish, shiny side up.
Cut your squares from the roll using as many as you need. You can also cut extras for later use.
Again, cut a size that will easily slide in the mini zips and large enough for your caps.
Stack as many extras as you wish in one corner away from the ones you'll be printing on this time.
Place the squares on the lower layer of foil, shiny side up, in rows with space in between each.
Place the 2nd sheet lightly on top shiny side Down.
Cut a 3rd piece large enough to cover the dish as a lid and crimp it around the edge of the dish as if you were storing leftovers or dinner.
Heat the oven to 400ºF.
Bake the dish for.5 to 1 hr. Let cool, do not open the oven.
You can either bring the sub to the oven or take the dish to the sub or both to your clean work area.
I slide out the oven rack just a bit sitting the sub tray on the side or the open door.
When ready, everything clean and sanitized as before, Loosen the crimp on the foil to make it easy to lift with one hand.
The shiny side down sheet is just an additional layer of protection. while you lift the outer cover.
Proceed as previously stated to choose and remove a cap.
With one hand lift the outer cover of foil and then lift the addition layer.
Place your cap on the square the furthest away from opening. allow the cover layer to lay gently back down and just close the cover layer.
Repeat until you fill the squares. working from furthest away first, to the closest squares last.
gently lay the protection layer back down and close the cover layer.
seal it up but not airtight.
Now wait, same as before.
when ready repeat the process of cap removal and print to mini zip starting with the closest and working your way back.
all done with gloved sanitized hands and area, and equipment. Keep it clean!
Now you have sterile foil squares with prints in bags, ready to go. Label, date and store as before.
If you made extra squares They can be left stacked and placed in a mini zip as well for later use.
 

JPCyan

Well-Known Member
"The Print Box"
Choose a box to fit your needs.
Similar in size to the baking dish is perfect for several prints.
You can choose to bake 2 sheets of foil and the squares inside as in the oven method .
Make sure you fit the foil to the print box size, not just the dish.
This time slightly crimping one or two place to hold the lower layer , the squares, and the protective layer as a sort of envelope for the transfer to the print box.Then carefully! transfer it as a whole into your Print box trying not to let the squares slide around, keep it level and work quickly but smoothly.
The other option is using alcohol wiped foil straight from the roll. One layer shiny side up in the bottom, the squares, the protective cover sheet is optional.
The rest is universal as before.

As I said this is just a few ways that I have used successfully many times. All without the need for a Glove Box.
Making sterile syringes is quick and easy with this method and several can be made from each print.

Good luck
 

Voodu

Well-Known Member
T

Thanks for... oh yeah,, nothing informational or constructive.... again. Arent you proud? :|
In case you missed it, a neighborhood friendly admin let us know that HeatlessBBQ and Wildcard008 are the same IP address. So don't sweat it, it's just a sad little person looking for attention and playing at being different people. At least when this person isn't sending me death threats.

In other news....

Thank you very much for the printing information! I have one more mushroom growing in the kit, that is just begging me to let it go to spore. I'm going to read over what you posted a couple times and gather my materials and sterilize a work area before making a step by step plan.
Once I have my created spore syringe, is the fridge a good place to store it? Or should I plan to keep it at room temp? Standard practices for plant and meat food safety tell me the fridge is the safest and best way to store perishables, is there any reason I shouldn't let the temp drop too low?
 
Last edited:

JPCyan

Well-Known Member
I would suggest letting the spores dry a few days, and if you are not going to immediately put it to use, just leave it as is, in the zip bag. Wait on making the syringe until 3 days or so before you plan on hitting jars. The spores will be fresh but a day or so rehydrating in the syringe wont hurt.

They store fine as a syringe in the fridge, but better as a print. Less chance of contamination just in the mini zip, in an envelope in a drawer.

If it is only one, do the simplest method you can. no need for a whole tray or baking dish.
If you have a mason jar with a lid, wash it really well or run it through the dishwasher. Clean the inside of the lid with Alcohol, and just use the inside of the upside down lid instead of a plate to lay your square on, put your mush cap on the square foil and thread the upside down jar on it. Aint gotta be super tight just secure. About 24 hrs later you should have a print. You can oven sterilize if you want but for one piece of foil Id just roll off to a clean section of foil, cut the square, wipe with alcohol both sides and put it in the lid, cover with jar until ready to add the mush cap.. Foil is fairly clean fresh off the roll and even a regular zip lock will work. The small ones just give less room for outside air being introduced when you open to put the foil in.
Sorry it took me so long, you could have had dozens of prints :( my apologies.
Btw one decent print can make many syringes. When you purchase a syringe often it is hard to even see the spores. If you use one whole print for one syr,, it will be a purple water in the syringe hehe.
 
Last edited:
Top