Journal of my attempt at the "Mr Green" hydro setup (with influence from Al B Fuct)

Ahzweepay

Well-Known Member
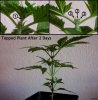
Journal of my attempt at duplicating the hydroponic setup as outlined in the "Mr Green: I Grow Chronic" series on YouTube.

Initial Issue #1 - I'm a total newb - no prior experience - not a "green thumb"
Initial Issue #2 - The "Mr. Green" series seems like it's very in depth to the total newb, but alas as I tried to put together my list of things necessary I started running into big gaps in certain very important details.

Part 1 - Room Setup
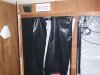
I decided to use a big/odd closet in my basement for my grow room. It's got 2 separate halves, measuring:

Veg Side (Mr Green dripper system) = 26"deep x 44"wide x 71" tall
Flower Side (Mr Green/Al B Fuct flood/drain system) = 26"deep x 48"wide x 71"tall

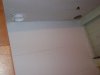
I gutted the closet and cleaned it with a strong bleach solution. Once that dried I resealed the walls with the water proof paint, and applied styrofoam insulation.

Installed a new breaker in my main power box and ran a new circuit into the room. Hooked up a long power strip in each room and each is plugged into the new outlet.

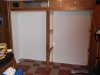
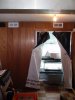
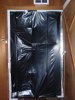
Cut holes in the ceiling for intake and exhaust ventilation, on both sides, and covered it all in panda film. Created doors out of panda film and used velcro to seal each door (still need some work there).

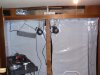
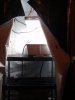
Installed vent blowers in each side (suspended with bungie cords) and added backdraft flappers on each since they both push into a common exit duct which is attached to a can filter. Each side has a passive intake duct that drops down to about 1' from the floor and is sourced from a separate room from where the exhaust is being pumped.

Added a small 2 speed clip fan for circulation and a wireless digital thermometer/hygrometer in each room too.

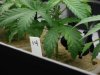
Veg side lighting is provided by 2 24" SunBlaze T5 HO Fluorescents.
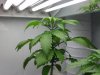
Flower side lighting is provided by a 400watt HPS w/reflector.

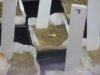
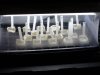
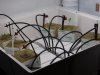
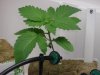
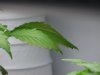
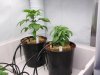
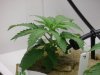
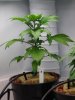
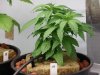
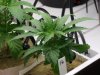
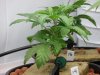
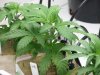
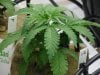
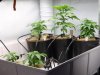
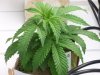
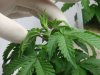
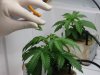
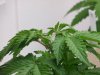
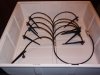
Attached images should give a decent interpretation of the setup (more photos of flower side to come).
 

Attachments

Ahzweepay

Well-Known Member
Part 2 - Seeds

I've been a practicing smoker :joint: for many years now and had always thought about growing myself. Whenever I've come across seeds in some good bags I've kept them.
I first tried to germinate some that were known to be from extremely good smoke, but they were also at least 3yrs old. Tried several ways over the course of a week and didn't get any action.
Found a container of some seeds that were from much more recent collections, less than a year for sure. Of the approx. 30 I tried I got 17 to germinate.

My most successful germination method was the moist paper towel in the dark.

The first batch (6 seeds) went into small rockwool cubes that had not been pretreated. None of those sprouted further.

Just after those went into cubes I found info on pretreating the cubes. I bought some rockwool conditioner and got my cubes pretreated for the next batch of seeds. They went in to the tray over the next 2 days in batches of 5. They were in a covered (humidome) tray and I only gave them a little distilled water as needed. The tray was placed under fluoroescent lights on 24hrs.

Due to these coming from bag seed I just numbered each seedling using some plastic tags.
FYI - These seedlings could be either White Rhino, White Russian, AK47, Super Skunk, Mr Nice, Bubbleberry or Great White Shark (those are the names as stated from my connection)

Image of the full tray of seed/seedlings and an image of one seedling that went nutz.
 

Attachments

Ahzweepay

Well-Known Member
Part 3 - Veg Side Dripper

I constructed my dripper system following the guidelines in the "Mr Green" video series. Unfortunately I wasn't able to find that 8 headed water diverter, but made due with some small air diverters instead.
The system consists of:

1 14gal Rubbermade tote
A bunch of 1/4" air hose (bought a 50' roll)
2 5' lengths of 1/2" outer 5/8" inner vinyl hose
2'x2' grow tray with a 1/2" drain fitting
2 5 connection air diverters with shutoff valves
10 1/2gph dripper tips
10 6" dripper spikes
1/2" to 1/8" reducer to go from pump hose to dripper system hose (made from several parts in the fittings section at Home Depot)
1 water pump
1 air pump
1 air stone
1 digital timer

The finished product had 10 drip sites in the tub. Each site can be turned on/off as needed.

Initially set timer to turn on pump 3x per day for 20min each.

I'm using General Hydro nutrients, and had found a guide online that stated to lower the nutrients by 50%, so I converted the chart (see below), and used the "Seedlings" phase for my first batch of nutrients. I set my fluorescent lights to 12" above & made sure my pH was at 5.8. (I didn't have my ppm meter yet, so no info on that.)

Plant Phase---Hours Of Light------- Grow------Micro -------Bloom-------------PPM Range
Seedlings ----------24 ---------------1.25ml ----1.25ml -----1.25ml-------------100-200ppm (6.25ml each per 5gal or 1.25tsp + 25ml H2O2)
Week #2 -----------24 ----------------2.5ml -----1.25ml -----1.25ml------------200-400ppm (12.5ml/6.25ml/6.25ml + 25ml H2O2 for 5gal)
Week #4 -----------24 -----------------5ml -------2.5ml -------1.5ml------------400-500ppm (25ml/12.5ml/7.5ml + 25ml H2O2 for 5gal )
Week #6+ ---------24 -----------------6ml --------3ml --------1.5ml------------500-700ppm (30ml/15ml/7.5ml + 25ml H2O2 for 5gal {Norm for Mothers})

Images attached of finished drip tray before adding seedlings and an image 2 days after they had been in running in the tray.
 

Attachments

Ahzweepay

Well-Known Member
Part 4 - Getting seedlings established & trouble

The Plan: Once seedlings are established take clones, root them and put them in the flower room to determine sex.

As I stated in the last post my first batch of nutes were mixed as the seedling phase (6.25ml each solution in 5gal tap water pH adjusted to 5.8 ), and the pumps set to run 3x per day for 20min each time. A few days later I noticed the cubes were feeling pretty light, so upped the pump times to 30min on.

Topped the nute tank and adjusted the pH back to 5.8 a few days later.

At the beginning of the second week on the original nutes I had become well versed in the preachings of Al B Fuct, so went and got myself some H2O2. I slightly misunderstood Al's dosing though, and only dosed the 1gal of water I used to top up the tank (rather than topping the tank and dosing for the full 5gal).

Ran into issues with the pH pen I initially purchased (the readings would jump all over the place - guy at the hydro shop said he'd never seen on act like that before), so I exchanged it for a Hanna pH/TDS meter.

I noticed that the roots on plant #8 were looking fuzzy and was worried it may be mold, so posted the https://www.rollitup.org/hydroponics-aeroponics/131944-need-help-dripper-timing.html thread (3rd attached image). Got a few replies that the roots looked good and suggested I was watering for too long. I adjusted the timers to run 6x per day, but for only 10min. I also changed out the 1/2gph dripper tips for 2gph tips figuring that would allow me to get enough nutrients into the rockwool cubes in a shorter period of time. I also adjusted my Veg Room config to have both of my fluoro fixtures mounted on the ceiling as I was no longer using the one for the humidome tray (first attached image). While I had the tray/shelf out of the room I noticed that #8 was starting to smell a bit skunky (second attached image) :D
Ran like this for a couple days, topped the tank with some H2O2 prepped tap water and adjusted the pH.

Beginning of week 2 I dumped the nutes, washed the tank/pump/stone with bleach water and rinsed the hell outta them. Used the 2nd week nutrients (12.5ml Grow/6.25ml Micro/6.25ml Bloom + 25ml 35% H2O2 in 5gal tap water). Got all nutes mixed and lowered pH to 5.8 - noted ppm was 414. Did a little plant shuffle in the tray so the taller plants were on one side to make adjusting the lights easier - set lights to approx 4" above tops.
After a couple of days went to top the tank and noticed the pH had crept up to 6.7 (before adding any new water). Topped tank w/1gal tap water treated w/H2O2 and corrected pH to 5.6.

At this point I started to worry about spots that were showing up on a leaf of #8 (4th image), so posted to the Hydoponics thread here on Rollitup. Per a suggestion from potroast I changed my drippers to run 4 times per day rather than 6. I also checked the pH in my tank and noticed it was up to 6.1 - lowered it to 5.8.
The next day during inspection I noticed the roots on #8 and 10 were looking a bit brown in spots (5th image). I again posted to the Hydro thread and was informed it was overwatering and "air pruning". Checked the res and it was at pH 6.3! Dropped it to 5.3 as I was going to be away for a little over a day.
When I returned #8 had gotten a bit worse (6th image) - more spots on more leaves. Transplanted #8 & 10 to pots of hydroton (7th image) so the roots could have more room to grow without being pruned, and lowered lights to 1" above tops. Checked the tank and it was at pH 6.3 again! Lowered it to 5.5.

Around this time I was reading the Al B Faqt and found that H2O2 is not compatible with GH nutrients - what a bummer! So, when I topped the tank I just used plain tap water. Initial pH was 5.9, lowered to 5.7.

Yesterday morning I checked pH and it was back up to 6.2 - lowered it to 5.5. Noted that #8 continues to get more spots and spots have now shown up on #14 also (images 8-10) - other plants are fine other than a few "character marks" here and there. Adjusted the timer to run 3x per day for 10min each.
Last night went to check on nutrients and noticed some whitish-grey slime in the tank. Cleaned out the tank/pump/air stone with some bleach water and rinsed the hell outta everything. Pumped some bleach water through the pump/feed tube (not connected to drippers) and then ran several gallons of fresh water through it. Remixed the week 2 nutes omitting the H2O2 - set pH to 5.8 and noted ppm at 407. Late last night I checked and the pH was up to 6.2, so I lowered it to 5.5.

The pump ran last at 3am, so I checked pH this morning and it was at 5.8 so I decided to leave well enough alone. Will check it again this evening...
 

Attachments

Ahzweepay

Well-Known Member
Wondering if the spots on 8 & 14 could be N deficiency?

My thinking is that it could be that the N in the GH nutes is derived from an organic source, and that my previous addition of H2O2 could have depleted the N causing a deficiency.

I've attached an image I found of a plant showing N deficiency in the Veg stage. Seems to me many of the leaves on this plant look a bit like mine.
 

Ahzweepay

Well-Known Member
Just received the following reply from GH Tech Support...

"Hello,
There are no living organisms in Flora Series. It is perfectly fine to use H2O2 with it.
Thank you,
Jesse Pennington
GH"

So, I guess that H2O2 is fine to use in the GH Flora series after all, which I like to hear.

Would anyone here be able to explain exactly why they think H2O2 shouldn't be used with GH Flora series nutrients? I'd like to hear back from the "growers in the know" before I start using it again.
:confused:
 

sparkafire

Well-Known Member
I started out just like you only i have a green thumb and from what i have seen so far i think your doing fine. We tend to kill our plants with kindness they are like baby's we don't want anything to go wrong and die. They look fine just keep up on the water schedule and you will be great.

As far as H2o2 and the flora series i never used H202 with it and ABF said it was a combo type of nute and if its true you would lose some of the nute value. I use a natural orginizem and never had any issues with my grow h202 is just too expensive and a pain in the ass to administer. .
 

Ahzweepay

Well-Known Member
Just got done checking my nute tank. pH was stable all day today - still at 5.8 :)

Did a little re-arranging in the tray. Moved 14 & 16 to pots of pellets and over to the "tall side" of the tray. Readjusted the lights since 8 had grown up almost into them - it may be a bit ugly, but it's still growing well. (Lights were moved up for the pictures)

Thanks to those who replied about using H2O2 with GH nutes. Since my pH was stable all day today I'm going to skip the H2O2 for a while and see how it goes.
 

Attachments

Ahzweepay

Well-Known Member
...and another stable day - pH was 6.0 at 8am and still 6.0 at 7pm.
Topped the tank and got it set at 5.8.
Friday/Saturday will be the next tank change - hopefully things will hold steady until then.
 

prnkstr

Well-Known Member
as far as the H202 goes i would not use it unless you have root rot or other types of root problems. It can be used to add some air to the water but some airstones do that pretty nicely. I use clearex myself to clear out the rockwool and hydroton every other week seems to be going good so far. Also H202 cannot be used with organic nutes im not sure if what you are using is organic so i cant say for sure or not if that was the problem. I continue to have a similar PH problem with mine as well but it was due due 2 things as first 1 - I was using tap water so i got an RO system. 2 - I use an additive called Dark Energy it raises the PH of the water over about a 24 hour period so i have to maintain it during res changes. Looking forward to see your next post!
 

unity

Well-Known Member
Looking good mate :)
Keep in mind that you want your ph to go slowly up. It means the plants are eating. If it climes too much in the medium it means that you do not have enough 'run off' in the watering cycle to bring it back into balance. But it looks like you are dialing it in;)
PH in Rockwool will spike like this in the first view weeks and the spots on your leafs are related in my opinion to the ph being erratic like it was in the beginning, probably causing a lock out. I would not cut off h202, especially since you have a mix of hydroton and rockwool which is not an ideal combo due to the fact that the rockwool requires a lot less watering then the hydroton. The h202 will bring more oxygen to the roots, use it, just stay within Al's 1.7ml per liter (35%) and don't over due it.
I am not blessed with a green thumb and have so far learned by 'deadly' mistakes and by the kind people here sharing their experience. My biggest advice: DO NOT SMOTHER YOUR BABIES WITH LOVE, AND DO NOT OVERREACT TO A GIVEN PROBLEM. Sit back, ask for advice, and have several people agree on a solution before you administer 'first aid'. At least until you know whos advice holds true more often then not.
Btw, if you are using RO water, are you supplementing with Cal-Mag?

Unity:hug:
 

Hydrotech364

Well-Known Member
Looks good to me,when i saw the film i saw a couple of obvious flaws.With AL in the grow as a advisor you should get way more weight....
 

Ahzweepay

Well-Known Member
i agree with unity, cal-mag may be needed even with tap water. the spots are def the start of ca deficiency
:mrgreen:

-OitW
I'm using plain tap water that's not been "softened". Spose I should dig up info on my local water treatment plant to see what's up.
Either way I have another trip to the hydro shop planned, so one more thing on the list...

Checked on the pH this evening and it was up to 6.3 (I lowered it to 5.6), and I noticed that the tank doesn't seem quite as clear as it was yesterday. There's no goo in it, just a little murky. Hopefully it will make it until Friday before it needs a change.

Plants are looking good in general - lots of growth overnight :D
Just realized a bit ago that I really shoulda topped these buggers a while ago. My hope is to get a mother or 2 outta this batch, and a little extra branching is always nice for them, or so I've read. I'll have to give that a go tomorrow evening.

On the subject of topping plants that are planned to be mothers, does the attached diagram describe the proper method? (seems pretty clear to me - cut at 1 and see it branch out at the 3s) One of the plants (#10) topped itself very early on - I assume that topping each of those would be prudent too? Any suggestions on how often to top the mothers-to-be in order to achieve a plant I can get several clones off of? I say "several clones" cuz I haven't really decided how many I want to grow at once - just gonna take it as the plants give it to me...

Thanks again for everyone's suggestions!
 

Attachments

prnkstr

Well-Known Member
i was gonna ask you the same thing about topping lol Ive never done it before and want to give it a test run but i think i may wait till the second gen mothers or first set of clones to give it a go. I need to get some pruning utilities as well so I am gonna wait to do it right rather than using my ghetto scissors in my kitchen :razz: . Ill keep up posted though i may go and do it tomorrow anyway. As far as i know now would be an OK time to do it to the mothers so it branches off and you have more sites to take clones from. top it then wait about 2 weeks and top both of those, that's my plan anyway.
 

Ahzweepay

Well-Known Member
Well, I decided to give topping my plants a go. Attached you'll find pictures from one of the plants - Before, Pre-clip, After w/tip and a little closer shot of the aftermath. Pretty sure I did it right, but any comments are appreciated.

I also included a new shot of all of the mothers-to-be.

Topped my res this evening and it was looking pretty decent, the murk hasn't gotten any worse (forgot to check pH before topping up water, but it was 6.3 after the top up, so it couldn't have been too bad previous). Lowered the pH to 5.5 after the top up.
 

Attachments

Top