Homemade Stealth Cabinet- Lots of pics!

EvlMunkee

Well-Known Member
Welcome to my first thread. First, I should thank all of the good people here at Rollitup who have helped me to learn so much in a short time.

I started to plan for this wardrobe cabinet and grow back in Jan 2010 but didn’t actually get started until the cab arrived in late Feb. I ordered this cab and had to wait 3 weeks until it was delivered which gave me a lot of time to think about what I was going to do….maybe too much time. I changed my plans several times but eventually got a fairly good idea of what I wanted to do.
Mostly, I want it be stealthy. It needs to be quiet and look like it belongs in my bedroom. I am also a bit lazy so it needs to be as self sustaining as possible.
I welcome all comments and questions so fire away!

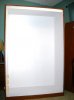
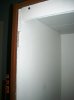
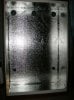
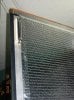
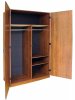
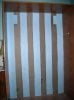
First pic is the cab as it was meant to be built. I decided to not use the divider and shelves so I would have room to grow 3-4 plants up to three feet or a little taller. I think it was a good choice and later I will tell you why.
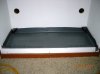
It finally was delivered about the third week of Feb but without any of the hardware except for the hinges and door magnets. No problem…. I’ll get started.

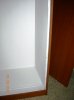
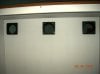
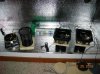
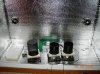
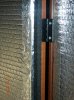
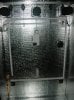
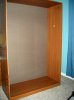
The basic shell is assembled. I added a few angle clips to the bottom side for strength. BTW, I had very few tools to do this. I had a Skilsaw, cordless drill, a pair of Klein’s pliers, hammer, tape measure, some bits and a couple of screwdrivers. Oh yeah, and a Swiss army knife.
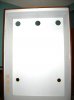
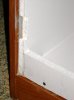
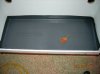
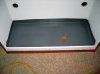
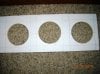
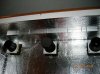
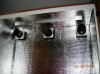
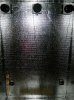
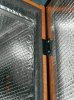
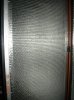
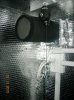
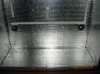
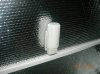
I started gluing strips of 1/8” polyfoam made for door thresholds to the inside with 3M adhesive spray. I made sure that the polyfoam covered the places where the fans will be cut in.

Be back soon with the next post.:peace:
 

Attachments

EvlMunkee

Well-Known Member
I’ve added a layer of underlayment to the back with two good coats of primer/ sealer. I found that, in this case, it is better to not cut the pieces to fit tightly. You will have less vibration transferred to the outside if you leave a gap between pieces and caulk it.

The inside has been insulated and doubled with the underlayment board. I don’t want to add any more weight to the doors, so I only used IR Blocker. The IR Blocker has a layer of polyfoam sandwiched between 2 Mylar sheets.

I added a two inch strip of underlayment to the front at the top and a three inch piece at the bottom to make it more rigid since I will not be using any of the shelves or divider. The three inch piece at the bottom will also serve another purpose. You will see later.

I had to notch the front edge where the hinges will be so I can add them later. It will also let me adjust or remove them if I needed.

I should have cleaned it a little before I took this shot but you get the idea. You can also see that I held all of the interior wood back about 3/8” from the front for weather stripping.

Holes have been drilled for three 120mm exhaust fans at the top and two 80mm intake fans at the bottom. I had to buy a three inch and a four inch hole saw to cut the holes. Believe me, they are very proud of these hole saws at Lowes!

I located the intake holes so they will not blow into the back of the pots but just above them for better air movement and cooling.
In the next post I will start to install the equipment.
 

Attachments

EvlMunkee

Well-Known Member
Hey ppl, I'm still movin along but it seems like it's takin forever.

Pic 1
I’ve mounted the casework adapters for the exhaust fans. It is a kit made by Silenx for media cabinet cooling.


Pics 2 & 3
This is where the three inch strip helps out. I have installed a PVC shower pan liner to the bottom about two inches high for leaks or spills. It should hold about seven gallons of water. I used the 3M spray for the shower pan too.


Pic 4
I welded the corner seams with PVC cement but a little silicone caulk won’t hurt.


Pic 5
IR Block has been installed on the entire interior. The layer of polyfoam inside will add some sound insulation.


Pic 6
I couldn’t find a “square to round” adapter for the fans that I liked, so I made some from the leftover materials. The hole saws are coming in handy now.


Pics 7 &8
I am using a kit made by Silenx designed to cool media cabinets. It is a 5 channel controller and 2 fans. I want another exhaust fan so I bought one more.


Pics 7 & 8
I am using a kit made by Silenx designed to cool media cabinets. It is a 5 channel controller and 2 fans. I want another exhaust fan so I bought one more.
Here are the fan assemblies. They consist of a fan mounting plate (included with the Silenx fan kit), fan, and square to round adapter. Two of them have a plastic duct extension to bring them out to the middle of the cab for a better airflow pattern. The one for the center has only a mesh pencil cup from Office Depot which will be a DIY carbon filter. The pencil cup also fits nicely onto the duct extensions. The filters will be added later to the duct extensions.
All of the pieces have been screwed together and caulked with silicone where they join.


Pic 9 & 10
All of the fans have been installed. The three exhaust fans are 38-104 cfm and the two intakes are 13-34 cfm for a negative pressure. Of course, when I add the carbon filters, it will be lower but not too much. The two corner exhaust and two intakes will all run off of the same controller continuously or whenever I need them. The center exhaust will run at full speed on a 12v dc adapter timed with the lights. I am using a wrap of Honeywell Universal carbon filter sheet around the pencil cups and a piece of the same material between the fans and the grills of the intakes for any air that may seep out when they are not running. I also put light traps made of 1/8” Elmer’s foam board on the back side of the cab for the intakes.

Pic 11

Here, at the top, you can see the aluminum tubing with screw hooks for hanging lights and whatever.

Feel free to jump in anytime and add your comments, criticisms or whatever.

More to come...
 

Attachments

EvlMunkee

Well-Known Member
Hey everybody...
I lost about half of my pics to a bad media card so I will take new ones of what I have done. They will not show the work in progress though. Sorry about the quality of the pics. I am definitely not a photographer! :sad: lol


Pics 1 & 2
Foam weather strip was applied into the groove at the edges of the cab to seal the doors.

Pics 3 & 4
I used a couple of door sweeps for sealing the door edges on the left door where they meet in the center. Pic 3 makes it look like the sides are warped but it's just optical confusion.:confused:

Pic 5
Barrel bolts were used at the top and bottom of the left door to hold it closed.

Pics 6 & 7
To finish up the door hardware, I used a cabinet style camlock on the right door. It's not burglar proof but it will keep the honest people out.

Be back soon with more...
 

Attachments

Mylar

Well-Known Member
No doubt. I have never grown, workn on my set ups and dry runs right now. Veg is done, workn on flower room. I'm picky and anal bout stuff too (just eliminates variables.) Cant wait to get going though. Just started germ last night. I will post as soon as I have substantial info. Continue with the updates looks sick!
 

EvlMunkee

Well-Known Member
No doubt. I have never grown, workn on my set ups and dry runs right now. Veg is done, workn on flower room. I'm picky and anal bout stuff too (just eliminates variables.) Cant wait to get going though. Just started germ last night. I will post as soon as I have substantial info. Continue with the updates looks sick!
Great! Can't wait to see your posts.
Ya know... being anal is a pain in the ass ( no pun intended) but the upside is that sometimes you get really good results.
I have started testing and growing too. I will cover that a little later.
 

EvlMunkee

Well-Known Member
Pic 1
Here it is nearly finished. I will show better looks at the various components.

Pic 2
Hanging wires drive me crazy so I used Cordmate II plastic raceways to route some of the wiring. The 12/3 power cord comes into the cab low on the left side and goes to the upper left to a duplex receptacle. From there it goes to the upper right receptacle through the raceway with 12/3 Romex wire. The other raceways are to power the timer, fans, sidelights, pumps, etc.

Pic 3
Here is a shot of one of the DIY carbon filters. They are mesh pencil cups from Office Depot wrapped with Honeywell Universal carbon filters cut to size and strapped with Velcro. You also see the one of the four yoyos for hanging lights.

Pics 4 & 5
Here are the intake fans by Silenx and the wireless remote temp / humidity sensor by Lacrosse. I was surprised at how inexpensive this Lacrosse unit was. ($22 w/ free shipping at Amazon)

Pic 6
I can watch the temp and RH from my desk. Perfect for a lazy man!

Still more coming...
 

Attachments

EvlMunkee

Well-Known Member
Daaammmmmmmmm thats looking really really good i just wish you cud build me 1 but so i cud use cfls :)
Preciate it SC.
Ya know, If I had more tools and a decent place to work it would be great to keep doin these things. I barely had room to lay it down in my small room.
CFLs would be a good choice since you wouldn't have to deal with the heat issue in a small cab. If I add some side lights (which I probably will), it will be some HO T5s. I have ordered some 3 foot strip lights but they are taking forever to get here.
Thanks again for the kind words.
 

EvlMunkee

Well-Known Member
subbed for this one, Your eye for detail is paying off.
Hey there JP.
Glad you showed up. So far I am pleased with the way it is turning out. It will sure be nice when I can just kick back a little and watch the grass grow.
I'll have more to post in a little bit....looking forward to your input.
 

EvlMunkee

Well-Known Member
i wish i could do somthing like this but im using a cardboard box lol
Hi Youngrich,
We all just do what we can right? The main thing is getting started.
If you watch these experts at Rollitup you can slowly put together a plan that will work for you.
Good luck with it and thanks for coming by. Hope you stay for a while.
 

EvlMunkee

Well-Known Member
yea thats a nice grow box!!!
my grow box is made out of fuckin boxes duct tape and velcro lol
Hello GENERALIVXX,
Thanks a bunch for the compliment!
Believe me, I have done with much less in the past. It just so happens that now I have to time and opportunity to make something that I really wanted. I consider myself lucky to have the chance.
In the end though, what really matters is results. I guarantee that some guys with boxes, duct tape and velcro will out grow me.
Hope you can stick around for a while.
 
Top