hybridway2
Amare Shill
Thnx! Got some sbs action in the works x3 rn in here. Not the middle isle though.Dude
That's killer what your doing over there!


 bar-8
bar-8
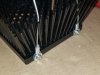
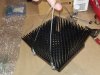
 CMH on left
 This last picture is the Elite 96 plant with 640w over it.
Thnx! Got some sbs action in the works x3 rn in here. Not the middle isle though.Dude
That's killer what your doing over there!
bar-8CMH on leftThis last picture is the Elite 96 plant with 640w over it.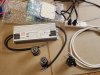
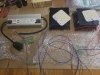
I'm confused, you are going to attach both of the QB 96's to 3 outlet power strip and wire that to the driver output side?Hey guys. So I received my QB96 elites and have been working out my wiring and hanging design. Figured I'd float my plan here first before I commit and finish the build. Any input would be appreciated.
So for wiring the driver, trying to keep it simple and use what I've got kicking around. Found an old tri-tap/3-way extension cable that I've cut down to size. I'll attach plugs and sockets to the driver. We dont need the ground for the DC output of course but I have these plugs already and it'll let me disassemble the lights if I need to move things around.
View attachment 4743445
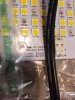
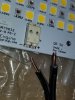
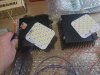
Then I've got these stranded wires to wire the boards. I know HLG says solid core wire is best, but this should be within tolerances right? Should I find better? I'll tin the bare ends before connecting to the board.
View attachment 4743450View attachment 4743451
That was my original plan but saw some other builds doing it this way and figured this would save me some work. Not a good idea? I guess I'm still not quite understanding the difference. I should have gotten the constant voltage output if I were to run it in parallel? I can easily go back to running it in series if that's just better.I'm confused, you are going to attach both of the QB 96's to 3 outlet power strip and wire that to the driver output side?
The QB 96's need to be wired in series with the driver you chose.
If you had an HLG-320H-54 driver they could be ran in parallel because that driver outputs 5.95A @ 54v. So basically each board would be receiving ~3A @ 54v when wired in parallel. Since you have the C2800 driver they need to be ran in series to split the voltage. The constant current range of the C2800 is 57v-114v and it supplies 2.8A. If you wired them in parallel each board would only receive 1.4A.That was my original plan but saw some other builds doing it this way and figured this would save me some work. Not a good idea? I guess I'm still not quite understanding the difference. I should have gotten the constant voltage output if I were to run it in parallel? I can easily go back to running it in series if that's just better.
Ok right, to get the voltage into the proper range for the correct draw. thanks for clarifying that!If you had an HLG-320H-54 driver they could be ran in parallel because that driver outputs 5.95A @ 54v. So basically each board would be receiving ~3A @ 54v when wired in parallel. Since you have the C2800 driver they need to be ran in series to split the voltage. The constant current range of the C2800 is 57v-114v and it supplies 2.8A. If you wired them in parallel each board would only receive 1.4A.
No problem! Didn't want you to only be getting ~160w total from your 320w driver. The 96's are awesome lights. I'm ordering another 2 within the next few weeks.Ok right, to get the voltage into the proper range for the correct draw. thanks for clarifying that!
Ive done stranded wire on all my setups, if you can get them in securely with no strands outside youll be fine. Tinning is even. Better but make sure you dont overtinn and the wores wont go in.Hey guys. So I received my QB96 elites and have been working out my wiring and hanging design. Figured I'd float my plan here first before I commit and finish the build. Any input would be appreciated.
So for wiring the driver, trying to keep it simple and use what I've got kicking around. Found an old tri-tap/3-way extension cable that I've cut down to size. I'll attach plugs and sockets to the driver. We dont need the ground for the DC output of course but I have these plugs already and it'll let me disassemble the lights if I need to move things around.
View attachment 4743445
Then I've got these stranded wires to wire the boards. I know HLG says solid core wire is best, but this should be within tolerances right? Should I find better? I'll tin the bare ends before connecting to the board.
View attachment 4743450View attachment 4743451


 All wired up and installed in the tent this weekend. Looking good! Thanks again for all the advise! Happy growing everyone.
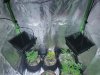
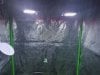
They're supposed to be bright!Finally got around to wiring things up and fired up the QB96's for the first time. Wow these are bright!
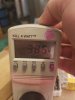
Tested with my meter and I'm drawing a bit more than I expected from the wall. I guess the driver outputs at 320w, but it'll draw a bit more than that
They're a bit less efficient based on the 115v AC this setup seems to be wired for, but still above 90% when the load is above 50%. Once the load drops below 50%, the efficiency seems to drop significantly as well.Meanwells with A type dimming exceed their rated power, plus it's rated at 94% efficiency so that's another 18w or more.
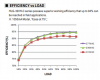
I just looked at the efficiency number in the catalog, should have looked at the graph. Some models have about the same efficiency at both 120v and 240v, but some have a few percent difference. I always wondered why.They're a bit less efficient based on the 115v AC this setup seems to be wired for, but still above 90% when the load is above 50%. Once the load drops below 50%, the efficiency seems to drop significantly as well.
View attachment 4750358
I used to just look at the number in the catalog too until someone pointed out to me that my 115v AC Meanwell driver wasn't as efficient as I thought it was.I just looked at the efficiency number in the catalog, should have looked at the graph. Some models have about the same efficiency at both 120v and 240v, but some have a few percent difference. I always wondered why.