GrowTech
stays relevant.
So I just completed (to as much as my needs require) Al B. Fuct's quick dry cab. I took plenty of pictures, so I decided to throw an additional guide on forum for how I built mine.
Mine can be used with hanging strings up, building chicken-wire shelves (i recommend the plastic alternative to chicken wire), or just about any other method of drying your herbs.
So first... to do this without spending a time, you would need no more than the following:
Parts I used:
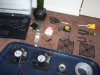
Here is a picture of all of the supplies I had available (just in case I needed it).
So, considering I had all of the parts to use (aside from the heat sink, and a couple other minor parts, either of which I did not need), I decided to get started on building my drying cabinet...
So here are the steps I followed to complete my prjoect:
This has made a wonderful addition to my grow, and now I don't need to utilize the same environment that I grow in, to dry my herbs. I highly recommend Al B. Fuct's design to anyone who has the parts laying around and would rather build a quick-dryer than spend $150+ for one of equal or lesser quality elsewhere. I'll probably add an on/off switch in a week or so, but it isn't really needed that badly.
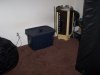
The total build time took me 2.5 hours including the time I spent on the Live Chat kickin' it, and a couple of smoke breaks. All in all, I'm happy with what I got:
Hope this can help somebody! Remember to Visit the Live Chat
Feel free to post any questions or comments.
Mine can be used with hanging strings up, building chicken-wire shelves (i recommend the plastic alternative to chicken wire), or just about any other method of drying your herbs.
So first... to do this without spending a time, you would need no more than the following:
Parts I used:
- 1 Rubbermaid 18 Gallon Roughneck tub w/ snap-on lid.
- 2 12volt PC fans (out of a server I trashed years ago).
- 2 Plastic PC fan covers (were attached to the fans).
- 8 Snap in plastic screws (They were holding the fan covers onto the fans)
- 1 radio shack power adapter of equal voltage and amperage.
- 1 razor blade for cutting your holes in the roughneck.
- 1 wood screw for starting holes in the roughneck for the snap-in screws.
- Tape, scissors, miscellaneous stuff that everyone should have (See picture)
Here is a picture of all of the supplies I had available (just in case I needed it).
So, considering I had all of the parts to use (aside from the heat sink, and a couple other minor parts, either of which I did not need), I decided to get started on building my drying cabinet...
So here are the steps I followed to complete my prjoect:
- Clean your tub, lid, PC fans(they get dusty), and the fan covers thoroughly.
- Use your fan covers, and a sharpie to trace out the holes you will be making. Remember to have one fan on top, and one fan on bottom.
- Use your sharp razor of destiny to cut through the dense flesh of your rubbermaid box. A true ninja pulls the loose flap to easily angle each slice to achieve a perfect circle, the other ninjas just scrape out piece by piece.
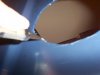
- Once your holes are made, place the fan cover over the hole to confirm that the cut is right. While the fan cover is aligned, use the sharpie to mark the holes you will make for your snap-in plastic screws.
- Use your wood screw to get the holes started, after using your wood screw you may want to stick the scissors in the hole to bore out the hole faster while being careful to not overdo it.
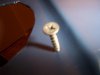
- Now that you have 5 holes on each side (One vent hole, 4 screw holes) you can mount your first fan. Align the fan cover on the outside of the box, over the hole, and put the plastic snap-in screws into the 4 holes. Push your fan into the snap-in screws on the inside of the box.
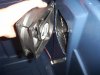
- Complete the same cutting, screwing, clipping procedure on the other side but either higher or lower. (The idea being air should move AROUND the box, and NOT STRAIGHT THROUGH the box)
- Drill a hole in the bottom of the box, small enough to tightly hold the power plug in.
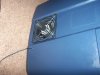
- Insert the power plug, and connect the wires to the fans. The positive leads on both fans will be connected to each other, the negatives connected to each other, and both will be connected to the corresponding leads on the 12 power connector.

- Use your masking tape to tape down the wiring so that it is not at risk of being disturbed at any point by your hurricane force winds.
- Air dust everything out, and then wipe it down once more with a damp rag to confirm all plastic debris are out of the environment.
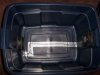
This has made a wonderful addition to my grow, and now I don't need to utilize the same environment that I grow in, to dry my herbs. I highly recommend Al B. Fuct's design to anyone who has the parts laying around and would rather build a quick-dryer than spend $150+ for one of equal or lesser quality elsewhere. I'll probably add an on/off switch in a week or so, but it isn't really needed that badly.
The total build time took me 2.5 hours including the time I spent on the Live Chat kickin' it, and a couple of smoke breaks. All in all, I'm happy with what I got:
Hope this can help somebody! Remember to Visit the Live Chat
Feel free to post any questions or comments.