Wizard of Nozs
Active Member
Hello everyone! I am creating this journal to document and share my take on indoor ''No-till''.
After my medium is constructed, you simply set it under a light and add water. You will add non ph'd water for feed and it will buffer to the correct ph needed. The nutrients are all organic and present 24/7 for uptake so you don't have to worry about it. Once the plant is completed its cycle, you simply cut it at the base of the stalk and replant a new seed right beside it.
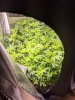
This medium is alive with worms and a top cover of mini clover. Mini clover will feed nitrogen to the plant through the circle of life. Once it dies, the roots break down and provides whats needed. Worms eat, poop and replenish the medium with vital nutrients.
Here is the base.
30% Peat Moss
30% Worm Castings
30% Pearlite
10% chicken manure
Basically this will get you into a great aerated mix. It's going to make sure that you will never need to worry about overwatering. We're going to be using 20 gal fabric pots for this. I've done silly things like grow 3 in one 20 gallon pot before (remind me to post pics) but one does extremely well in it with this setup. You can play around with this mix as well, but try and stick with these ingredients for the base. You can add vermiculite if you wanted.
Now for the amendments. This is going to be the main food source for your girl.
Amendments (per cubic ft)
Epsom Salt 1/2 teaspoon
Neem Seed M 1/2 cup
Fish bone meal 1/2 cup
Crab meal 1/2 cup
Kelp meal 1/2 cup
Azomite 1 1/2 cup
Powdered Dolomite Lime 1 tsp (the amount of this may change depending on your tap water ph. If it's extremely high, or extremely low, you may need to compensate. You will know by the color of your plant after she starts growing. As long as the ph of your tap water is not too wild, this amount should be sufficient for most people)
Now I could tell you what all of these do, but i'd rather you look them up and find out yourself. Instead, I'll throw in some optional amendments you can add as well that are known to be pretty good. Make sure you get Powdered Dolomite Lime. There are a lot of different types of lime out there and they don't all do the same things. Powdered dolomite lime is whats going to be buffering the ph of the water you put in it to 7 which is the perfect ph for this grow.
If your ph is out of whack, you'll want to water with 1tsp of powdered dolomite lime to 1 table spoon of molasses. Molasses acts as a binder and will in turn bind the lime into the medium. If this ever fails to work, then you'll know its because something else is having a stronger effect on ph (epsom salt in too large of a dose mixed into the medium can have that effect).
Bat Poop - Bat poop is great for a lot of things. Here's a good read. Use as directed on the package since a lot of them are different strengths.
https://www.royalqueenseeds.com/blog-bat-guano-the-cannabis-superfood-rich-in-macro-and-micronutrients-n763
Bokashi - you can use this stuff however you like. It's like a superfood you can feed with if you absolutely just want to feed with something. No worries about burning.
Mycorrhizal FUngi - Promotes root grown and soil health as well as vitamins.
Worms - This is a must. You absolutely must put worms into your medium. They will help naturally replenish nutrients, condition the medium as well as provide aeration.
Mini clover (or micro clover) - Microclover is a legume. Legumes can convert atmospheric nitrogen into organic nitrogen forms that can be eventually be utilized by turfgrass species. The nitrogen fixation process takes place in microclover root nodules formed by Rhizobium bacteria.
C02 - I can not express how important c02 is for yields. It is cheap to make and easy to use. Youtube how to make c02 and give it a go. You wont be sorry.
After you have your medium put together, You're almost done. You just have to either plant directly into the medium or start the seed and transplant then start watering and watch her grow. The time you save from not needing to ph and measure nutrients, you can use maximizing growth by defoliating, LST'ing or other training methods.
--
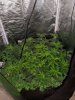
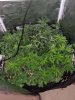
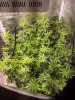
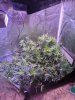
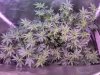
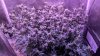
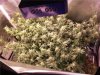
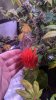
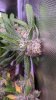
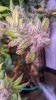
So there we go in a pinch. My current grow is a strain called God Bud from Bud Depot. It was a pretty old seed but is doing great so far. Here she is currently. I use some pretty extreme LST to put her on her side. She is staked out around the 2ft x 2ft fabric pot. Using the same recipe as above. Seed was started Nov 23rd.
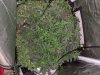
She's sitting under a 200 true watt (50 each) 4x SMD Cobs. Par is sitting around 750 and since she's staked down, she's about 4 inches tall all around. Every node getting a good amount of light. My micro clover turned out to be normal clover which is much larger so be careful who you buy from on amazon lol. Still working though, just have to cut it every once ina while.
Last part is cooking. I see a lot of people talking about having to cook their medium or let it sit before using it. That is not the case here. You can use this as soon as you make it. It will condition as it goes. Marijuana doesnt need that much to get growing and there is more than enough to properly feed it in its first stages of life. By the time the plant is to flower, the medium will be well conditioned. Please do not worry about ''cooking''.
Well, that's it for now. Will be back with more pictures soon! If you have any questions, feel free to ask.
After my medium is constructed, you simply set it under a light and add water. You will add non ph'd water for feed and it will buffer to the correct ph needed. The nutrients are all organic and present 24/7 for uptake so you don't have to worry about it. Once the plant is completed its cycle, you simply cut it at the base of the stalk and replant a new seed right beside it.
This medium is alive with worms and a top cover of mini clover. Mini clover will feed nitrogen to the plant through the circle of life. Once it dies, the roots break down and provides whats needed. Worms eat, poop and replenish the medium with vital nutrients.
Here is the base.
30% Peat Moss
30% Worm Castings
30% Pearlite
10% chicken manure
Basically this will get you into a great aerated mix. It's going to make sure that you will never need to worry about overwatering. We're going to be using 20 gal fabric pots for this. I've done silly things like grow 3 in one 20 gallon pot before (remind me to post pics) but one does extremely well in it with this setup. You can play around with this mix as well, but try and stick with these ingredients for the base. You can add vermiculite if you wanted.
Now for the amendments. This is going to be the main food source for your girl.
Amendments (per cubic ft)
Epsom Salt 1/2 teaspoon
Neem Seed M 1/2 cup
Fish bone meal 1/2 cup
Crab meal 1/2 cup
Kelp meal 1/2 cup
Azomite 1 1/2 cup
Powdered Dolomite Lime 1 tsp (the amount of this may change depending on your tap water ph. If it's extremely high, or extremely low, you may need to compensate. You will know by the color of your plant after she starts growing. As long as the ph of your tap water is not too wild, this amount should be sufficient for most people)
Now I could tell you what all of these do, but i'd rather you look them up and find out yourself. Instead, I'll throw in some optional amendments you can add as well that are known to be pretty good. Make sure you get Powdered Dolomite Lime. There are a lot of different types of lime out there and they don't all do the same things. Powdered dolomite lime is whats going to be buffering the ph of the water you put in it to 7 which is the perfect ph for this grow.
If your ph is out of whack, you'll want to water with 1tsp of powdered dolomite lime to 1 table spoon of molasses. Molasses acts as a binder and will in turn bind the lime into the medium. If this ever fails to work, then you'll know its because something else is having a stronger effect on ph (epsom salt in too large of a dose mixed into the medium can have that effect).
Bat Poop - Bat poop is great for a lot of things. Here's a good read. Use as directed on the package since a lot of them are different strengths.
https://www.royalqueenseeds.com/blog-bat-guano-the-cannabis-superfood-rich-in-macro-and-micronutrients-n763
Bokashi - you can use this stuff however you like. It's like a superfood you can feed with if you absolutely just want to feed with something. No worries about burning.
Mycorrhizal FUngi - Promotes root grown and soil health as well as vitamins.
Worms - This is a must. You absolutely must put worms into your medium. They will help naturally replenish nutrients, condition the medium as well as provide aeration.
Mini clover (or micro clover) - Microclover is a legume. Legumes can convert atmospheric nitrogen into organic nitrogen forms that can be eventually be utilized by turfgrass species. The nitrogen fixation process takes place in microclover root nodules formed by Rhizobium bacteria.
C02 - I can not express how important c02 is for yields. It is cheap to make and easy to use. Youtube how to make c02 and give it a go. You wont be sorry.
After you have your medium put together, You're almost done. You just have to either plant directly into the medium or start the seed and transplant then start watering and watch her grow. The time you save from not needing to ph and measure nutrients, you can use maximizing growth by defoliating, LST'ing or other training methods.
--
So there we go in a pinch. My current grow is a strain called God Bud from Bud Depot. It was a pretty old seed but is doing great so far. Here she is currently. I use some pretty extreme LST to put her on her side. She is staked out around the 2ft x 2ft fabric pot. Using the same recipe as above. Seed was started Nov 23rd.
She's sitting under a 200 true watt (50 each) 4x SMD Cobs. Par is sitting around 750 and since she's staked down, she's about 4 inches tall all around. Every node getting a good amount of light. My micro clover turned out to be normal clover which is much larger so be careful who you buy from on amazon lol. Still working though, just have to cut it every once ina while.
Last part is cooking. I see a lot of people talking about having to cook their medium or let it sit before using it. That is not the case here. You can use this as soon as you make it. It will condition as it goes. Marijuana doesnt need that much to get growing and there is more than enough to properly feed it in its first stages of life. By the time the plant is to flower, the medium will be well conditioned. Please do not worry about ''cooking''.
Well, that's it for now. Will be back with more pictures soon! If you have any questions, feel free to ask.
Last edited: