Dream Garden Come True

4ftRoots

Well-Known Member
Howdy doody everyone,

I think this section is lacking some organic grow threads. Lets get this party started! My new garden is complete so I have to show it off of course. Details and pictures are sure to follow. Look for stuff in italics if you can't stand my yammering. And welcome to my Dream Garden Come True!

Tent
I have a 4x4x8 foot grow tent from some random guy on amazon. This guy sits in my cold ass garage which is slowing growth to a standstill. I promise, the specs get better...

Lights
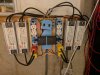
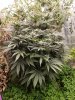
I finally upgraded! I've run with CXA3070 3000k cobs for as long as I can remember. I've been blinded by the light and enough is enough. I've since decided I want to save my sight and build a rig that is dimmable when I am gazing at the wonderful space I have been fortunate enough to build. Here is what I've got: 12 Bridgelux EB Gen 2 2ft led strips on a 2x2 modular frame. I have 4 total frames connected as a YUGE 48 strip 4x4 light. 6900 diodes with a wattage at 100% of 1066 watts! Lord Jesus protector of all that is holy, deliver me from blindness! This bad baby is hanging at the very top of my tent which is a little more than 4 feet away from the top of my soil bed. Currently running at 75% power which gives me a nice 38,000 lux at the soil surface. Yes I know, PAR is the only thing that matters. Well I spent all my cash on this build so PAR is going to have to wait. Conversation is Lux / 67 = PAR for my light system.

My beast of a light. Even when I lean over the soil I have minimal shadowing. This is going to be crazy!
View attachment DSC_4344.jpeg

Soil Bed
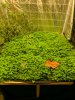
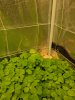
So my dream has finally come true. I used to run 35 gallon pots on wheels per Microbe Mans suggestion and after the results I had to go bigger and badder! The entire tent is filled with 18 inches of grade A homemade soil (I'm still tired) following Coots mix! For compost I am using horse manure that was aged in my outdoor garden all summer. My aeration component is Turface MVP. It truly is my most valuable player in this game and when paired with 7.5% Biochar this soil bed purrs with energy. I'm watering my bed with 9 Blumats each with 4 distribution drippers to keep the bed as evenly moist as possible. I have also loaded this bed with 1000 redworms and 200 european nightcrawlers. They are, of course, nowhere to be found and probably won't show up for a few months will they eat all the organic matter in the lower regions.

The soil bed. 4x4x18inches. over 150 gallons.
View attachment DSC_4341.jpeg

Plants
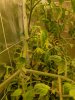
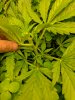
I know what your thinking. Who gives a flying worm?! I want to hear about the plants. Oh i'll feed ya baby birds. My previous goal when growing was to produce as much as possible with as high of quality as possible. Well we both know you can't have it all, quality was always high but I feel like I can do better. I am focused on high resin and terpene production. Yield can take a back seat on this ride, all this flower is for me and my bros. I currently have one half dead tomato, pulled from outdoors before our first frost and haphazardly transplanted at the time the soil was mixed. I have 3 green beans(more climbers to come) I plan to trellis on the walls as greenery for when I sit and vibe with my new system. And the grand finale, I have 1 cheeseberry haze from a grower who slips my mind right now. She(god I hope) is going on 1 month old right now. She got a rough start as this soil has not cooked and my grow area is currently at a high of 70 degrees. Damn you LED strips!

Cheeseberry haze. About a month old. I hardly keep track so honestly who knows how old she is.
View attachment DSC_4342.jpeg

Green Beans, about 2 weeks old
View attachment DSC_4351.jpeg

I hope you guys enjoy the ride. My camera is newer so pics will hopefully get better with time. This is a new start for me so I will be building a vortex mixer, worm bin, and whatever else I can think up. Additionally, I'll be experimenting with companion planting and fermented plant teas! Anymore ideas for me to try and I'm on it!

Lets get it on!

Credit to Daniel Tosh and George Carlin for my terrible jokes.

And here are some more random pics to get the wheels greased.

Drippers around the controlling Blumat. I prefer to setup my Blumats this way since it is easier to dial in a small area.
View attachment DSC_4346.jpeg

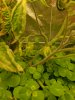
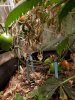
Here is where I pulled a clover root for the next picture. You can see food beginning to pile up.
View attachment DSC_4349.jpeg

Clover already has root nodules! Free Nitrogen for life.
View attachment DSC_4355.jpeg

And finally some worms, had to rip a large patch of clover to find these guys. and now they have food at the surface!
View attachment DSC_4356.jpeg
 

Attachments

4ftRoots

Well-Known Member
Thought I would touch on my light controller today.

Here is a pic:
IMG_20200127_192707.jpg

So this a raspberry pi 3b+ running Mycodo. It is a environmental controller application you can download for free online and install on the rpi.

I have 4 outlets that can be controlled separately from the rpi. I had to 3D print the outlet case for the relay and the outlet so everything is compact. I have a big power distribution bar sending power to each component. This also has the ability to dim the lights and turn on the lights anytime with the two switches. I am redoing the switches because I always forget to turn them off.

Right now this lets me run my lights 10:20 on and the rest off. in Veg I run modified gas light with 1 hour on in the middle of the night to keep the plants in veg. I have always run gas light routine in veg. Great growth and explosive flowering. My flowering cycle is new, I am a big reader of RM3. He did great research and settled on 10:20 lights on. What is great about plants and light is the amount of light matters, not the length of light. So if you want a shorter light cycle you just make the lights brighter until the plant is saturated.

I have 4 wireless temperature sensors in the tent at top, middle, bottom, and soil level. This communicate over BT to my RPI and it is logged and graphed in Mycodo. This lets me actively track my VPD at night and day. I don't do anything to get a perfect VPD, it is just nice to see the trends.

I think that is all for now. I'll be back in a little bit with more pictures!
 

4ftRoots

Well-Known Member
Alright here are some update pictures!

Tomato plant. Damn he looks terrible. I feel like it is suffering, I might remove and replant from seed.
20200127_195129.jpg

Here's the Cheeseberry haze. Little more growth since last update. Definitely growing, just not explosive yet. I think this is the first set of leaves that look normal.
20200127_195107.jpg

I place a cup here with the tools for the tent. Lifted it today for shits and giggles... Look what I found! We have a patch of Brown and White mites. Does anybody know the name of these? I saw some rove beetles as well!
20200127_195033.jpg

Until next time!
 

meangreengrowinmachine

Well-Known Member
Thought I would touch on my light controller today.

Here is a pic:
View attachment 4466066

So this a raspberry pi 3b+ running Mycodo. It is a environmental controller application you can download for free online and install on the rpi.

I have 4 outlets that can be controlled separately from the rpi. I had to 3D print the outlet case for the relay and the outlet so everything is compact. I have a big power distribution bar sending power to each component. This also has the ability to dim the lights and turn on the lights anytime with the two switches. I am redoing the switches because I always forget to turn them off.

Right now this lets me run my lights 10:20 on and the rest off. in Veg I run modified gas light with 1 hour on in the middle of the night to keep the plants in veg. I have always run gas light routine in veg. Great growth and explosive flowering. My flowering cycle is new, I am a big reader of RM3. He did great research and settled on 10:20 lights on. What is great about plants and light is the amount of light matters, not the length of light. So if you want a shorter light cycle you just make the lights brighter until the plant is saturated.

I have 4 wireless temperature sensors in the tent at top, middle, bottom, and soil level. This communicate over BT to my RPI and it is logged and graphed in Mycodo. This lets me actively track my VPD at night and day. I don't do anything to get a perfect VPD, it is just nice to see the trends.

I think that is all for now. I'll be back in a little bit with more pictures!
Wow this is super cool, all I ever did with my pi is make a put all Nintendo and super nintendo games on it hahaha
 

4ftRoots

Well-Known Member
Man, I want to build some 4000k lights with the cheap strips from DigiKey but I’m soooooo not a DIY person. You in Canada mate?
Unfortunately not! I wish, Canada is the shit!

I would check out some builds in the LED section. It is very easy to do, especially with the strips. I'm planning to make more for a small breeding room in the not so near future. I'll be sure to post the process here when I finally get around to it.

LedGardener is another great resource for building lights. Just don't build in parallel. So silly.
 

meangreengrowinmachine

Well-Known Member
Hey thanks man! I might need to get another and try that! Did you use old Nintendo controllers?

I'll put a parts list up sometime so others can make it if they want.
You can buy USB snes controllers on amazon. There is a specific kind to get that feel very close to the real thing... some people actually take them apart and add a very precise weight to the inside (like 4 grams only) to make the weight EXACTLY like the original. It is crazy how far people go. And making a pi into a mini arcade is waaaaay easier then what you have already done, you would have no problems at all :-)
 

4ftRoots

Well-Known Member
You can buy USB snes controllers on amazon. There is a specific kind to get that feel very close to the real thing... some people actually take them apart and add a very precise weight to the inside (like 4 grams only) to make the weight EXACTLY like the original. It is crazy how far people go. And making a pi into a mini arcade is waaaaay easier then what you have already done, you would have no problems at all :-)
I smell a new project on the horizon! Do you still use yours?
 

4ftRoots

Well-Known Member
Howdy!

Update time! Cheeseberry haze is doing great! I'm 99% sure it is a female, she smells amazing already. Started a new experiment I call composting in place. When we cook with avacados or tomatoes at home, I blend it, soak in water overnight, then place in a random spot in my pot. The worms are really loving it!

Full shot of the pot. The clover is really thick
IMG_20200203_171930.jpg

I have tomatoes forming. Can't wait to plant more when I have time. Nothing like homegrown tomatoes.
IMG_20200203_171942.jpg

More tomatoes!
IMG_20200203_171946.jpg

This is my composting in place experiment. This spot has been going for a week. The number of worms and mites is astounding. I'd like to see some springtails and rove beetles, but you can't have everything. I wonder if this will help keep spider mites away from my tent. Too much competition?
IMG_20200203_171959.jpg

Here is the baby! She smells very fruity. Not much of cheese yet. offshoots are growing real quick. I'm only planning to supercrop and tie down, we'll see how big she can get. She has 4 feet of headspace. Bring it on!
IMG_20200203_172038.jpg

Full pic. Her color looks great. She seems very happy!
IMG_20200203_172044.jpg

Here are the beans! Very slow growing. Gosh I wish it would warm up down here.
IMG_20200203_172050.jpg

Planted some garlic. Finally sprouted. Weirdly, it is not a green sprout. Hope it makes it! If not, I have more scattered about.
IMG_20200203_172056.jpg

Green onions, Planted a few days ago. Looking good. I think they like low light. I don't expect much, but they sure are tasty!
IMG_20200203_172100.jpg


Well thats all folks! I built a compost tea brewer. I'll post the build soon!

AND GO CHEIFS!
 

4ftRoots

Well-Known Member
Hello,

Here is update. The plant I thought was a male turned out to be female! Woohoo! It's been in flowering for a while now, honestly I don't know how long. I think she is about 2 ft tall and 2 ft wide. I didn't top this time around because I was lazy through the winter. Anyway, here are some pics!

You can see she is competing for light with the tomato. That baby is growing like a madman.
IMG_20200404_163213.jpg

A tiny bud shot, I don't think I'm going to get a huge yeild from this guy. This run was to get the soil going anyway.
IMG_20200404_163241.jpg

Another bud shot. Rubbed the leaves; they smell amazing!
IMG_20200404_163233.jpg

A few more tomatoes about ready to come out.
IMG_20200404_163257.jpg

Later Gators!
 

Attachments

loco41

Well-Known Member
Howdy!

Update time! Cheeseberry haze is doing great! I'm 99% sure it is a female, she smells amazing already. Started a new experiment I call composting in place. When we cook with avacados or tomatoes at home, I blend it, soak in water overnight, then place in a random spot in my pot. The worms are really loving it!

Full shot of the pot. The clover is really thick
View attachment 4471110

I have tomatoes forming. Can't wait to plant more when I have time. Nothing like homegrown tomatoes.
View attachment 4471111

More tomatoes!
View attachment 4471112

This is my composting in place experiment. This spot has been going for a week. The number of worms and mites is astounding. I'd like to see some springtails and rove beetles, but you can't have everything. I wonder if this will help keep spider mites away from my tent. Too much competition?
View attachment 4471113

Here is the baby! She smells very fruity. Not much of cheese yet. offshoots are growing real quick. I'm only planning to supercrop and tie down, we'll see how big she can get. She has 4 feet of headspace. Bring it on!
View attachment 4471114

Full pic. Her color looks great. She seems very happy!
View attachment 4471115

Here are the beans! Very slow growing. Gosh I wish it would warm up down here.
View attachment 4471116

Planted some garlic. Finally sprouted. Weirdly, it is not a green sprout. Hope it makes it! If not, I have more scattered about.
View attachment 4471117

Green onions, Planted a few days ago. Looking good. I think they like low light. I don't expect much, but they sure are tasty!
View attachment 4471118


Well thats all folks! I built a compost tea brewer. I'll post the build soon!

AND GO CHEIFS!
Just looked through this whole thread and really like what you have going on. If I had my way, I would have a very similar set up to yours. Im stuck in small spaces for the time being, but am trying to make the full organic thing work.

Did you ever get more information on the mites in those pictures though? I set up two new worm bins and used composted leaves/yard litter from my outside piles as the base for these, instead of coco/peat as the base bedding. Both of these bins have similar mites visible on all the food scraps tossed in. My third and original bin has a lot of springtails present now but not many of these mites. Only a small amount of the outdoor compost was added to this well established bin for added carbon from time to time. After a little google searching, I think they belong to the oribatid mite family. Seems like a large and broad "family" of mites that are generally populated in upper layers of forest soil working on the decaying layers of organic material. I suppose yours made their way in from the compost pile as well and should be aiding in the breakdown of all the nice looking living mulch you are laying down.

I could be way off on this, but would love to hear some feedback on what you've learned about them as well. Maybe I'm naive to the dangers of pests in a grow, but I always just assume the more diversity the better as long no visible damage is seen on the plants.
 

4ftRoots

Well-Known Member
Just looked through this whole thread and really like what you have going on. If I had my way, I would have a very similar set up to yours. Im stuck in small spaces for the time being, but am trying to make the full organic thing work.

Did you ever get more information on the mites in those pictures though? I set up two new worm bins and used composted leaves/yard litter from my outside piles as the base for these, instead of coco/peat as the base bedding. Both of these bins have similar mites visible on all the food scraps tossed in. My third and original bin has a lot of springtails present now but not many of these mites. Only a small amount of the outdoor compost was added to this well established bin for added carbon from time to time. After a little google searching, I think they belong to the oribatid mite family. Seems like a large and broad "family" of mites that are generally populated in upper layers of forest soil working on the decaying layers of organic material. I suppose yours made their way in from the compost pile as well and should be aiding in the breakdown of all the nice looking living mulch you are laying down.

I could be way off on this, but would love to hear some feedback on what you've learned about them as well. Maybe I'm naive to the dangers of pests in a grow, but I always just assume the more diversity the better as long no visible damage is seen on the plants.
I found they are typical compost mites. They are the step right before the worms in the composting chain. So usually the mites will break down the material into small pieces while the worms eat the bacteria growing on it. The smaller it gets it is more easily digested by the worms.

I found the info on this site: https://www.redwormcomposting.com/worm-composting/a-mite-is-a-mite-is-a-mite-not-quite/

I didn't know the mite family they belonged to, Oribatid could definitely be it. That is definitely what happened! I brought in soil from our raised beds to use as my organic portion in the soil mix and mixed fresh compost into the beds. I was happy to see them. I mixed in the winter and thought all life would be dead or dormant.

In all honesty, after I found them I did a small amount of research then decided to observe them. I found they love to chill in the moist parts of the soil, so you will always find them in the living mulch close to the blumats. If you compost in place, they will be the first to show up followed by rove beetles and worms. They are also the ones to stick around after everything decomposes. I have a feeling they shred the material then feast on the bacteria. I don't know a lot about mites though.

In your worm bin, if i'm not forgetting springtails and mites tell you a lot about the conditions of the compost. I think I always found springtails when the bin was too dry. I stopped worm bins because of composting in place. It is more fun to watch the worms directly in the pot, and it attracts all kinds of life. My last compost in place was a rotten eggplant I pulled from the outdoor compost pile, it was wild.

I agree diversity is key. I hope the soil life will be so diverse it will scare away spider mites. I know they will come this summer so I am getting this grow out of the way asap lol. I also had a frog come by a while ago, but I couldn't get him to enter the tent. I was excited to see what he would bring to the soil life. Oh well!
 
Top